

How to use Motion Tracking with 360 Video Editing
To make 360° videos even more interactive, Motion Tracking offers a great way to highlight specific objects you would like your audience to follow. To achieve this, you can add a title or an effect to an object. PowerDirector 17 makes Motion Tracking easier than ever via an intelligent tracking algorithm that accurately follows objects throughout your 360° footage. You can even follow objects with frame-by-frame motion tracking for complete accuracy.
Step 1: Add Video Footage to the Timeline and Begin Motion Tracking
Drag your 360° video footage onto the timeline and select “Create a 360° video project”.

Select your video clip on the timeline and click on Tools > Motion Tracker.

Step 2: Use the motion tracker on an object
When you open Motion Tracker, you’ll first need to drag and resize the selection box to sight-in the object you wish to track. A smaller selection box is recommended. Once you have marked your object, click Track to begin the motion tracking process.

Step 3: Add a Title or Media to the Tracked Object
After motion tracking is complete, you can add a title for the tracked object.

To add more text or media clips to the same object, just right click on Tracker 1 and then select Copy Tracker.
You can also click +Add a Tracker to add a new Tracker (Tracker 2).


Step 4: Frame by Frame Motion Tracking
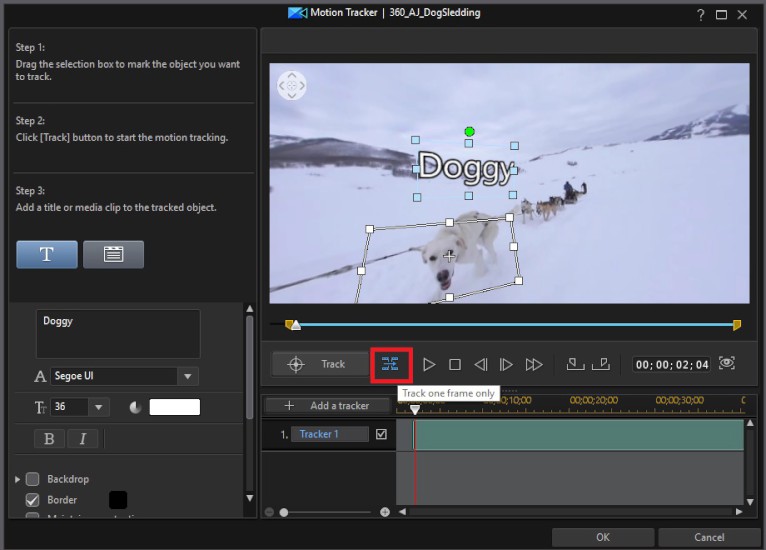
If the motion tracker was unable to successfully track your object, use the Track One Frame Only option to begin tracking frame-by-frame. Simply reposition the selection box at every frame.
Get PowerDirector 365 Essential for Free
Take your videos to the next level with the best video editor for Windows PC
