“3…2…1…smile!”
Most people instinctively smile when someone points a camera at them, often showing their teeth. Unfortunately, sometimes cameras capture colors incorrectly, causing your teeth to look more yellow than they are.
If your teeth look yellow or dull in photos, you may hesitate to share them with others. Thankfully, you can whiten teeth in photos with editing software.
If you’ve never used an image editing program before, you may falsely believe whitening teeth in a photo is complicated and time-consuming. This couldn’t be further from the truth. Modern editing programs make it easy to whiten your teeth with a few clicks.
There are dozens of editing programs that allow you to whiten teeth. While these will get the job done, some require more editing knowledge and experience than others. If you’re looking for the perfect teeth whitening photo editor for beginners, we recommend using PhotoDirector.
PhotoDirector is a user-friendly editing software with several beauty retouching tools that allow you to improve your appearance in photos while creating a natural finish. All you have to do is select the teeth you want to whiten and set the strength of the effect. The software will do the rest.
Download PhotoDirector for free and give it a try by following the step-by-step how-to below.
Continue reading to learn how to whiten teeth in a photo with PhotoDirector and YouCam Makeup.
Here’s a step-by-step guide for how to whiten teeth in pictures using PhotoDirector:


If you’re going to spend time whitening your teeth with an editing program, you may as well touch up a few other aspects of your appearance while you’re at it. Here are five other touch-up tools available through PhotoDirector that you can use to enhance your appearance.

The Face Shaper tool allows you to alter your face shape to create a more symmetrical appearance. Studies have shown that people find symmetrical faces more attractive than asymmetrical ones. Therefore, changing your face shape may make you look more pleasing overall without producing a noticeably altered effect.
PhotoDirector makes it easy to achieve a symmetrical face shape by showing you feature points that should align on your chin and the sides of your face. Then, you can drag a slider to adjust your face shape to conform to these feature points.
To learn more about face shaper check out 3 Best Face Editor Tools for Photo Touch-Ups.

PhotoDirector’s Wrinkle Remover tool can allow you to remove wrinkles and other blemishes from your photos instantly. This tool lets you use a small brush to smooth specific areas of your face, reducing the appearance of wrinkles. You can find the Wrinkle Remover tool in the “People Beautifier” section of PhotoDirector.

Sometimes, when you take a photo of someone in a dark room with a flash, their eyes look red in the picture. If you ever notice the red-eye effect, you can use PhotoDirector to restore a person’s eyes to their natural appearance.
PhotoDirector’s red-eye removal tool is easy to use. You select the eye you want to correct, then let PhotoDirector auto-detect the redness and replace it with a natural-looking eye.
You can find this tool under “Adjustment” > “Manual” > “Regional Adjustment Tools.”
For a more in-depth guide check out How to Remove Red Eye in Your Pictures for Free.

The Skin Smoother tool is similar to the Wrinkle Remover tool in that it can help you eliminate blemishes on your skin. However, this tool gives you more precision by allowing you to adjust the feather, smoothness, and detail within the effect. You can apply this brush to your entire face to give it a smooth, blemish-free appearance.
For more information on skin smoothing check out 3 Tips to Touch Up Photos.

PhotoDirector’s Body Shaper tools can allow you to adjust the shape and size of a person within your photo.
There’s an old saying that the camera adds 10 pounds, and as such, many people don’t like how their bodies look in photos. If you’re dissatisfied with your body shape in an image, you can use this tool to slim yourself down while maintaining a natural appearance.
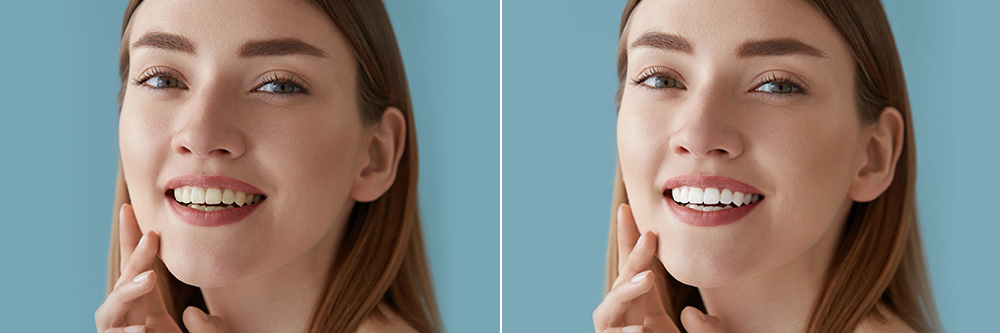
Taking portrait photos where your smile isn’t pearly white can lower your confidence and make you hesitant to share the image with others. Thankfully, PhotoDirector makes it easy to enhance your smile in photos, even if you do not have much editing experience.
With PhotoDirector, you can use a small brush to apply a white filter to your teeth, making them appear brighter. Create a natural-looking white smile with a few simple steps.
PhotoDirector is free to download, allowing you to try out its features without a monetary commitment.
If you’re looking to download teeth whitening software, you’ll want to ensure it has the right features to whiten the teeth in your photo and apply other high-level edits. We recommend looking for an app with beauty touch up tools and the following features at a minimum:
All of these features and a lot more can be found in PhotoDirector.
If your teeth tend to look yellow in photos, you may wonder if it’s essential to whiten them in post-production. Of course, the decision is up to you. However, having whiter teeth or portraying white teeth in photos has numerous benefits, such as:
Overall, image teeth whitening is an effective way to improve your photos and make you feel more attractive.
If you want to add more professional effects to your photos, you may want to edit pictures on your laptop or desktop computer instead of your phone. Editing on your computer can give you more control over your changes and allow you to view your images on a larger screen, enabling more precision and fine-tuning.
If you prefer to edit photos on your computer, you should download a professional-level editing program suitable for your image-editing needs. The best editing programs allow you to achieve more than just image teeth whitening yet use simple, easy-to-navigate interfaces that anyone can quickly learn.
Here are our top five programs for photo editing on Windows and Mac:
For an in-depth look at each, check out The 5 Best Photo Editing Software for 2022.