Capture Recorded Video Contents - Batch Capture
Batch capturing allows you to select the scenes (video sequences) you want to capture and then capture them all at once. All you have to do is select the start and finish time of each scene you wish to capture, click start and the program will begin capturing your selected video clips one after another. Batch capturing is efficient and reduce the waiting time when capturing numerous scenes. Create a Batch To add a new task, just click on the new task button. |
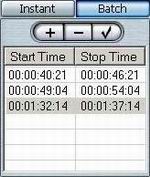
The Start Time will be set to the current DV position that is displayed in your Preview Window .If you wish to choose the start time, navigate through the video and click on the Mark In icon when you have found the beginning of the scene you want to capture. Continue playback of the DV video until you reach the end of your desired scene. Click on the Mark Out icon. To delete a task, select the batch you want to delete, and click on the delete task button. |
Mark In
Mark Out |
Start Recording
Before you start recording from your DV camcorder, you can adjust your capture profile settings or choose to capture in real-time or non real-time. To find out more, please click here.
Once you have adjusted your profile settings & recording options, and set your batch tasks, then you can start capturing.
To start Batch Capturing all you need to do is to click on the ![]() Start Selected Task(s) button*, and PowerDirector will start capturing your selected video scenes into the Video Library.
Start Selected Task(s) button*, and PowerDirector will start capturing your selected video scenes into the Video Library.
*For Batch Capturing, the record button will be disabled. You need to click on the Start Selected Tasks button once you have created all your batch tasks.
Stop Recording
When capturing in DV-VCR Batch mode, capturing will stop once all of the batch tasks specified are captured. You can choose to abort the batch-capturing process by clicking on the Stop button. ![]()
![]()
