
Guide to HDR (High Dynamic Range) Photography

If you’ve ever taken photos of a subject under sunny skies, where the brightness and contrast range are high, the chances are you either lost details in the subject or the sky is blown out. This is because the difference between the brightest and darkest areas, or Dynamic Range, is too wide that you can’t capture them both in a single shot. In this article, we will explain the HDR approach to overcome this problem.
First of all, let’s start with understanding “Dynamic Range” in photography. Dynamic Range described the ratio between the brightest and darkest areas. Our eyes far surpass in distinguishing the brightness than the camera. The human eye can see a range of approximately 10,000:1, while a digital camera can capture about 1,000:1. Conventionally, one would expose for the object and the sky blown out, or expose for the sky and the subject is totally dark.
At the core concept of HDR is taking two or more bracketed photos – which is photos of the same subject with varying shutter speed or aperture combinations to cover a wide range of luminosity of the subject. Then, using a post-processing software such as PhotoDirector to blend the photos together and create a single image with the most lit and colors of the subject.
What you will need to create an HDR image:
For best results, here is what we recommend:- A digital camera, with or without Auto Exposure Bracketing function. If it doesn’t, then a tripod is a must. Without Bracketing, you can manually change shutter speed and aperture settings between each shot. But, you have to make sure, your camera is still (no movement between frames) or the photos won’t line up in the editing software.
- A tripod or any other type of stabilizer. This is highly recommended for best results. If your camera is equipped with Auto Exposure Bracketing, you can shoot without a tripod. Make sure you set the shutter to high speed continuous mode to minimize movement between frames. When you blend the photos, PhotoDirector comes with image alignment feature, which will only work to certain extend. The best plan is to take all measures for a stable sequence of shots.
- HDR photo-blending software (PhotoDirector). There are a number of different programs out there, in this tutorial, we will be using PhotoDirector. It sports six different photo-blending algorithms going from a more realistic to surrealistic look, you should be able to achieve the look you want.
Once you have all the equipment, it’s time to go out and take some pictures. Here are a few tips for getting good pictures:
- For intense contrast, such as sunrise or sunset, take several photos of different exposures in manual mode to make sure you capture a wider range of light.
- HDR and exposure bracketing is meant for still subject. You won’t be able to capture a moving subject easily. Choose a scene that isn’t going to move drastically for at most 10 second.
- Choose a high speed memory card. Faster write speeds will help reduce the time your camera takes to store your shots
- Shoot in RAW for better quality.
- Take 3 or 9 photos of different exposure to make sure you cover all the light range. You don’t necessarily have to blend all of them in PhotoDirector, sometimes blending 2 or 3 photo will produce the optimal visual effect.
- Experiment and play around with it. It takes time and patience, but once you get the feel, you can have lots of fun with the artistic effects.
How to blend photos using PhotoDirector
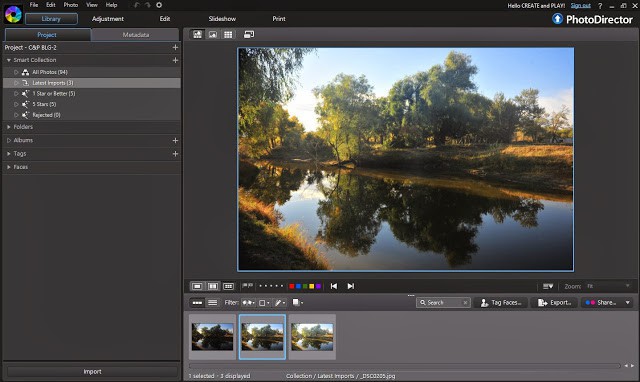
First of all import the bracketed shots to the library:
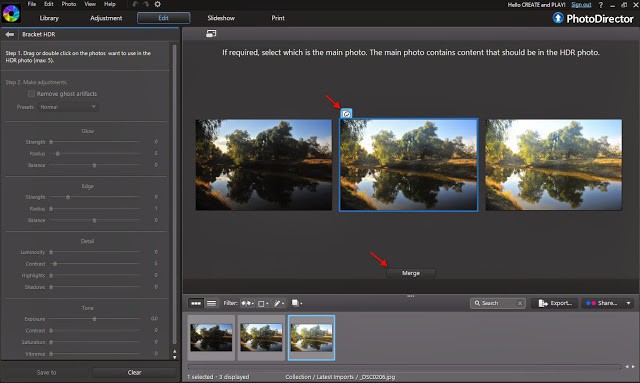
Select Edit and choose “HDR” on the left panel:

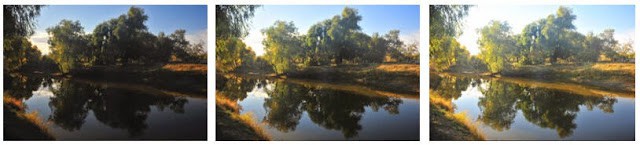
Drag and drop photos into the main panel. You can merge up to 5 bracketed shots. In this example, I will merge 3 photos: one underexposed to capture color of the sky, one for midtones and the last one for highlights.

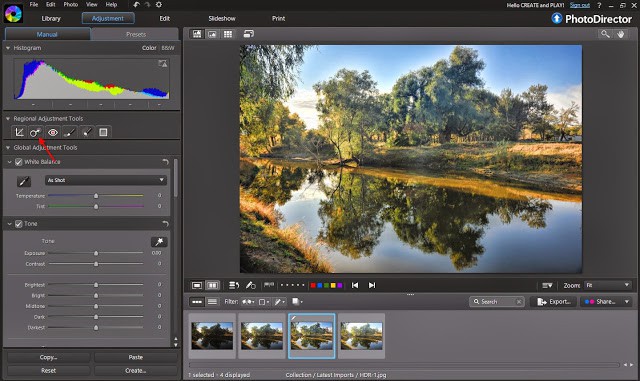
Select a main photo and click on merge to process HDR.
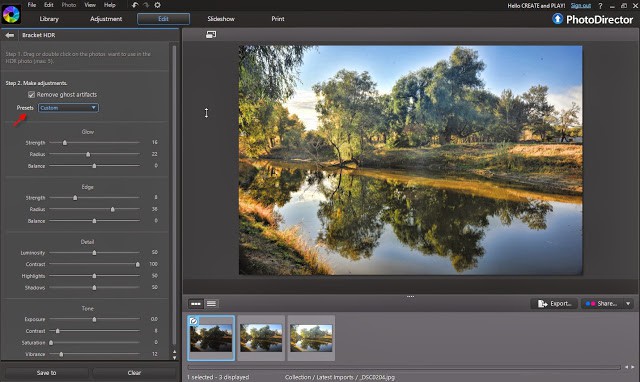
You can further adjust HDR effect using the quick preset selection or manually adjust the Glow, Edge, Detail, and Tone to bring out the HDR effect you want. Don’t be afraid to try, nothing will be changed on your original images.
Once you are happy with the result, click on “Save”. When you return to the PhotoDirector main interface, the HDR photo will be automatically imported to your library.
Usually in the HDR result image, dust spots become more obvious. So, make sure to clean up the spots using the the Clone/Heal tool:
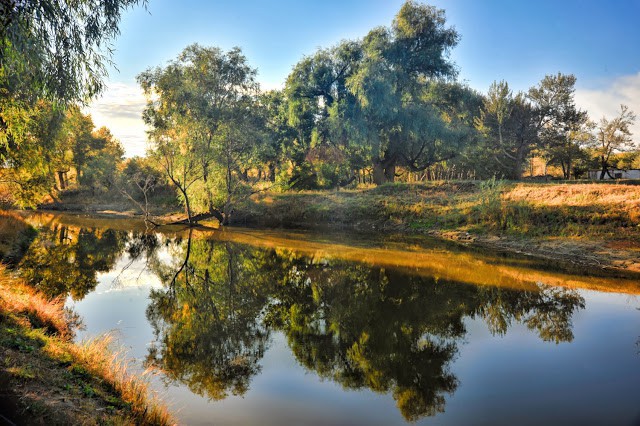
And now here is the final image:
PhotoDirector 2026 Essential
Free Software With 30-Day Premium Features
