

How to Create an HDR Photo [Windows, Mac]

Knowing how to capture a high dynamic range (HDR) photo is a valuable photographic skill. You can produce engaging images for your clients, marketing projects, or portfolio by catching the details in a scene's highlights and shadow elements.
However, creating the perfect HDR photo can be challenging, especially if your camera doesn't have a built-in HDR function or if you are a beginning photographer. This guide takes an in-depth look at how to create an HDR photograph using a camera, HDR editor, and HDR effect.
In this article, we use PhotoDirector to demonstrate the HDR photo creation process, as it is the best software for photo editing.
- What Is an HDR Photo?
- Best HDR Photo Editor
- How to Make an HDR Photo
- How to Shoot an HDR Photo
- How to Create an HDR Photo in a Photo Editor
- How to Apply an HDR Effect in a Photo Editor
- Download the Best HDR Photo Editor for Free
- HDR Photo FAQ
What Is an HDR Photo?
When taking a single-exposure photo, you might notice that the scene’s dynamic range is too wide for your camera. In other words, your camera doesn’t capture all the detail in one frame.
For example, suppose you are photographing an object in sunlight. In this case, the brightest elements will appear glaring white, and you will lose the details of these elements.
Similarly, when taking a photo of a person in front of a bright background, your camera might capture your subject as a flat shadow with no detail.
HDR stands for high dynamic range. This function increases your camera’s dynamic range to pick up detail in the shadow and the light elements of a frame.
HDR processing involves taking multiple images and capturing the same scene at different exposure values. Then, you need to merge these images using high-end photo editing software such as Adobe Lightroom or PhotoDirector.
The result is an image with visible detail in its lightest and darkest elements, making it appear more natural to the human eye.
Best HDR Photo Editor
PhotoDirector is a professional photo editing software for photographers of all experience levels.
The software offers two HDR photography functions. With the HDR Effect tool, you can enhance a single image's exposure and contrast levels. The Photo Merge Bracket HDR tool lets you merge multiple exposures to create professional HDR images.
The sections below provide instructions on how to use these features with PhotoDirector.
How to Make an HDR Photo
Creating an HDR photo is a multi-step process that starts with the correct camera settings. Before you start developing your HDR photography skills, download PhotoDirector.
How to Shoot an HDR Photo
The first stage in creating an HDR photo involves capturing multiple images of the same scene at different exposure levels. This section provides step-by-step instructions you can follow to create these images:
- Choose the right memory card.
Make sure that you have sufficient storage space to shoot your images in RAW format. Unlike JPEGs, a RAW file doesn’t reduce the file size, and using this format won’t result in detail loss.
- Mount your camera on a tripod.
You should capture images for HDR photo creation from a fixed position. You will need to use a longer shutter speed when capturing the details in shadows. If you don’t use a tripod, you might notice a “camera shake” effect in your images.
A tripod makes it easier to align and merge your images when creating an HDR photo.
- Select the Aperture Priority mode on your camera.
In this camera mode, you can control your camera’s aperture while your camera automatically adjusts the shutter speed. To select this mode, move your camera’s PASM dial to the A or Av setting.
- Set your ISO value.
Your ISO setting determines your camera’s light sensitivity. Choose the lowest possible setting to ensure that your images are not grainy. At an ISO of 100, you will likely have no problem capturing a still image.
- Select the aperture for your HDR photo.
Generally speaking, a wide aperture between f/1.8 and f/7 is ideal if you want shallow depth and background blur—for example, when photographing a flower or insect.
In landscape photography, a narrow aperture of f/11 or higher is ideal. All your subjects will be in focus at these aperture settings, even at varying distances.
- Set your exposure metering mode to Evaluative or Average, depending on your camera model.
In this mode, your camera will factor in all the scene’s tones and establish an average exposure.
- Take multiple photos to capture the scene at varying exposure levels
Most photographers take three shots at exposure values of -3, 0, and +3. A negative value results in a darker exposure, and a positive exposure is brighter.
You can take more than three shots to capture more image data. For example, instead of three shots, you can take five shots at exposure values of -2, -1, 0, 1, and 2.
You might not use all these shots during the editing stage, but the additional data might come in handy.
- Use your camera’s HDR mode.
A camera with an auto exposure bracketing (AEB) function can automatically take multiple photos at varying exposure levels. If your camera doesn’t have this function, follow the instruction in Step 7 to make manual exposure adjustments before each shot.
The AEB feature reduces the risk of the camera shifting between shots. However, even using the AEB function, you should keep the camera still while it takes the shots in quick succession.

How to Create an HDR Photo in a Photo Editor
After capturing multiple images of the same scene at various exposure values, you can create your HDR photo. Follow the steps below to create a high-quality HDR image using the Photo Merge Bracket HDR tool in PhotoDirector.
- Download PhotoDirector to your Windows PC or Mac.
Install and launch the editor on your computer when the software download is complete.
- Import your images.
Once you have launched PhotoDirector, you can upload the images you want to use to create your HDR photo.
To import your images, click on the Library tab, then select Import from the bottom of the library panel. Then, select the From Camera import option to upload the files directly from your card reader. You can also choose the Photo import option if you have already stored the image files on the hard drive.
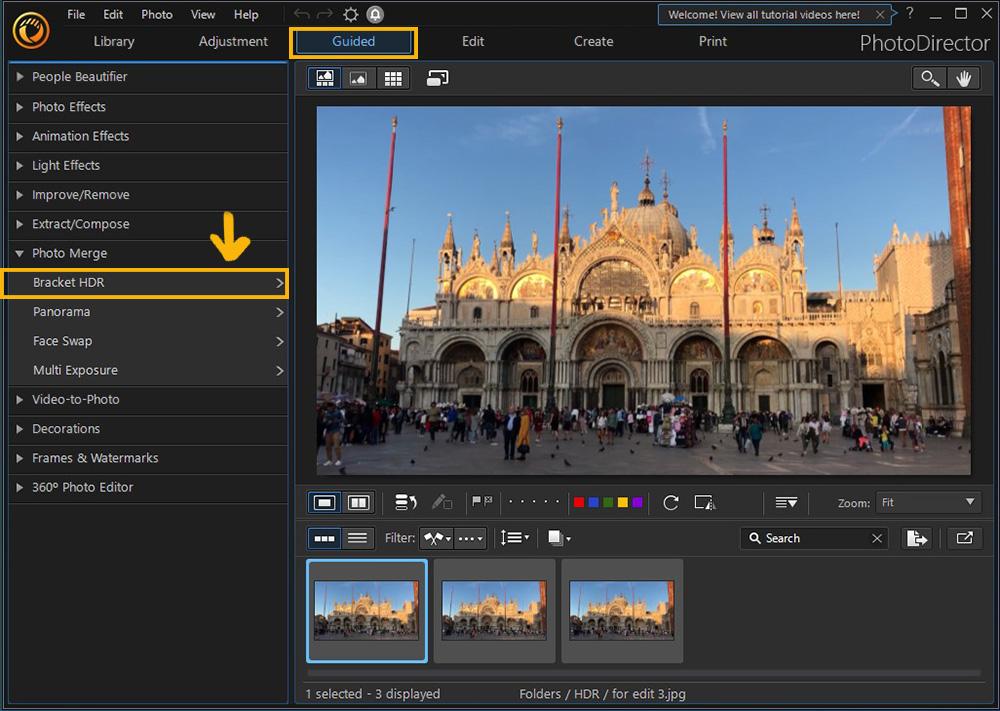
- Open the Bracket HDR tool.
After uploading your images, you can use the Bracket HDR tool to merge them into one HDR image.
Open the Guided tab, then select Photo Merge from the left-hand vertical menu. Next, select the Bracket HDR tool from the top of the Photo Merge drop-down menu.
- Add your images to the Bracket HDR tool.
When the Bracket HDR tool is open in PhotoDirector, you can select up to five images from your library to merge into an HDR photo.
Thumbnails of the photos that you most recently imported to the PhotoDirector platform will appear below the preview screen. You can double-click or drag these thumbnails to your preview screen to use them.
- Merge the images into an HDR photo.
After selecting the photos, you want to use, click on the Merge button below the preview screen. While the Bracket HDR tool merges these image files into an HDR photo, a Merging Photos window appears with a progress bar.
When the Bracket HDR tool completes the merging process, the composite will appear on the preview screen. This HDR photo combines the over- and under-exposure of each image to show detail in the scene’s darkest and lightest elements.
- Enhance your HDR photo.
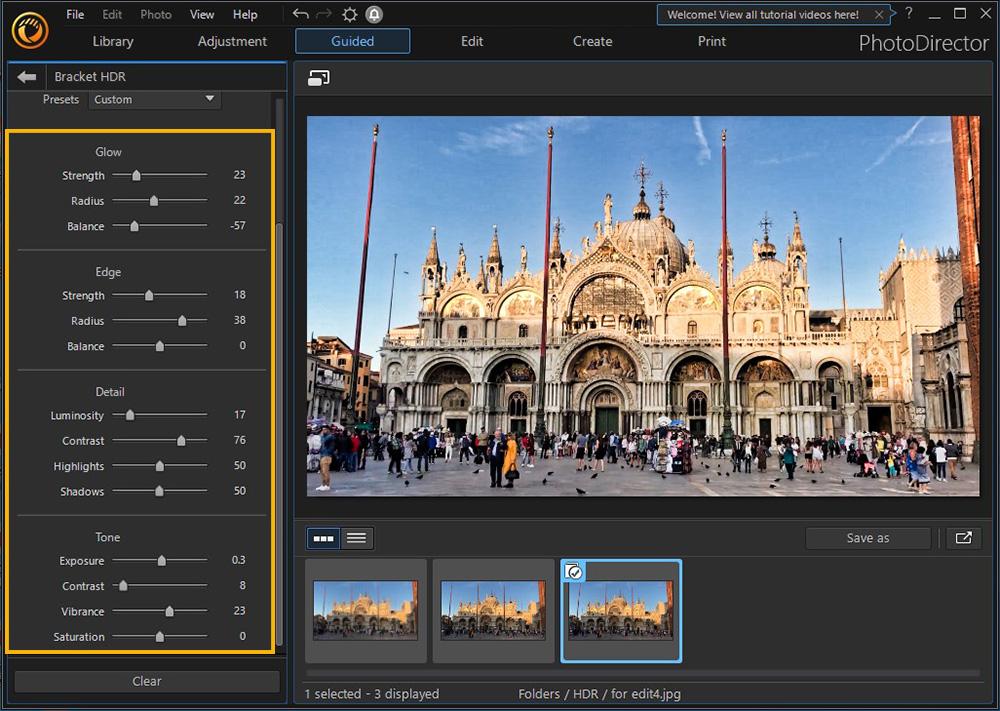
You can edit the composite using the adjustment sliders to the left of the preview screen. These editing categories include Glow, Edge, Detail, and Tone. Experiment with these adjustments to enhance your HDR image and create the effects that fit your project requirements.
- Save your HDR photo.
If you are satisfied with your HDR photo, click on the Save as button in the lower right corner of your screen. A file manager window will open where you can give your new HDR image a name, select the storage location, and save the file.
When you save the HDR image to your computer, the image will automatically save to your PhotoDirector library.


How to Apply an HDR Effect in a Photo Editor
The HDR Effect in PhotoDirector consists of tone map nodes that you can use to create an HDR photo from one single-exposure image. This tool is helpful if you don’t have a set of images with varying exposure levels. Follow the steps below to apply an HDR Effect to a single image.
- Download, install, and launch PhotoDirector on your computer.
- Upload the image you want to turn into an HDR photo.
Click on the Library tab, then click on the Import button. In the Import panel, you can choose the folder from where you want to upload the image.
- Open the HDR Effect tool.
Click on the Adjustment tab, then open the Global Adjustment Tools drop-down menu. The HDR Effect menu appears under this list.
- Open an edit preview.
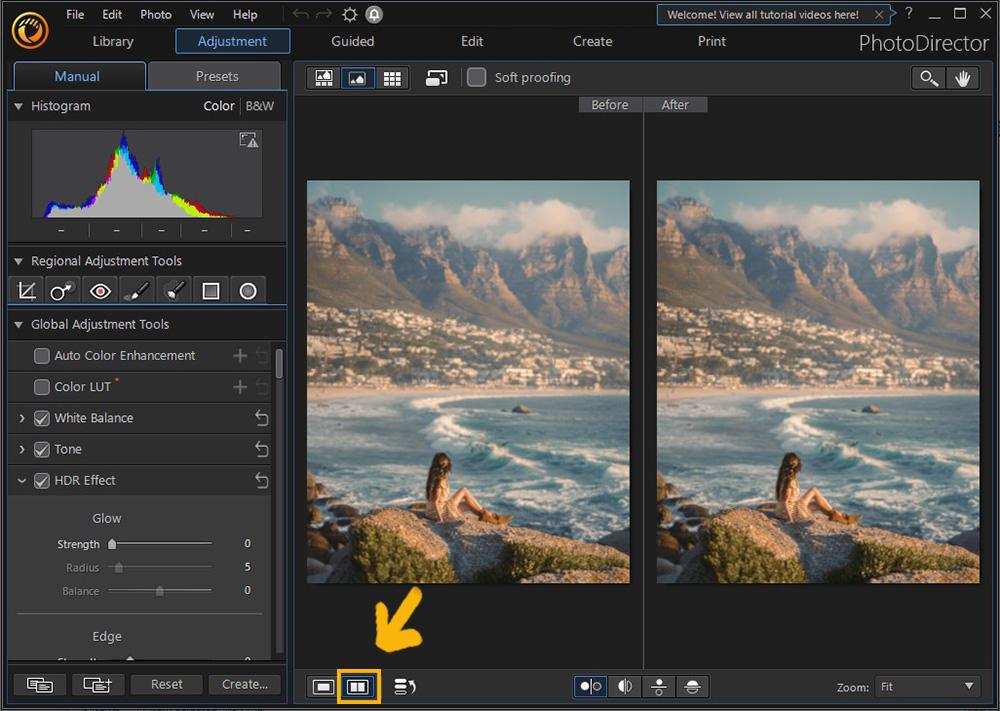
Before using the HDR Effect tool, click the Compare Before/After button below your image. This tool lets you preview all your changes in a side-by-side comparison view.
- Adjust the HDR effects under Glow.
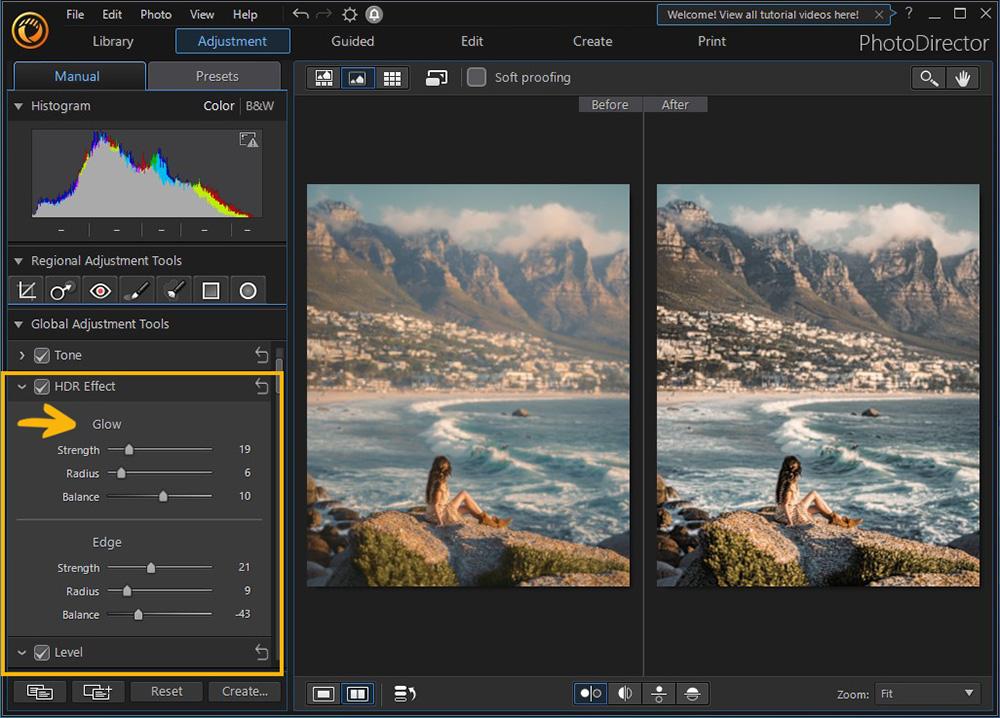
Three adjustments appear under the Glow category. Experiment with these sliders to apply the Glow or halo effect to your image.
The Strength slider adjusts the halo effect that applies to your photo. The Radius slider adjusts the contrast that applies to the edges in the photo. The Balance slider applies the glow effect to your image’s bright or dark elements.
- Apply the HDR effects under Edge.
Drag the Strength slider to the right to increase the visible detail in the contrast edges. The Radius slider adjusts the amount of contrast that applies to the edges in the image.
The Balance slider applies the HDR edge effect to the image’s bright or dark elements.
- Save your image.
After applying the HDR Effect to your photo, click on File in the top left corner of your screen, then save the image to your local storage.


Download the Best HDR Photo Editor for Free
An HDR photo is the result of combining multiple exposure values of the same scene. Unlike single-exposure images, an HDR photo has vivid details in both the brightest and darkest elements, making the image more engaging to viewers.
Even if you have a high-end camera, creating a high-quality HDR image can be challenging, as the process involves the precise merging of multiple photos. However, with the Bracket HDR tool from PhotoDirector, the editing process only takes a few minutes.
PhotoDirector also features an HDR Effect tool, which lets you turn a single image into an HDR image. Like the other photo editing features of the software, the HDR Effect tool is user-friendly and suitable for beginner and professional content creators.
Download PhotoDirector to quickly create HDR photos.
HDR Photo FAQ
Whether an HDR photo is better than a non-HDR photo depends on the HDR creation process, the quality of the original images, and the project requirements. Generally, an HDR photo is better if the scene’s conditions create a high contrast that hides the visual details of the subject or background elements.
Ideally, the HDR photo should retain the natural appearance of the subjects. An over-processed HDR photo is not necessarily better than a non-HDR image with a mid-range exposure value.
An HDR photo has a wider dynamic range than a normal photo. In other words, in an HDR photo, the exposure values don’t affect the visibility of details.
For example, when you look at an HDR photo of a person against a bright background, you can see all the facial features. On the other hand, normal portrait photos against bright backgrounds are typically flat shadows or silhouettes.
The best way to improve your HDR photos is to use robust photo editing software such as PhotoDirector. You should try to use at least three images with different exposure levels to create your HDR image.
When shooting the single-exposure images for your HDR photo, use a tripod to ensure optimal image alignment during the merging process. Also, shoot the images in RAW format to maximize image quality and retain scene details.
You can only create a true HDR photo from a sequential set of still images of the same scene that has no movement. When you merge a series of shots of an ongoing movement, such as a flower moving in the wind or a person running, your HDR image will appear blurry.
An HDR photo is also not ideal when hidden details contribute to the photo’s artistic or visual appeal. For example, if you want to incorporate an element of ambiguity into a portrait, revealing all facial features through multiple exposures might defeat the purpose.
Your HDR photos will look more natural if you shoot all your single-exposure images at the same time and with the same camera settings except for the exposure. Don’t over-saturate or edit your HDR image extensively.
When creating an HDR photo, contrast adjustments are generally unnecessary. By combining exposure values, your HDR photo should provide sufficient visual interest, even in the image’s darkest and lightest areas.
The most significant benefit of an HDR photo is that it makes up for your camera’s dynamic range limitations. These images appear more natural to a person’s eyes, making them ideal for wedding and landscape photography projects. An HDR photo also has more depth than a non-HDR photo, allowing you to make the most of all the scenery’s elements.
People enjoy looking at HDR photos because they appear more natural than single-exposure shots. In many cases, people don’t know that they are looking at an HDR photo—they only know that the image is exciting and engaging. With HDR photography, you can make the most mundane subjects appear interesting.


