




How to Make a Music Video: A Step-by-Step Guide (2026)
A good music video can turn a song people stream into a song people share. Making one no longer requires a record label's budget or crew, just a plan, a camera, and a video editor that can keep up with you.
We put this guide together the way we would actually work through a music video project ourselves, from the first shot list to the final export. We'll cover the planning and filming stages first, then walk through editing the footage into a finished video step by step using PowerDirector, including syncing multiple cameras to your track, adding titles, and getting it ready to upload.
Disclosure: PowerDirector is CyberLink's own product, and this guide focuses on that program from start to finish.
- What You'll Need
- How We Made This Guide
- Part 1: How to Make a Music Video (Planning & Filming)
- Part 2: How to Edit a Music Video Step by Step
- Music Video FAQ
What You'll Need
Before you shoot anything, it helps to know what you'll be editing with and what it can do. This guide uses PowerDirector, a video editor for Windows and Mac that includes the tools this workflow depends on: multicam syncing, title templates, and color adjustment, in both its free and paid tiers.
Compatibility: Windows, Mac
Price: Free (PowerDirector Essential)
*PowerDirector 365 subscription available for $4.33/month, billed annually
Tools you'll use in this guide:
- Multicam Designer: Automatically syncs footage from multiple cameras to your audio track
- Video Collage Designer: For building split-screen layouts if you're cutting between angles
- Color Match: Pulls a color grade from a reference video or image
- Title templates and text animations: For lyric overlays and credits
A quick, honest note before you commit to it:
Pros
- Beginner-Friendly: Guided edits and tutorials make the multicam and syncing steps below easier to follow the first time through
- Built-In Audio Tools: Basic syncing, mixing, and cleanup are included, so you don't need a separate audio program for this workflow
Cons
- No Stock Library in the Free Version: Royalty-free music, sound effects, and stock footage require a subscription
- AI Tools Are Credit-Limited: Generative AI features draw from a monthly credit allowance, even on paid plans, so heavy use of those specific tools can run into caps
Outside of the software, you'll also want: a camera or two (a phone is fine), a final mix of your song as an audio file, and, if you're filming with a band, a rough shot list before you show up on location.
How We Made This Guide
We edited an actual music video from raw footage to final export to write these steps, rather than describing the software from the outside. Here's what that involved:
- Device: MSI Laptop
- OS: Windows 11
- Software version: PowerDirector Version 24.0.1216-03
- What we tested: Importing multicam footage, syncing to an audio track, building a rough cut, adding title/lyric text, color correction, and exporting for YouTube
- Date tested: August 2026
Part 1: How to Make a Music Video (Planning & Filming)
Everything below happens before you open a video editor. Skipping this stage is the most common reason an edit takes three times longer than it should.
- Decide what kind of music video you want to make.
Music videos are stylized and artistic. They don't have to match up with the song's lyrics or even make literal sense. Most fall into one of two categories, or a mix of both: Performance-Based or Narrative.
Performance-based videos usually lean on one visual gimmick to keep a single-location shoot from feeling static. In Reptilia by The Strokes, the whole video is shot in extreme close-up. In Hardest Button to Button by The White Stripes, the band's instruments keep multiplying across cuts.
Narrative videos tell a story, sometimes a full mini-movie like Michael Jackson's Thriller. The story doesn't need to match the lyrics; TLC's No Scrubs and Britney Spears' Oops I Did It Again are both breakup songs with videos set in outer space.
Pick one lane before you plan the shoot. Trying to do both without a clear plan is how you end up with footage that doesn't cut together.
- Build a shot list and mood board.
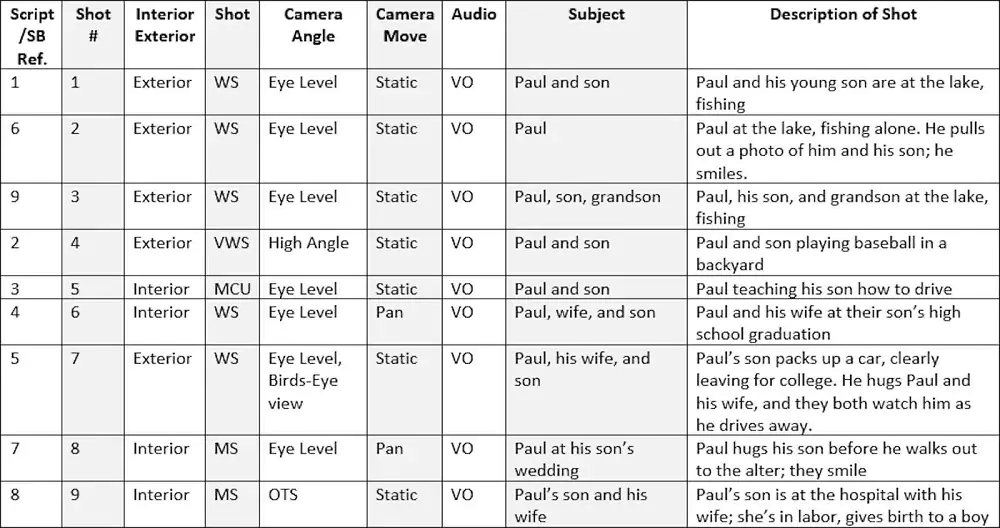
Image from StudioBinder.com - What is a Shotlist
Plan the video shot by shot so you don't forget to capture anything you'll need in the edit. A shot list keeps the filming day efficient, and a mood board (photos, artwork, color references) helps you and anyone else on set agree on the look before you're standing in the location trying to describe it out loud.
- Gather equipment, locations, and props.
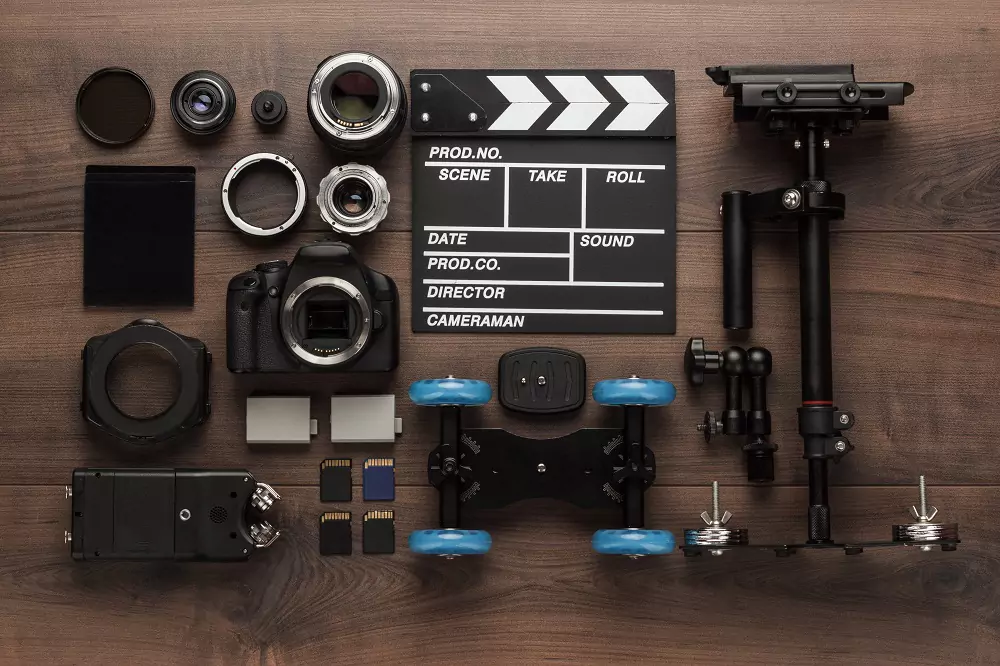
Match locations, costumes, and props to what's on your mood board, and confirm you have the actual gear (cameras, mics, lighting) before shoot day. Budget shapes almost every decision here, so decide early what you're willing to spend on versus where you'll improvise.
- Shoot more coverage than you think you need.
Music videos rely on fast cuts, so extra coverage and b-roll give you options in the edit rather than forcing you to stretch a handful of usable takes. If you're filming a band, run the full song for each member individually rather than trying to catch everyone in one take. If you have access to a second camera, even a second phone, use it: it gives you multiple angles of the same performance to sync together later, which is exactly what Part 2 walks through.


Part 2: How to Edit a Music Video Step by Step
This is the same sequence we used while testing this guide (see the methodology above), edited in PowerDirector. If you're following along, you can download it for free from the link at the end of this guide.
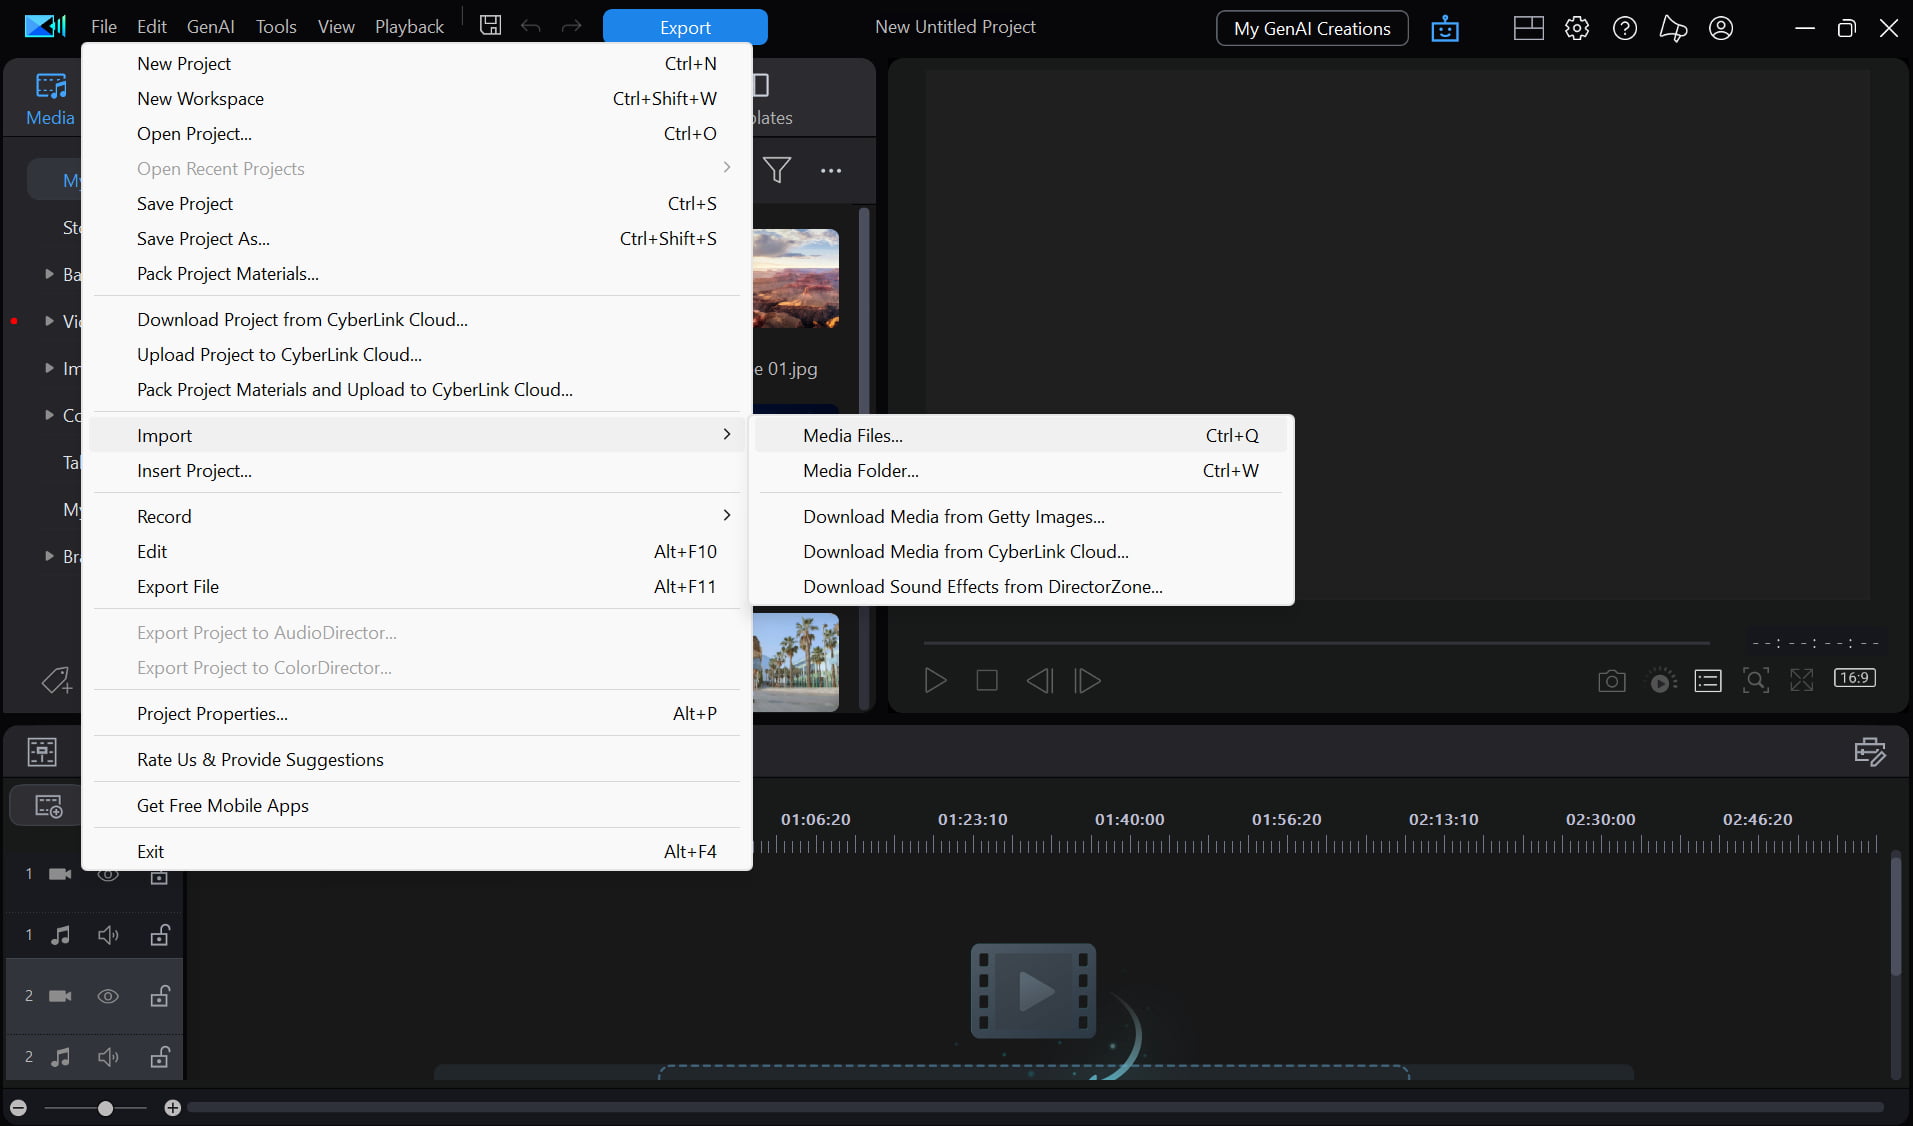
- Import your video clips and final song audio.
Open PowerDirector and select Full Mode. Click Import Media, then Import a Media Folder, and browse to the folder holding all your video and audio files. Click Open.
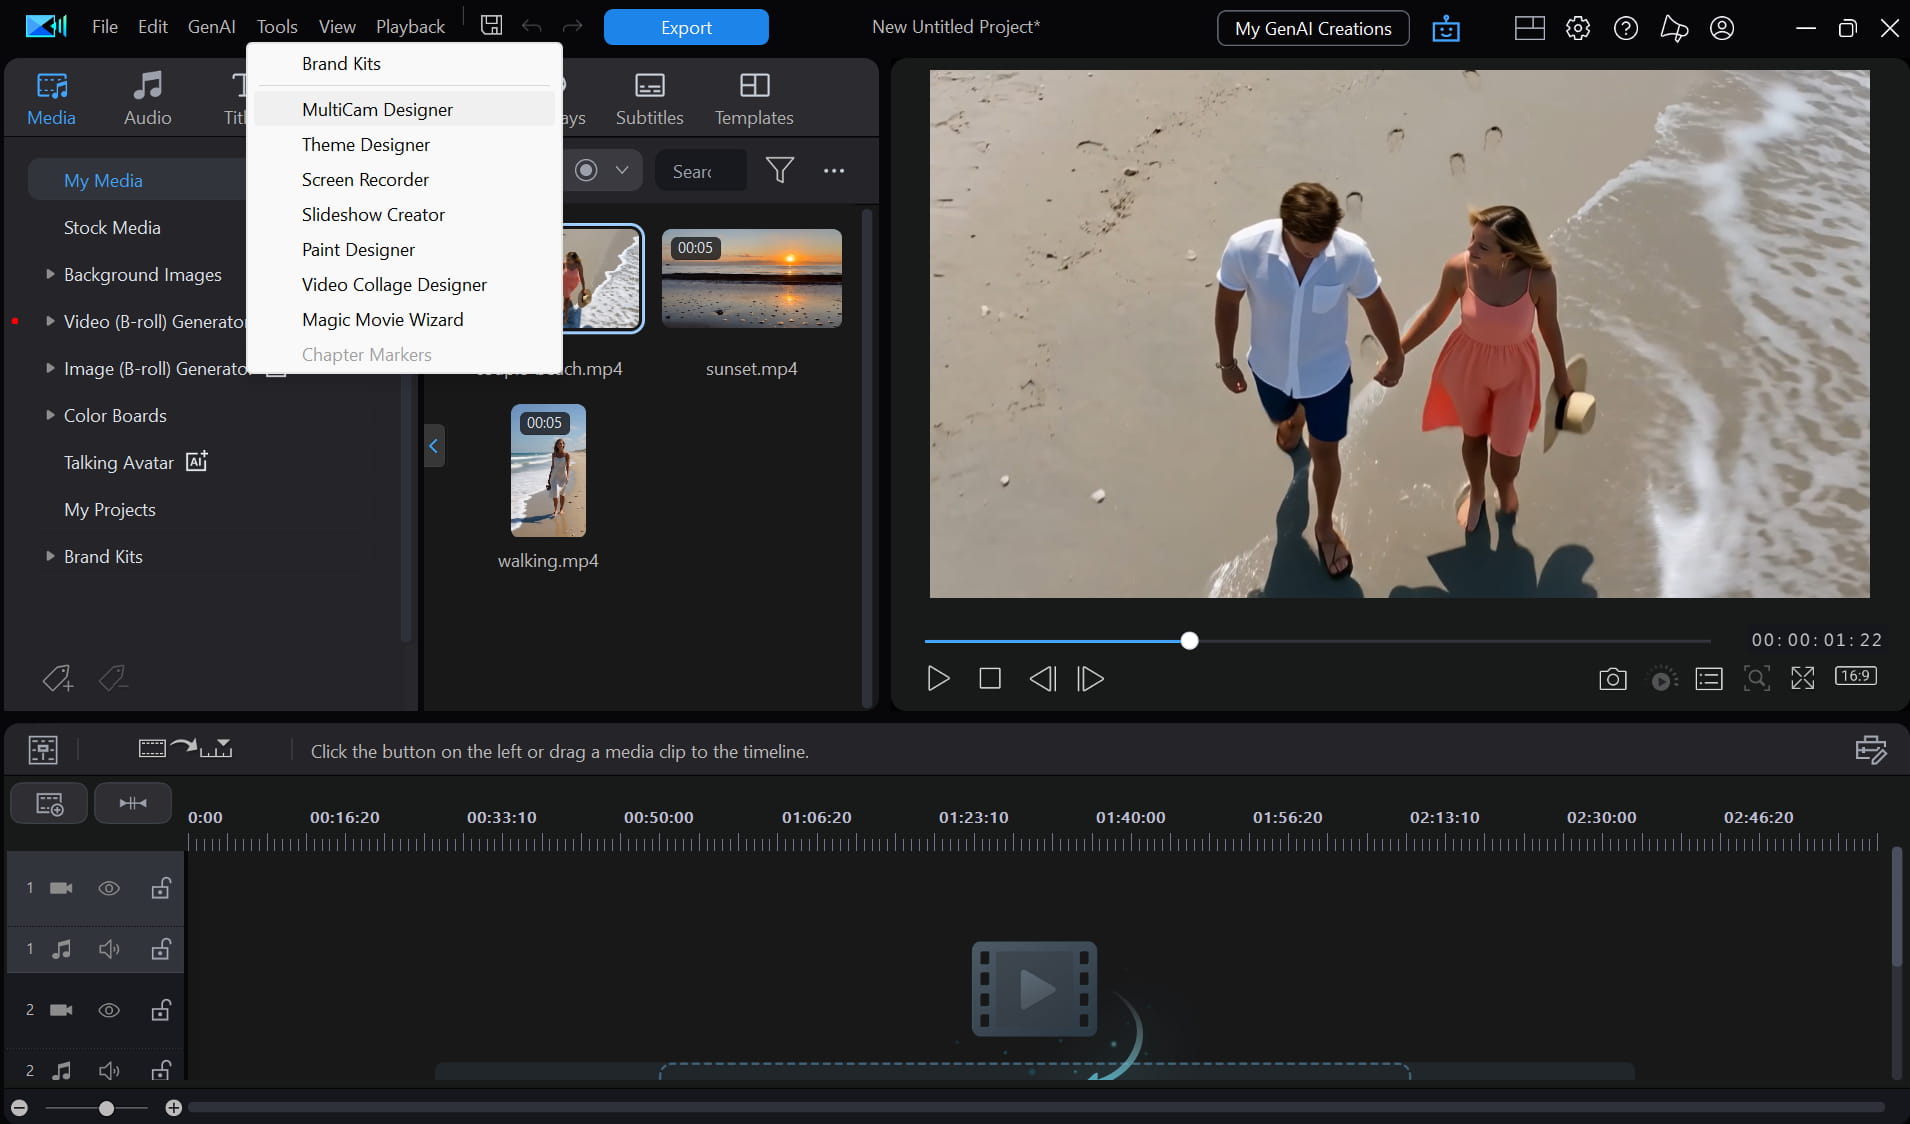
- Sync multiple cameras to your audio track with Multicam Designer.
Select all your video clips in the Media Room. Go to Plugins > Multicam Designer, open the Synchronization dropdown, and choose Audio Analysis. Click Apply.
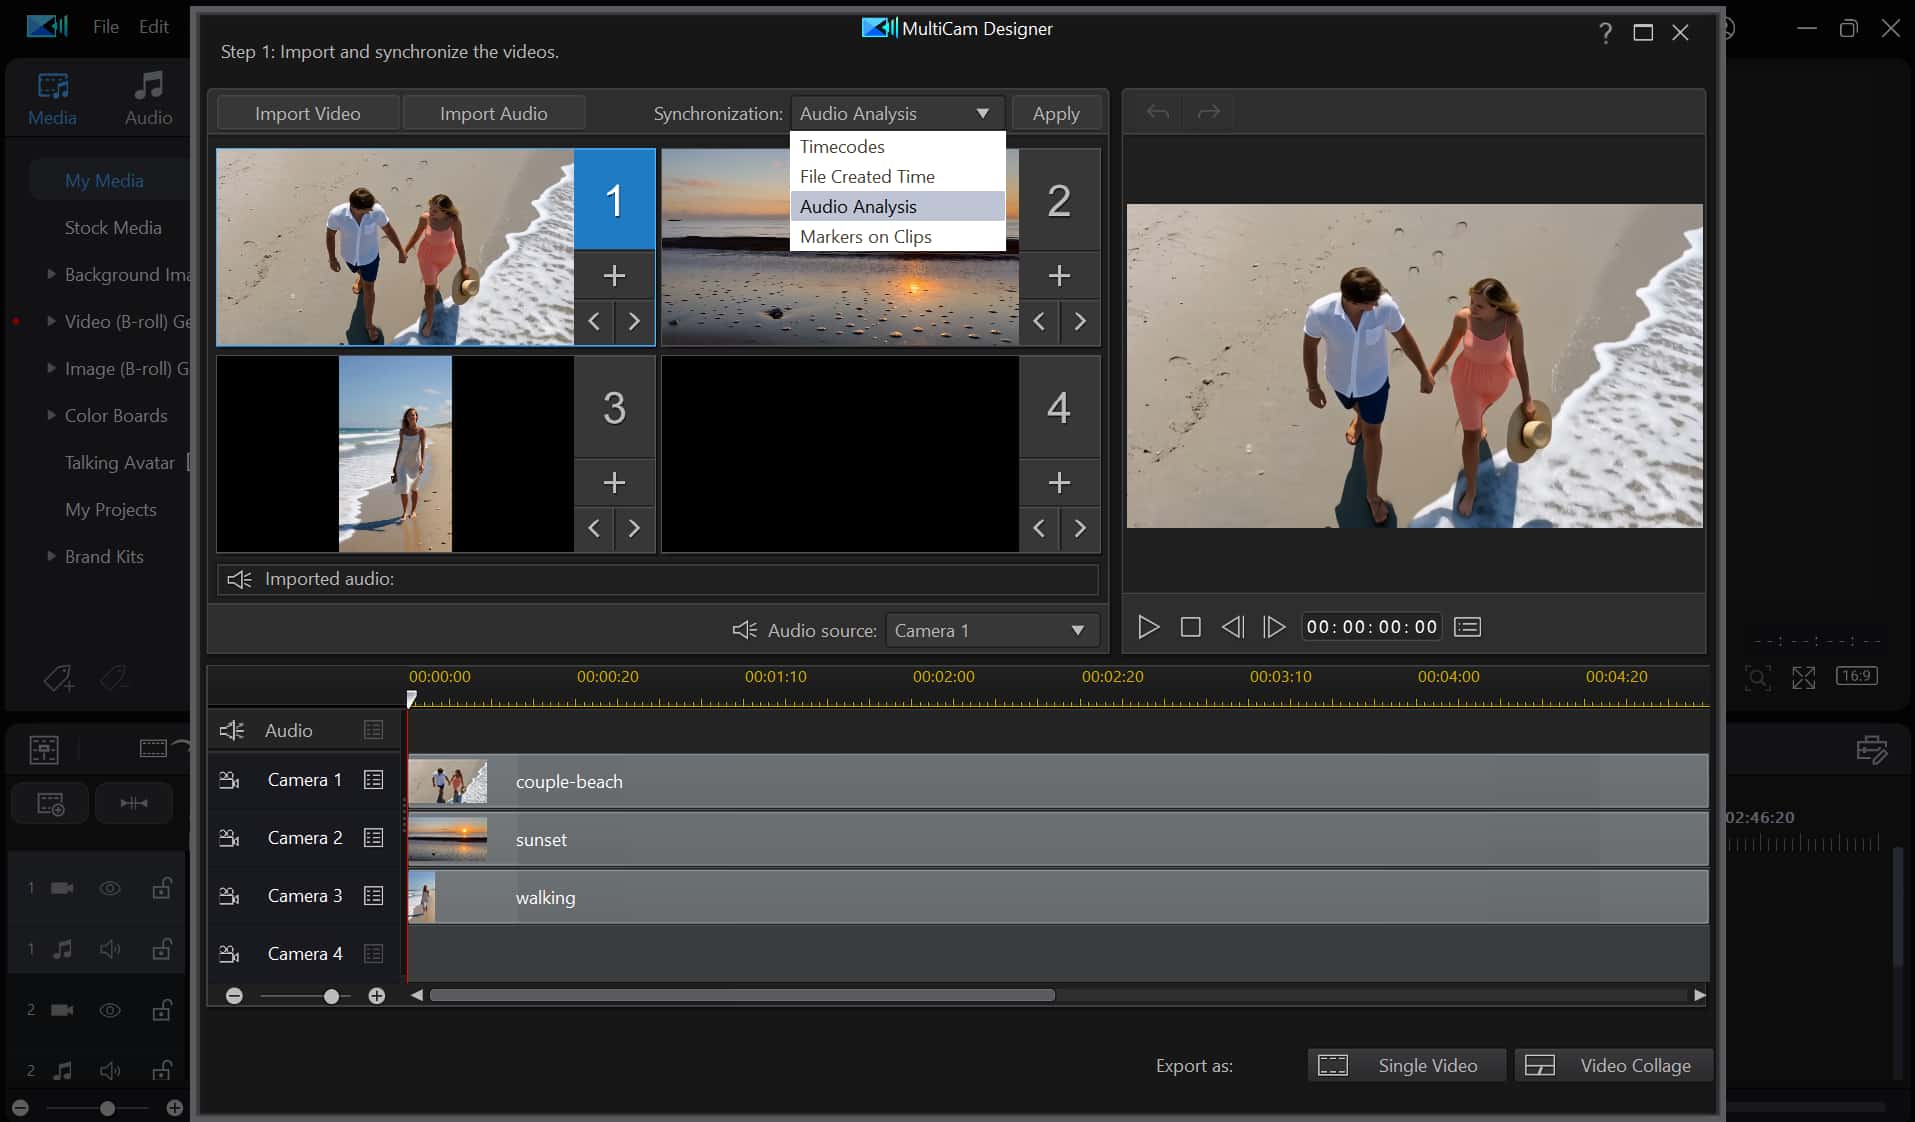
PowerDirector matches each clip's audio waveform to your track, so every camera angle is time-synced to the same point in the song, even if you didn't use a clapperboard on set.
- Record your multicam performance into a single multi-clip.
Move the Timeline Slider to where you want the take to start, click Record to begin, and click it again to stop. The synced footage appears on the Recording Track as one combined clip, and you can choose to produce it as a single video or a video collage.
You can pull the audio from any one of your camera sources, or drop in the separately recorded track from step 1 instead.
- Trim the multi-clip and build your rough cut.
Move the cursor between two clips on the Recording Track until the resize arrow appears, then drag to adjust the length. Click OK to send the finished multi-clip to the main Editing Timeline, where you'll do the rest of your cutting.
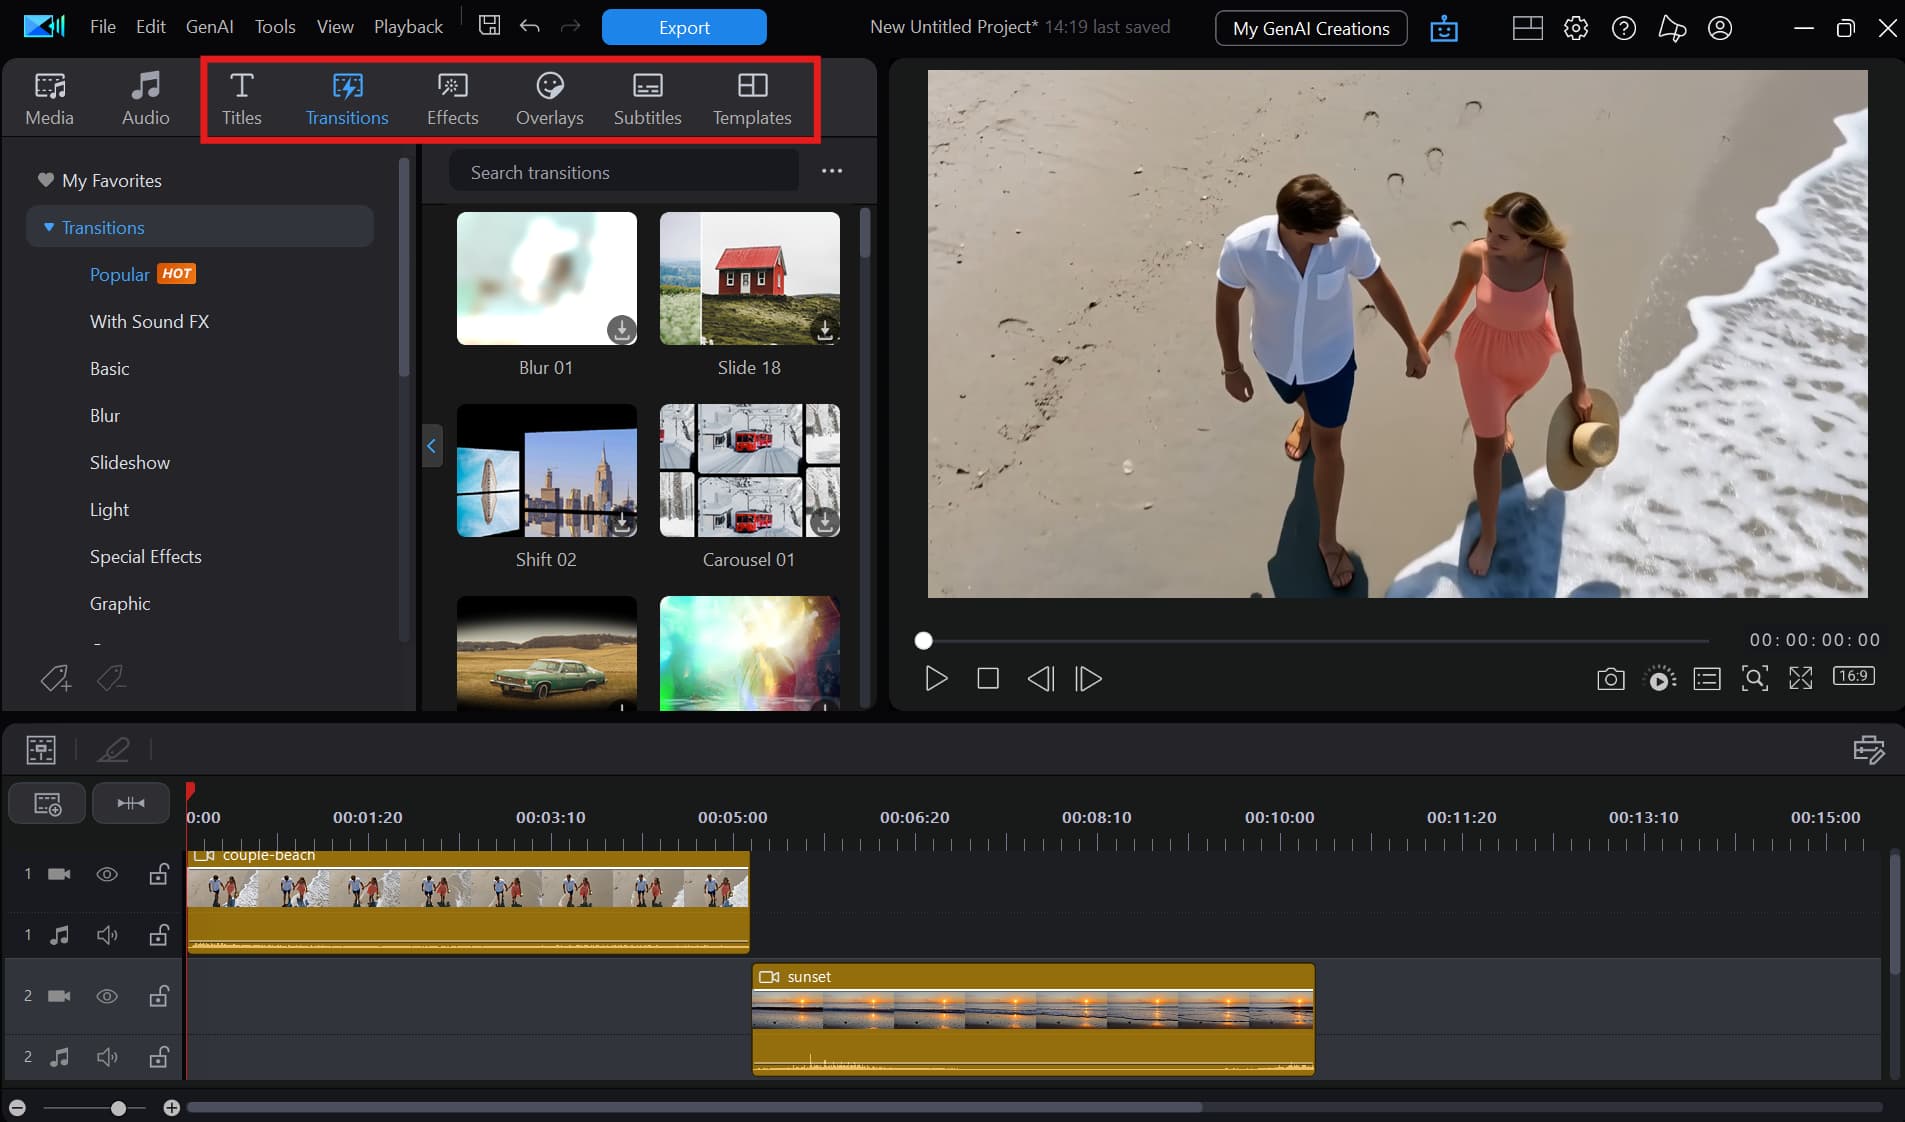
- Add titles, lyrics, and transitions.
Drag a title template onto the timeline above your video track to add lyric text, an artist credit, or an intro card. Keep transitions simple between performance shots; a hard cut or quick dissolve usually reads better than an elaborate wipe.
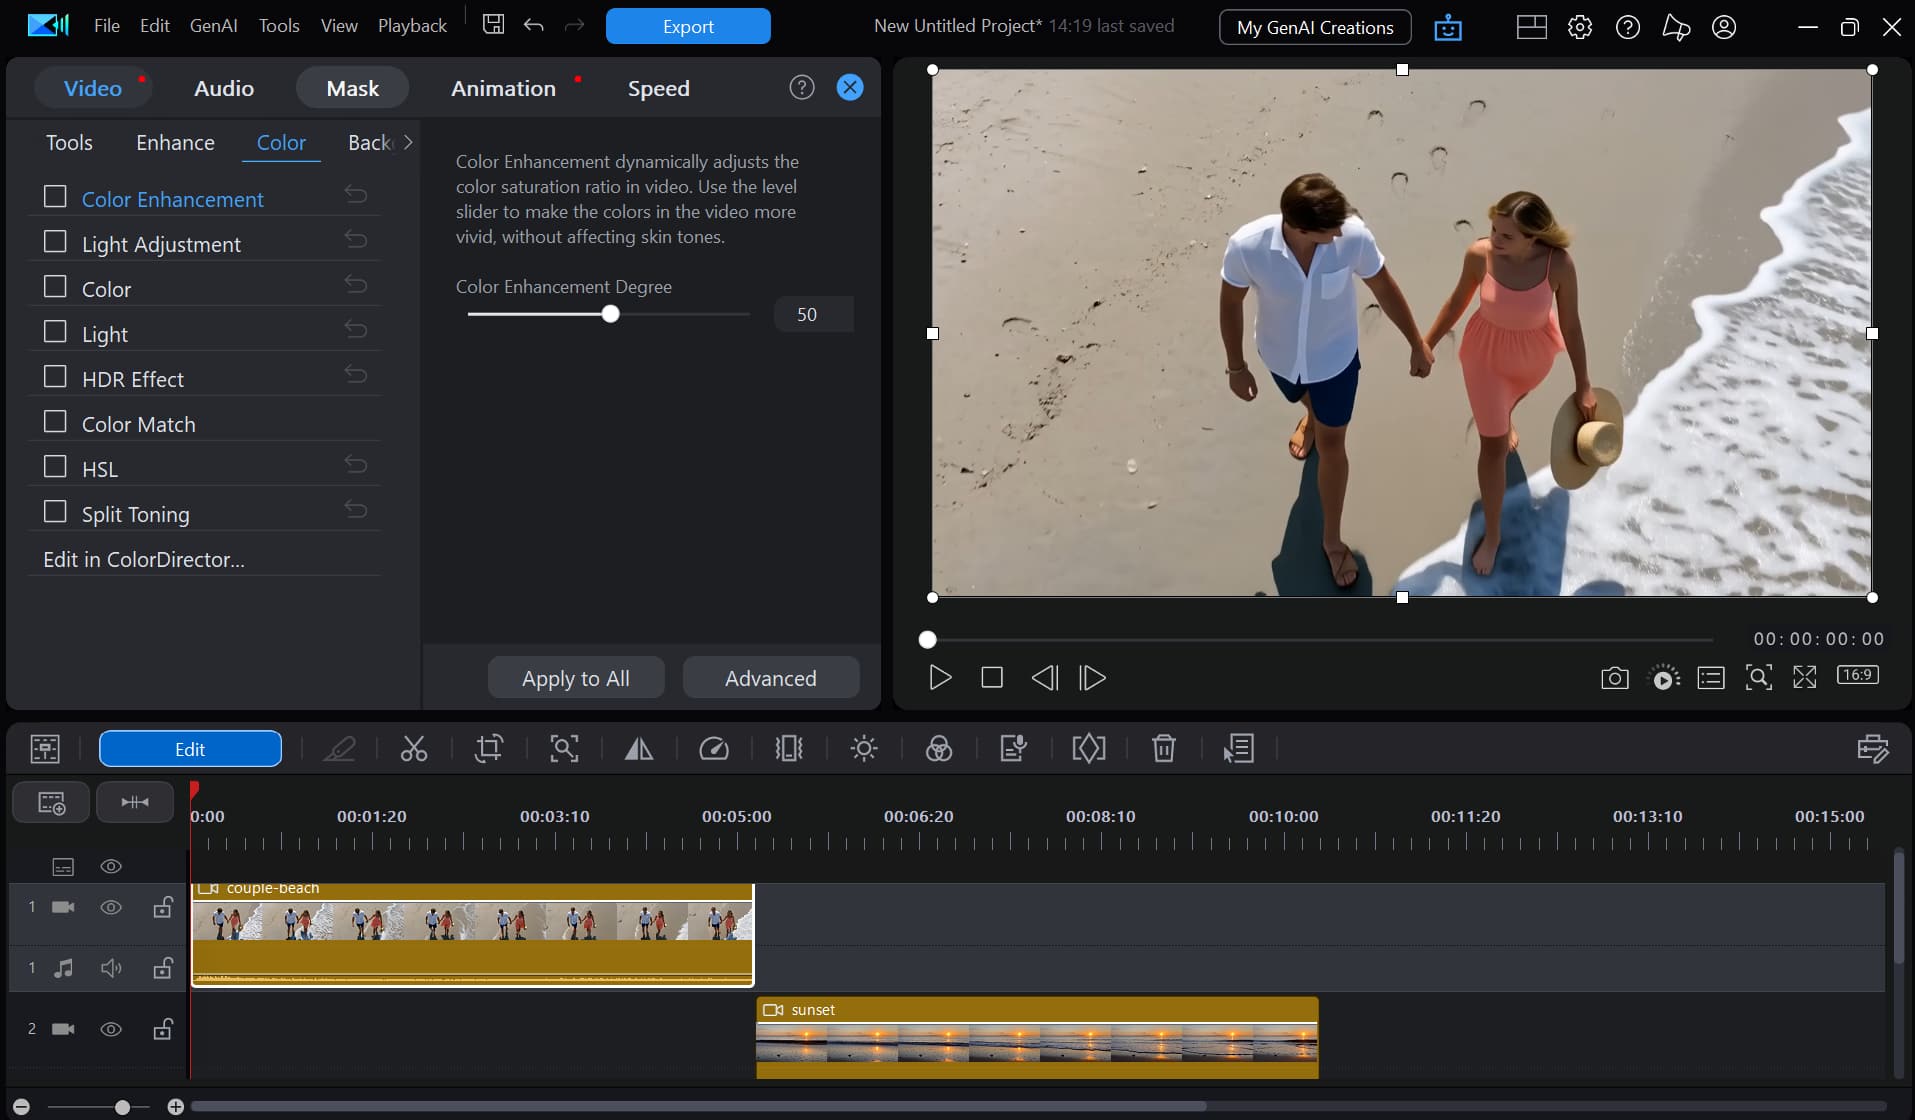
- Color correct and match your shots.
If footage from different cameras or times of day looks inconsistent, use Color Match to pull a reference look from your strongest shot and apply it across the others so the video feels like one continuous world.
- Export and upload.
Export at the resolution and frame rate your source footage was shot in, and upload directly to YouTube or your platform of choice from PowerDirector's export panel.


Common Problems (and How to Fix Them)
A few issues come up often enough in this workflow that they're worth troubleshooting before you assume something's broken.
- Multicam Designer won't sync your clips: Audio Analysis needs a clear, audible waveform on every clip to match against. If a camera's mic was muted, too quiet, or too far from the sound source, that clip won't align. Check each clip's audio levels before syncing, and manually nudge any clip that doesn't lock into place using the waveform as a reference.
- Clips start synced but drift out of sync partway through: This usually means your cameras were recording at different frame rates. Check each camera's frame rate before importing, and match your project settings to it, or convert the mismatched clips, before running Multicam Designer again.
- Export finishes, but YouTube (or another platform) rejects the file: This is typically a codec or resolution mismatch from a custom export setting. Use a standard preset that matches your platform (for example, a 1080p YouTube preset) instead of a manual configuration.
- Export is very slow or freezes partway through: Check that hardware acceleration is enabled in your export settings, and confirm you have enough free disk space; a nearly full drive is a common, easy-to-miss cause of stalled exports.
Ready to Start Editing
That's the full process, from deciding on a concept to exporting a finished video. The planning stage in Part 1 is what makes Part 2 go quickly; most of the time lost in editing comes from footage that wasn't shot with the edit in mind.
Download PowerDirector for free below to follow along with the steps.
Music Video FAQ
A music video is a filmed performance of a song, often paired with dancing or visuals that interpret the lyrics. It can promote a song or artist and help establish a visual identity for them.
MTV launched in 1981 as the first television channel devoted to music videos. Today they live mainly online, on platforms like YouTube.
At minimum: a camera (a phone works), a finished mix of your song, a shot list, and a video editor that can sync footage to an audio track and add titles. If you're filming more than one performer or angle, a second camera makes syncing much easier in the edit, which is what Part 2 of this guide covers.
Follow the two-part process in this guide: plan and film your footage first (Part 1), then edit it together (Part 2). Most of what determines how smooth the edit goes gets decided during planning, not editing.
Record on a smartphone using your own costumes and props, and film somewhere you already have access to. If lighting isn't ideal, color correction in the edit (see Part 2, step 6) can even it out, and chroma key tools can swap the background if you end up shooting somewhere unremarkable, like a living room.
PowerDirector Essential is a free option that includes the syncing and title tools this guide uses, so you don't need to pay for software to follow along.
The process isn't fundamentally different from what's outlined in Part 1 and Part 2, just with a bigger budget and more people involved. A concept is agreed on with the artist and director, a storyboard artist draws every shot, and a production team scouts locations and gathers costumes and props to match. The director and cinematographer plan lighting and equipment for each shot, the video is filmed, and it moves into post-production, where editing, color, and audio may each be handled by a different specialist before the final video is delivered.
Click Import Media Files in the upper left of PowerDirector and select your song from your desktop. Once it appears in your Media Library, drag it onto an audio track on your editing timeline.
Your video is automatically protected by copyright the moment you create it, whether or not you formally register it. Most platforms, including YouTube, also have their own systems to flag stolen or copied work.
Registering with the copyright office isn't required, but it makes it easier to pursue damages if someone infringes on your work later, since it removes any ambiguity about who owns it.
Music videos don't need to match your song's lyrics or even make literal sense, so build the concept around locations, costumes, and props you already have access to rather than what you'd need to rent. Film on a phone, use an affordable external mic for cleaner audio than a built-in one, and lean on your video editor's color and title tools (Part 2, steps 5 and 6) rather than paying for effects you don't need.