Live streaming is a community-driven and interactive avenue for content creators. Millions of people use streaming platforms like Twitch every day to chat with their favorite live streamers and join the communities they foster.
Twitch is one of the most popular live-streaming platforms because it is highly flexible and provides streamers with several ways to monetize their content. And it’s not just for gamers. Twitch hosts lots of different broadcasts in categories such as Music, Talk Shows, Sports, Travel & Outdoor, Just Chatting, Food & Drink, and Special Events.
Even if you are a seasoned influencer on social media with your own popular YouTube channel, you may not know how to stream on Twitch. You may not understand the ins and outs or the unique set of rules that come with live streams. This guide takes a comprehensive look at how to stream on Twitch from your PC or gaming consoles. We will go over all the equipment you will need, explain the “dos and don’ts” of live streaming, and answer any frequently asked questions about how to stream on Twitch.
You need to be a registered user to access Twitch’s features for live streaming. Creating an account will also allow you to interact with other broadcasters via chat and receive alerts. Follow these steps to learn how to stream on Twitch by setting up a Twitch account from your desktop.
Read through the Twitch Terms of Service, Privacy Policy, and Community Guidelines so you know how to avoid getting your account suspended.
Go to the Twitch Homepage and click Sign Up in the top-right corner.
You will be asked to choose a username and password and provide your email and date of birth.
Check your email, click on the email from Twitch, and verify your account.
Once your account has been verified, go to the Security and Privacy Settings page to enable two-factor authentication. You cannot live stream on Twitch without this step.
Click Set Up Two-Factor Authentication, then Enable 2FA. You will be asked for your mobile phone number, then enter the code texted to you to complete the process.
Choose a Live Streaming Software for Twitch
There are a plethora of streaming software for Twitch but we recommend PowerDirector with Screen Recorder 4. It is a live streaming software, screen recorder, and video editor rolled into one. Even if you don’t know how to stream on Twitch, you can stream high-quality, content with this user-friendly and professional broadcasting software. Screen Recorder 4 is compatible with most external devices and multiple audio-visual inputs. Download PowerDirector with Screen Recorder 4 and start live streaming today.
Learn More
What You Need to Start Streaming on Twitch
This section discusses everything you need for your live streaming setup. If you want to learn how to stream on Twitch from multiple sources, you need the correct components to record and broadcast your content simultaneously.
Primary Streaming Device
The first thing you’ll need is a streaming device. Twitch users typically use PCs, Macs, mobile devices, and gaming consoles, such as PS4 or Xbox, to capture and broadcast their streams.
While you can use any streaming device, most streamers learn how to stream on Twitch using a computer or laptop for broadcasting while creating the content using their mobile device or gaming console. Using a computer lets you integrate a high-end broadcasting solution into your stream, making interesting effects and overlays possible.
If you are using a computer as your primary streaming device, high-end screen recording is critical. Screen Recorder 4 is available as a plug-in within the video editor PowerDirector and is a viable option, thanks to its professional recording options and Twitch-specific streaming features.
When using a computer, ensure that your processor is powerful enough to handle gaming and encoding simultaneously. An i5 processor with 8GB RAM should be sufficient to ensure a decent upload speed and video quality.
Microphone
A microphone lets you add commentary to your stream or chat with your followers. Ideally, you should invest in a high-quality microphone instead of using the built-in mic of your AirPods or webcam. Here are some popular microphones for streaming:
Elgato Wave 3
HyperX Quadcast S
Audio Technica AT2020
Razer Seiren Mini
Blue Yeti X
Webcam
A webcam or camcorder lets you show your face while adding commentary to your stream. With a microphone signal input via your camera, you can embed the audio into the video as a single source, simplifying your streaming configuration. Some popular webcams used for streaming are:
Logitech C920 and C922
Creative Live! Cam Sync HD
Razer Kiyo.
Video Encoder
RAW audio-visual feed is bulky and streaming this signal online will result in lagging video, causing your audience to click away. A video encoder compresses your content’s audio-visual feed into a digital, web-friendly format. Due to the time sensitivity of live streaming, you need an encoder that is powerful enough to process your content feed in real-time.
Two types of encoders exist: Software and hardware encoders. Let’s take a look at both:
Software Encoders
A software encoder is an application you install on your computer for compressing and streaming video online. Various professional encoding software products are available. Video encoding is CPU-intensive, and you might need to upgrade your hardware if you don’t want to downscale your output resolution or reduce your frame rate.
Hardware Encoders
A hardware encoder is an external device for capturing, encoding, and streaming audio and video files to platforms such as Twitch. Depending on the model, a hardware encoder can be compatible with multiple input formats, including HD-SDI, HDMI™, DVI, VGA, 3.5-mm analog audio, and XLR.
Capture Card
Most video sources, such as cameras, have HD-SDI, HDMI™, or component outputs that computers can’t recognize. If you are using a software encoder, you can’t connect these outputs directly to your computer.
A capture card is an external hardware device you need to connect to your camera to convert its output signal into a recognizable digital format. You also need to connect the capture card to your computer typically via USB.
Most high-end hardware encoders feature a built-in capture card, allowing for a direct connection with your video source. You also don’t need a capture card if you are using a USB camera or mic.
Elgato is the most popular brand of Capture Cards among gamers for its excellent capture quality. The Elgato Game Capture Card HD60S is the most popular of Elgato’s cards.
Twitch Account
The first step in learning how to stream on Twitch is opening a Twitch account, a relatively straightforward process we outlined in detail above.
Stable Internet Connection
A stable, high-speed internet connection will prevent your stream from buffering or freezing. Consider an ethernet line instead of a Wi-Fi or mobile connection to prevent fluctuations.
How to Stream on Twitch With a PC & Automatically Retrieve Your Stream Key
This section looks at how to stream on Twitch with a PC using a broadcasting software. Twitch recommends doing extensive research to find a broadcasting application that fits all your streaming requirements.
Screen Recorder 4 is available in PowerDirector 365 for Windows, and it is among the most effective options for all types of streaming content. If you are a beginner who doesn’t know how to stream on Twitch, try this beginner-friendly software to start streaming engaging content today.
Learn More
After downloading Screen Recorder 4 to your computer, launch the software by selecting the program from your Start Menu.
Before streaming your video to Twitch, you need to set up all the elements you want to capture.
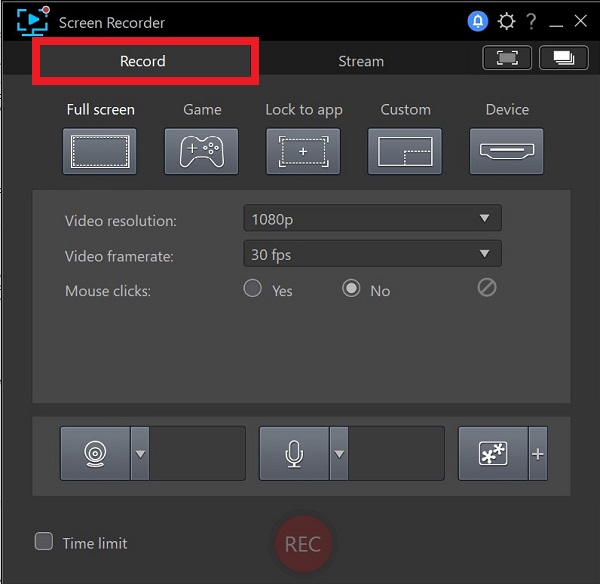
Click on the Record tab on the top left of the window. Here, you can choose to stream your entire screen or a custom-size desktop area.
You can also lock the stream to a desktop app, stream from a connected device, such as a gaming console, or broadcast a game directly from your computer.
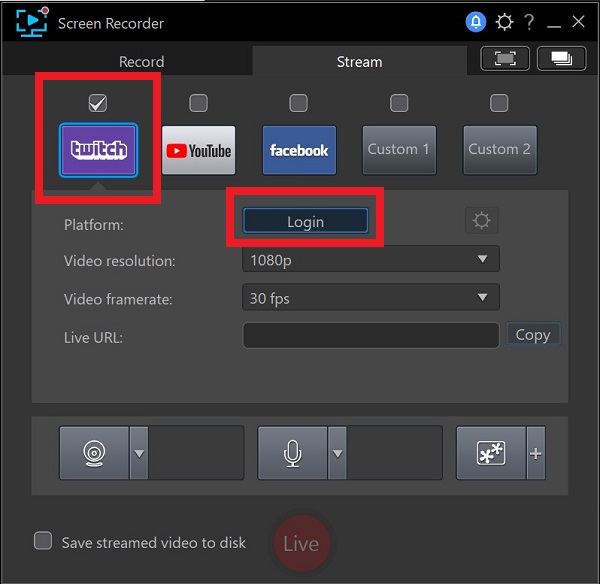
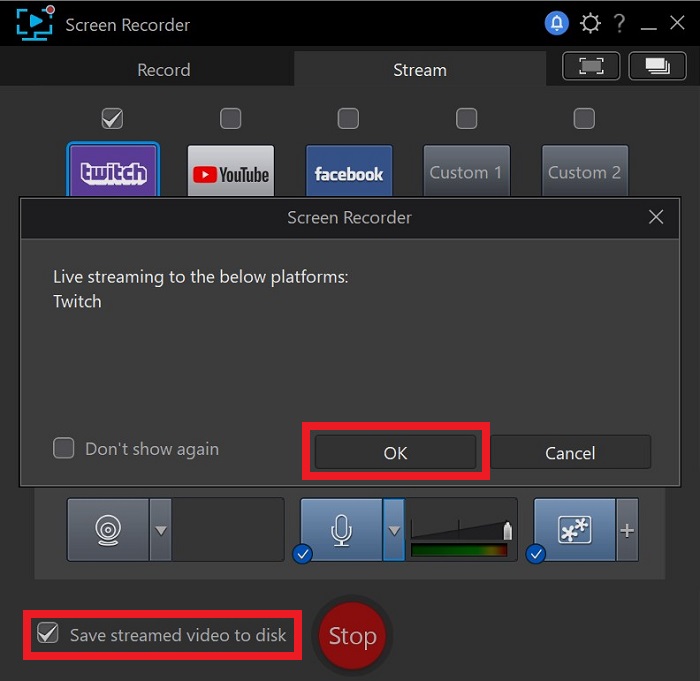
After setting up your stream, select the Stream tab to the right of the Record tab. Then, click on the check box above the Twitch icon. If you want to stream to multiple platforms, such as YouTube and Facebook, you can check these icons as well.
Click on Log in below the streaming platforms’ icons and follow the on-screen instructions to sign in to your Twitch account and enable the streaming session.
After you sign in and authorize your Twitch account, the software will automatically retrieve the stream key you need to broadcast your feed on Twitch.
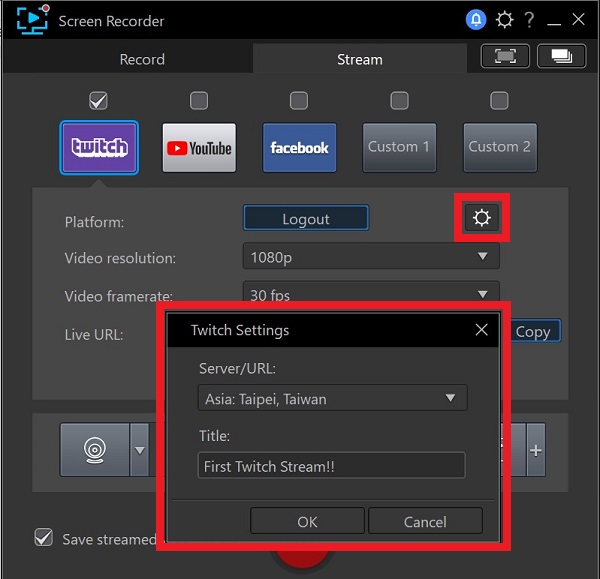
Once you’ve signed in to your Twitch account, click on the Gear icon on the top right of your screen. Then, select the server you want to use and enter your video’s title.
Set your recording options from the drop-down menus in the Record tab, including the video resolution and framerate. If you want to share your video’s URL to your social media, copy it from this window below the video framerate drop-down menu.
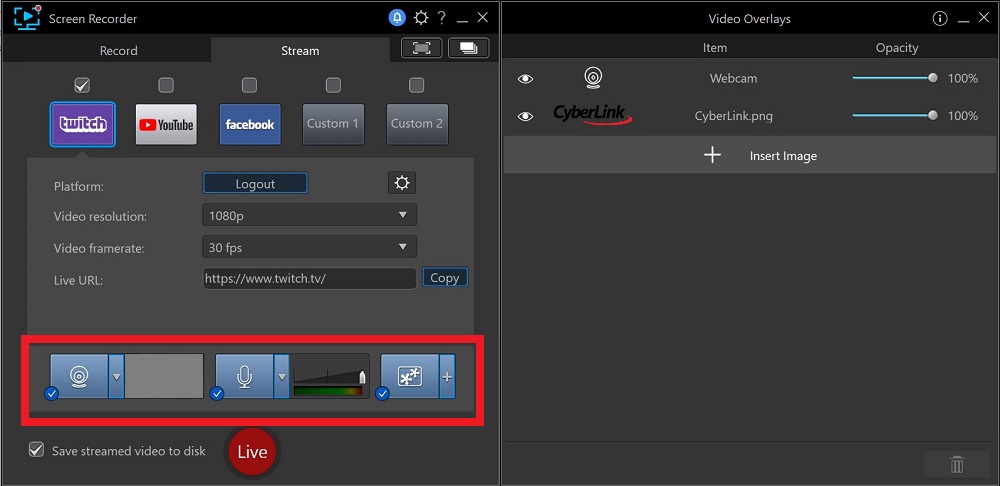
Before going live, you need to include your additional audio and video sources and add overlays, such as your logo.
At the bottom of the Stream tab, you’ll find Webcam, Microphone, and Overlay buttons. Start with the Webcam button to configure your cam feed, including its source, size, and location. Under Webcam Settings, you can use the chroma key function to replace and customize your webcam’s background.
Next, select the Microphone icon to enable audio from your microphone in your video stream. Using the slider, you can adjust your mic’s volume.
Lastly, click on the + icon next to the Overlay icon to upload a logo or other PiP image to your video stream. Under the overlay settings, you can adjust the opacity of your logo and webcam feed.
Click on Save Streamed Video to Disk to save a copy of your stream to your local storage. Then, click on Live to start your stream. When reaching the end of your stream, click on the Stop button.
How to Stream on Twitch With a Gaming Console
In this section we will give you a step-by-step guide on how to stream on Twitch using a Playstation 4, how to stream on Twitch using an Xbox One, and how to stream on Twitch using a Nintendo Switch.
How to Stream on Twitch With a PS4
Follow these steps to learn how to stream on Twitch with a PS4 after setting up a Twitch account:
Select System under Settings. Then, uncheck the Enable HDCP (high-bandwidth digital content protection) box. If you don’t disable this feature, you might experience interruptions in your stream.
Connect devices such as a mic and PlayStation camera to the AUX ports at the back of your console. Then, select them in Settings > Devices.
Launch the game you want to stream, and press the Share button on your controller, opening Sharing and Broadcasting Settings. Under Broadcast Settings, select Advanced Settings and go to Audio Sharing Settings. Here, you can enable your microphone’s sound for the stream.
If you want to view comments from your viewers, check the box next to Display Messages to Spectators and Spectators’ Comments under Advanced Settings.
After pressing the Share button on your controller, you can choose the platform where you want to stream. Select Twitch from the available options. Scan the QR code on your screen using your smartphone to connect your console to Twitch, and then start your broadcast.
Streaming directly from your PS4 will limit the control of your stream. If you want full control we recommend using Screen Recorder 4.
Follow the steps below to learn how to stream on Twitch by setting up your PS4 via a PC:
Connect your PS4’s dock output to your capture card’s input using an HDMI cable, then
connect your capture card’s output to your TV or computer monitor using an HDMI cable.
Connect your capture card to your PC via USB.
Launch Screen Recorder on your PC.
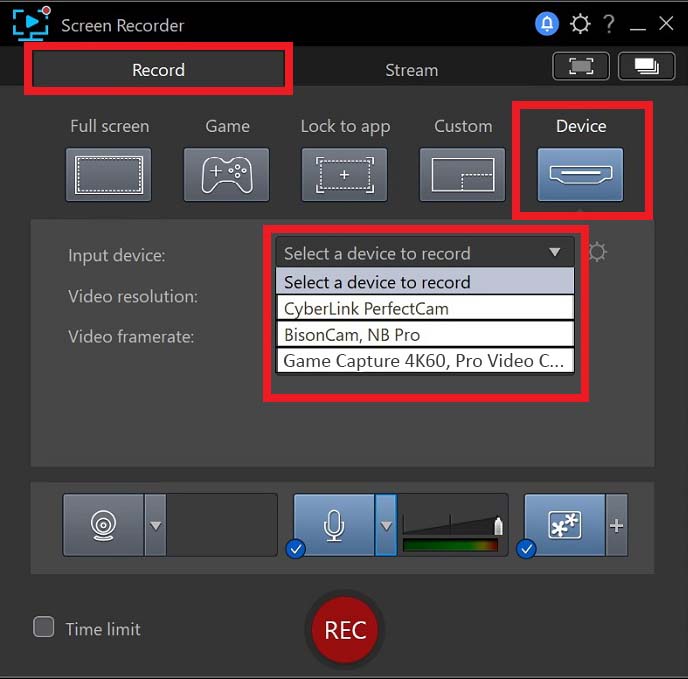
Click on the Device option in the Record tab.
Select the capture card from the Input Device drop-down menu.
Click on the Gear icon on the top right of your screen to configure the capture card’s input settings.
After connecting your PS4 to your PC, follow the steps we included in our section on how to stream on Twitch from your PC.
How to Stream on Twitch With an Xbox One
Xbox One doesn’t offer built-in Twitch support, so you’ll need to download the official Twitch Studio app from the app store on your console.
When you launch the Twitch app for the first time, it will provide you with a six-digit code. Using your computer or mobile device, visit Twitch.tv/activate to enter this code and connect your account to the Twitch app.
You can use any off-the-shelf microphone and webcam for Twitch streaming with Xbox, provided that it supports NV12 or YUY2 format.
To learn how to stream on Twitch from Xbox, follow the steps below.
Open your Settings Menu and select Account. Under this menu, open Privacy and Online Safety, and select Xbox Live Privacy.
Under View Details and Customize, you’ll find everything you need to make adjustments and start your broadcast.
Select Online Status & History, and then select Everybody under Others Can See If You’re Online.
Open Game Content. Select Allow under You Can Broadcast Gameplay, then select Allow under You Can Share Content Made.
Enter a title for your stream and select Start Broadcast!
Streaming directly from your Xbox will limit the control of your stream. If you want full control including the ability to use any high-quality webcam and mic, we recommend using Screen Recorder 4.
Follow the steps below to learn how to stream on Twitch by setting up your Xbox One via a Windows PC:
Connect your Xbox’s dock output to your capture card’s input using an HDMI cable, then connect your capture card’s output to your TV or computer monitor using an HDMI cable.
Connect your capture card to your PC via USB.
Launch Screen Recorder on your PC.
Click on the Device option in the Record tab.
Select the capture card from the Input Device drop-down menu.
Click on the Gear icon on the top right of your screen to configure the capture card’s input settings.
After connecting your Xbox to your PC, follow the steps we included in our section on how to stream on Twitch from your PC.
How to Stream on Twitch With a Switch
Nintendo Switch doesn’t have built-in streaming capabilities, but you can broadcast your gameplay using a capture card. First, you'll need to dock your Switch, as you can only stream gameplay in docked mode.
Follow the steps below to learn how to stream on Twitch with your Switch:
Connect your Switch’s dock output to your capture card’s input using an HDMI cable, then connect your capture card’s output to your TV or computer monitor using an HDMI cable.
Connect your capture card to your PC via USB.
The streaming software you need to use for broadcasting Switch gameplay depends on your capture card. Follow these steps for how to stream on Twitch using Screen Recorder 4:
Launch Screen Recorder on your PC.
Click on the Device option in the Record tab.
Select the capture card from the Input Device drop-down menu.
Click on the Gear icon on the top right of your screen to configure the capture card’s input settings.
After connecting your Switch to your PC, follow the steps we included in our section on how to stream on Twitch from your PC.
Do’s and Don’ts of Twitch Etiquette to Engage Your Audience
Dos
Connect to Viewers via Chat
The first rule for how to stream on Twitch is to chat with viewers. If viewers think you’ll engage, they are going to hang around longer. Even as your channel grows, it is important to chat with viewers, answer questions and respond to comments.
If you want, you can go to your settings page and set up rules you would like viewers to agree to before engaging in chat. For example, if you don’t like to know the viewing numbers during a live stream because it makes you nervous, you can ask not to be told.
Be Consistent
The easiest way to attain repeat viewers is to make sure they know where/how/when to find you. Try to live stream during specific hours and on specific days of the week. You can also be consistent with your branding - use the same colors, logos, and fonts to help fans scrolling through tons of content recognize you immediately.
You should define what your channel is about before you even start and let viewers know through titles, panels, tags, and extensions.
Market Yourself
Create social media accounts on Facebook, Instagram, Twitter, etc. It’s a great way to reach new viewers and a way to let your fans know about upcoming streams and events. Remember to link to your channel in your posts.
Also, try not to limit social media to posts about going live, but give your community a glimpse of who you are besides just a streamer. A good rule of thumb is the 70/30 split - 70% posts about you, 30% about your channel.
Don’ts
Announce You are About to Stream on Someone Else’s Chat
If you want to learn how to stream on Twitch, know this: do not try to poach viewers away from someone else’s live stream. It may seem like a good idea to go to a very popular stream and announce your stream to a large audience, especially if the stream is similar to your own. It is considered rude and will make an enemy out of a popular streamer you want on your side. But even if their stream is ending and you try to casually announce the start of your stream, it is considered bad form in the Twitch community.
Similar faux pas includes asking for shout-outs, subscribers, or collaborations from the host. Let relationships form naturally over time and then the streamer would be happy to help out your channel.
Call Out Lurkers
If someone is enjoying your stream and doesn’t want to be part of the chat, that’s ok! Some people just want to watch while they work on other things. As a streamer, there are bots you can turn on or off that will welcome new viewers by name, but that could make them uncomfortable if they just want to be left alone.
Spam People With Links to Your Channel
While you should market yourself on your own social media, don’t spam other people’s pages with constant links, or tag everyone you’ve ever met in your Going Live posts.
Download the Best Free Streaming Software for Twitch
Twitch stands out as a versatile, flexible platform for streamers who want to provide their audiences with engaging content. If you are learning how to stream on Twitch, you will need a streaming device, camera, microphone, and encoder. If you are using a software encoder, you need an external capture card to ensure that your computer can recognize the feed format.
You also need high-end broadcasting software for your PC. PowerDirector 365 is great for cutting highlight reels of streams, and it comes with Screen Recorder 4, a robust plug-in that is ideal for Twitch streaming.
The latest features of Screen Recorder 4 include streaming video to custom servers and multiple locations at once and including video overlays, such as images or logos, in your streams. You can also preview and adjust your webcam video’s location and size and customize your video’s streaming bitrates. Using the chroma key to replace your webcam’s background is another high-value feature for Twitch streamers.
If you want to stream high-quality, engaging content to Twitch, you need user-friendly but professional broadcasting software. Screen Recorder 4 is easy to learn and compatible with most external devices and multiple audio-visual inputs. Download ScreenRecorder 4 today.
Learn More
How to Stream on Twitch FAQ
To live stream on YouTube using a PC, launch Screen Recorder 4 and follow these steps:
Configure your recording settings.
Click on the Stream tab and select the YouTube icon. Follow the on-screen instructions to log in to your YouTube account.
Click the Gear icon then enter a title for your stream and choose your privacy settings.
Under the Stream tab, select video resolution, and frame rate.
Check Save Streamed Video to Disc, then Go Live.
A countdown will start, then whatever is on your computer screen will appear live on YouTube.
When you are done streaming, click Stop.
For more information on live streaming on YouTube, go to How to Live Stream on YouTube for Free.
Downloading your Twitch streams to your local storage is a quick and easy way to keep your interactions with your community on record. By saving your streams, you can revisit previous content, prevent duplications, and formulate ways to keep your online content engaging.
If you are using Screen Recorder 4 and want to learn how to stream on Twitch and save your streams to your hard drive, follow these simple steps:
Click on the Gear icon and select the File tab.
Under Default Locations, click on the Export folder to set the location where you want to save captured media.
Before going live, check the Save Streamed Video to Disk option, and Screen Recorder 4 will save the content in your designated export folder.
Using PowerDirector and Screen Recorder 4, you can record games directly from your gaming PC or a gaming console, using these simple steps:
Connect the console to your computer via a capture card and select the capture card as the input device on Screen Recorder 4.
Before you start playing, click the Save Streamed Video to Disk option to save the video to your hard drive.
After recording your gameplay, you can edit the video using PowerDirector’s professional video editing tools. This software enables you to add background music, transitions, and various engaging effects to your video content.
You can use various video editors to edit your gameplay videos, with the most popular including Corel VideoStudio, Pinnacle studio, and Vegas Movie Studio. However, many gaming content creators prefer PowerDirector 365 with its extensive editing features and user-friendly interface.
PowerDirector offers everything you need for gameplay editing, including professional effects, various motion graphic titles, and a library of Shutterstock royalty-free images you can use as overlays.
Using PowerDirector, you can also integrate and configure multiple audiovisual sources, including a webcam and mic. This software allows you to adjust the size and location of the webcam as part of your content during post-production.
When shopping for streaming software, consider products offering the following features:
A user-friendly interface
Multiple-platform streaming, including Twitch, YouTube, and Facebook
Webcam size and location adjustability
Webcam overlay configurations, including opacity
Chroma key functionality to replace your webcam background
Customizable video settings, including resolution and framerate
Customizable keyboard hotkeys to quickly make video adjustments or carry out other action
An affordable price including a free version or free trial
If you want to know how to stream on Twitch with software that checks all of these boxes, we recommend PowerDirector with Screen Recorder 4.
Before buying streaming software, consider your needs carefully. Various professional-level programs are available for Twitch streaming, but you should make sure their features cover all your requirements.
Research the features a software program has available before downloading it. If you don’t find free software offering the features you need, buying a higher-end product might be worth your while, especially if you are looking to monetize your Twitch content.