

How to Edit Instagram Photos Like a Pro: A Step-by-Step Guide

The first step in becoming a successful Instagram user or an influencer is posting engaging, professional-looking photos to your account. The higher your posts’ quality, the more likely users will be to engage with your profile—leading to increased traffic and followers.
However, if you don’t have much experience with Instagram, you may not know the best ways to edit your photos to garner the most engagement for your feed. Thankfully, you don’t need to be a professional photographer or editor to create impressive images. You just need a smartphone with a decent camera and this article to help guide you.
Before we get into all the techniques to create pro level photos you are going to need to download a mobile photo editing app. For this article we are going to use PhotoDirector to teach you all the best tricks for creating the best Instagram post.
If you are not familiar with PhotoDirector, it’s a user-friendly, professional photo editing app available for Android and Apple devices. Downloading the app will allow you to make a wide range of edits to your photos with your phone, making it easy to capture images, edit them, and upload them to Instagram from a single device.
We recommend downloading the app before reading on. It’s free to download and you’ll be able to try out all the things you are about to learn.

- How to Resize Photos for Instagram
- How to Use Instagram Filters
- How to Use Filters in the Instagram App
- How to Use PhotoDirector App to Add a New “Look” or Apply “Overlays”
- Object Removal for Instagram Photos
- Beautifying Tools for Instagram Pictures
- Top 5 Instagram Edits with Effects
- Create Double Exposure Photos for Instagram Posts
- Third Party Instagram Editing Apps
- Begin Editing Instagram Photos Like a Pro
How to Resize Photos for Instagram

Image sizing and dimensions for Instagram are among the first parameters you should consider before posting an image.
When Instagram first launched in 2010, users could only post square-shaped photos. In 2015, this restriction loosened, and users could begin posting 1080-pixel non-square images.
Even though Instagram is more flexible with sizing today, your image’s size is still an important aspect to consider when crafting your post. Instagram influencers recommend avoiding landscape-oriented photos, as the narrow nature of the Instagram app limits the space these photos can take up on the Instagram feed.
Instead, you should primarily post portrait-oriented photos (vertical rectangles) or square photos to your account. These image sizes take up more space on the Instagram feed, making them more noticeable to your followers.
We recommend posting pictures that are 1080 pixels wide and anywhere from 566 to 1350 pixels high. If you post a photo that is not a square, you should keep in mind that it will appear as a square in the thumbnail on your gallery page.
You may want to preview how the photo will look in your gallery before making it a permanent post to your account. If you dislike how the image appears in your gallery, you can always delete it and upload a resized version.
Now let’s discuss how to make a picture fit on Instagram using PhotoDirector.
How to Use PhotoDirector App to Resize Photo, Crop, and Rotate

PhotoDirector makes it easy to crop, rotate, and resize images for Instagram. You can follow these steps to ensure that your image is the perfect size for your Instagram account.
With your image open in the PhotoDirector app you should see a toolbar at the bottom of the screen that lists the different editing options available.
Tap the first icon in the toolbar, labeled Tools. Next, tap Crop and Rotate.
A new window will appear that gives you the options to rotate the image, flip it horizontally or vertically, customize the aspect ratio, or apply a 1:1 ratio.
If you would like to resize the picture to be square, you can use the 1:1 ratio feature. Otherwise, you can change the aspect ratio manually.
If you are editing a portrait-oriented photo, we recommend utilizing a 4:5 aspect ratio. This ratio will take advantage of Instagram’s height allowance while keeping it within the appropriate width range.
Once you are satisfied with the image’s size, you can save your changes and export the photo in your preferred file type. Most influencers agree that the best file type to optimize Instagram’s resolution is .jpeg.
We recommend trying out different sizing options for every Instagram photo you post. Some images may pop more as a square, while others may need a taller aspect ratio to showcase their beauty best.
Importing your photos to PhotoDirector and playing around with the sizing tools is an easy way to elevate your posts and create more engagement for your feed.
How to Use Instagram Filters
Another essential aspect to consider before you post a photo to Instagram is a filter. Filters are the overlays that change your photo’s saturation, hue, contrast, brightness, and overall color scheme. Instead of altering each of these aspects manually, filters do all of the work for you using preset alterations.
If you remember the early days of Instagram, you probably recall most users posting photos with obvious, overly saturated, colorful filters on their images. Today, most of the images you see on your Instagram feed contain some sort of photo filter, but the filter is so subtle that you may not even notice it.
Modern Instagram filters make it easy to adjust different aspects of your photo’s appearance and ensure that they look cohesive and clear in the final product. However, with so many filters available across editing apps and Instagram, choosing the right one for your feed may feel overwhelming.
One aspect to consider when choosing an Instagram filter is the type of content in your image. For example, if you are posting a food picture, you may want to accentuate the colors while keeping them natural and appetizing. On the other hand, if you are sharing a photo of a sunset, applying a vibrant filter will highlight the scene’s beauty further.
You should also keep consistency in mind as you consider what filters to apply to your photo. When a new follower visits your account for the first time, they will see your gallery as a whole before viewing any individual photos. Keeping a consistent color scheme throughout your posts could make your page more attractive and cohesive, encouraging users to follow you.
Overall, the filter you choose should look natural enough that it is not immediately noticeable to your followers, but still provide a pop of color that attracts users as they scroll through their feeds.
How to Use Filters in the Instagram App
Instagram offers several built-in filters that you can apply to your image right before you post it to your account. To access these filters, simply create a new post on Instagram, choose your photo, and click “Next.” You will see a list of filters at the bottom of the page.
You can try out each filter by clicking on it. Once the filter overlays on your image, you can click on the filter icon again to alter its intensity on your photo using a slider bar.
Instagram also offers a magic retouch tool that optimizes your image’s brightness and saturation. To use this tool, simply click the magic wand at the top of the filters page then change the intensity using the slider tool if you prefer.
Once you find the right filter for your photo, click Next. Instagram will take you to another page to add the caption, hashtags, and location to your image before posting it to your feed.
How to Use PhotoDirector App to Add a New "Look" or Apply "Overlays"

While Instagram’s built-in filters are convenient, the best influencers typically do not apply these filters to their posts. Instead, they edit their photos with an Instagram filter app such as PhotoDirector, which includes a broader range of filters, overlays and adjustments than Instagram offers.
Adding filters and overlays through PhotoDirector can give your images a fresh, new look, making them more likely to catch your followers’ attention as they scroll through their feeds. These filters and overlays are also more professional and artistic than the ones Instagram provides, giving you a better way to express your singular creativity through your posts.
To use PhotoDirector’s one-click overlays, simply open the PhotoDirector app and select Overlays. We recommend playing around with several until you find the one that gives your image the eye-catching effect you’re looking for.
Object Removal for Instagram Photos
Being a successful Instagram influencer means going above and beyond to ensure that every photo is clean, attractive, and precise. One aspect of photo editing that you may overlook is object removal.
Object removal is the technique of editing out of your photo people, animals, or objects that do not fit the overall aesthetic or that draw attention away from the central subject.
Let’s say you take a photo of a beautiful beach sunset only to realize that a few beachgoers crossed in front of the camera as you snapped the picture. Removing the beachgoers altogether would keep the sunset as the main focus of the photo, creating a cleaner, more attractive image overall.
Alternatively, let’s say you want to take a photo of yourself and your family at a crowded location like Disney World. Object removal would allow you to eliminate any unwanted background interference—such as people, trash cans, birds, and so on—to clean up the image and highlight the attractive amenities at the park.
If you are unfamiliar with modern editing apps, you may think the only way to remove an object is to use a complicated program like Photoshop. Good news: PhotoDirector offers simplified, automated object removal, making it easier than ever to clean up your photos before posting them to Instagram.
- Select the Tools option in the PhotoDirector toolbar. This icon is located in the bottom left corner of the screen.
- Next, find and select the Removal option under Tools.
- Your next step is to highlight any objects you would like to eliminate from your photo. You can select these objects by dragging your finger across the screen, essentially coloring over the object. Don’t worry about being too precise—PhotoDirector will identify the object’s outline using AI integration. If you make a mistake, you can use the Undo tool to remove your selection.
- Once you finish selecting your object, click the Apply button at the bottom of the page. PhotoDirector will spend a few seconds removing the object from your photo.
This process will take you a minute or less from start to finish, making it a fast, easy way to elevate your Instagram photos.
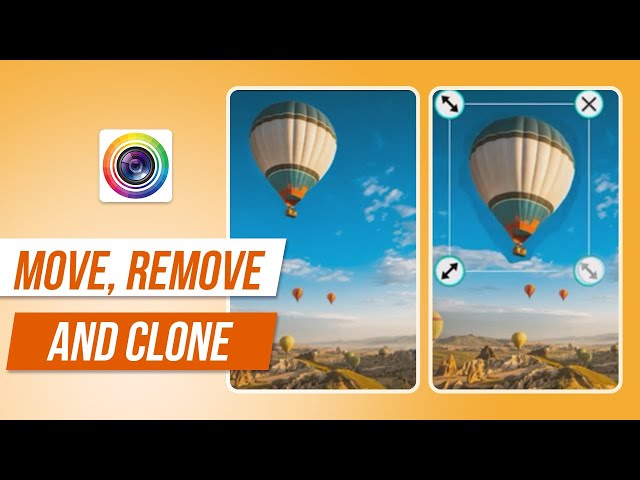
You can use a similar technique to clone objects in your photo. For example, let’s say you want to add a few clouds to the sky in your sunset photo or flesh out a crowd at a concert. Cloning existing objects through PhotoDirector is an effective way to add fun elements to your image without any expensive tools or computer-based programs.
To clone an object, start by selecting the Clone tool in the PhotoDirector toolbar. PhotoDirector will take you to a new page where you can highlight the object you would like to clone, just as you did in the object removal process.
Once you finish selecting the object, click Apply. PhotoDirector will duplicate the object and allow you to customize it by changing the size, rotation, and placement within the photo. Changing the object’s specifications will make it less evident that you cloned the object, creating a natural appearance in the image.
Beautifying Tools for Instagram Pictures
Beauty is a significant part of Instagram culture, and long-term Instagram users know how much the beauty standard has changed since the app’s initial launch. While snapping quick selfies and immediately uploading them to Instagram used to be popular, today, influencers spend time perfecting their appearance in photos before posting them.
Many Instagram users use beautifying tools in advanced editing programs to achieve a pristine appearance in their pictures. PhotoDirector makes it easy to apply beauty filters that will enhance your natural features and help you feel confident in the photos you post.
Whether you would like to remove a few blemishes or reshape your face, you can achieve these effects quickly through PhotoDirector. Let’s take a look at one of PhotoDirector’s most popular beautifying tools: the skin smoothener.
Skin Smoothener
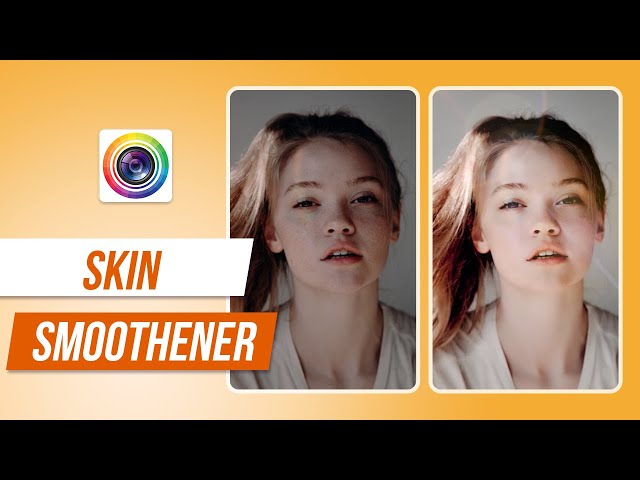
PhotoDirector offers an easy-to-use skin smoothener tool that removes pimples, freckles, and other blemishes from the skin, creating a smooth, clean appearance. You can apply this feature using the PhotoDirector mobile app by following these steps.
Before you use the skin smoothener tool, we recommend making any desired adjustments to the photo’s brightness, contrast, or exposure.
Next, scroll through the toolbar at the bottom of the page until you find Skin Tool. Select this icon, then choose which face in the photo you would like to alter. PhotoDirector uses auto-face detection to locate any faces in your images, making it easier to centralize the effect on your face.
Once you select the face, PhotoDirector will open a slider tool that allows you to adjust the intensity of the smoothing effect. We recommend playing around with this adjuster to create a natural smoothness that does not look too heavily altered.
After you are satisfied with the smoothing effect, simply save your changes and export the image as a .jpeg.
You can apply the smoothing effect to your photo in less than a minute, making it easier than ever to adjust your image before posting it to Instagram. Additionally, because PhotoDirector offers an assortment of beauty tools, you can accomplish all of your editing in one place, streamlining your Instagram posting process.
Top 5 Instagram Edits with Effects
Frequent Instagram users see hundreds of posts on their feeds each day. If you want to make your post stand out and increase engagement, you may want to consider adding advanced effects to your photos.
PhotoDirector offers dozens of professional-looking photo effects that you can utilize without any editing knowledge or expertise. A few of the most popular effects to add to Instagram posts include sky replacement, photo animation, painting effects, dispersion, and glitch.
Let’s discuss how to edit pictures for Instagram using these effects.
1. Sky Replacement

PhotoDirector’s sky replacement tool allows you to replace the sky portion of any outdoor photo with an impressive sky preset. This tool is handy for photos with cloudy, dull skies that take away from the beautiful landscape or nature scene present in the image.
To use the sky replacement tool, select Sky effect in the list of options in the menu.
PhotoDirector will show you several different sky presets that you can easily add to your photo to replace your existing sky. A few of our favorite sky replacements include:- Starry sky
- Nightfall
- Sunset
- Sunrise
These presets make it easy to enhance your outdoor photos and draw more attention to your Instagram page.
2. Photo Animation

Animating your photo is another easy way to make it stand out on your followers’ Instagram feeds. You can use the PhotoDirector app to animate a portion of the picture—such as waves, clouds, or birds.
You can find the photo animation tool in the PhotoDirector toolbar. Simply click on the Animation option then add vectors to the photo that signify the location and direction of the movement. PhotoDirector will automatically apply animation to these vector locations, creating natural-looking, eye-catching movement.
3. Make It a Painting
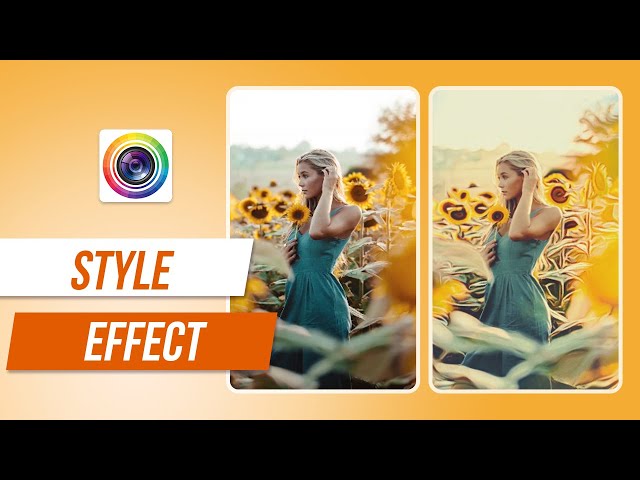
Another fun way to make your photo stand out is to turn your photograph into a painting. PhotoDirector offers several overlays that mimic the appearance of paintings, instantly transforming your image into a work of art.
You can find these effects in the Style tab of the PhotoDirector toolbar.
4. Dispersion

PhotoDirector’s dispersion effect creates the appearance of colorful light particles floating away from the object. You can use this effect to add a surreal look to your photo that captures your followers’ attention.
To use this effect, look for Dispersion in the PhotoDirector toolbar. Highlight the area where you want the dispersion to emit from and tap Next.
5. Glitch

PhotoDirector’s glitch effect creates a psychedelic, neon, cloned overlay for your photo. If you’re looking for a way to make the objects in your image pop, the glitch effect is a creative option to try out.
You can find the Glitch effect under the Adv. Effects tab in the PhotoDirector toolbar.
Create Double Exposure Photos for Instagram Posts

Many Instagram influencers limit their photo galleries to real-life, natural-looking photos. One effective way to make your account stand out from the thousands of other influencers on your followers’ feeds is to incorporate artistic elements into your posts — such as a double exposure.
Double exposure is the practice of overlaying two photos on top of each other, letting some elements of the bottom photo shine through to the top one. This effect comes from the photographic technique in which photographers take two pictures on the same film strip, essentially exposing the film twice.
While double exposure used to be a complicated, professional technique that only seasoned photographers could achieve, today, you can easily apply this effect to your images in post-production using PhotoDirector.
One popular way to utilize the double exposure effect is to layer a headshot or portrait photo over a nature photo, letting the scenery expose through the headshot.
To begin creating your own double exposure, tap Edit and select your headshot photo to open it in the PhotoDirector app. Find the Add Image option in the editor toolbar and use this tool to import a nature photo into the app. If you do not already have an image in mind, we recommend searching through the app’s free library to find an impressive scenery image.
Once you select an image, you should see it appear on top of your headshot. Your next step is to select the Blending Mode tool in the PhotoDirector editor, then select Screen. This tool will automatically blend the two photos, allowing the nature scene to shine or show through the headshot. You can change the nature photo’s position if necessary by dragging the image.
Another way to achieve a similar effect is to layer two photos on top of each other and then adjust the outermost image’s opacity. You can use the eraser tool to change the opacities in different parts of the photo.
If you would like to add another nature photo to blend into your current creation, you can do so by clicking Add Image again. Layering several images that feature different types of scenery—such as the forest, the ocean, and the mountains—onto one another will create a whimsical effect that will impress your followers.
Applying a double exposure effect is just one of the many creative ways to edit an Instagram photo with PhotoDirector. As you become more comfortable using the app, you can combine several of the techniques above to create a gallery of professional-looking, attractive pictures for your Instagram profile.
Third Party Instagram Editing Apps
If you search for Instagram editing apps on your app store, you will see dozens, if not hundreds, of different options. Many of these apps only offer cheap-looking, amateur features that could make your photos look worse than they did before you started editing them. Alternatively, some apps utilize complicated interfaces and charge outlandish prices for their features.
Instead, we recommend trying the affordable, user-friendly app PhotoDirector for all of your Instagram-editing needs. PhotoDirector offers the perfect combination of professional editing tools and features in an easy-to-use interface, making it ideal for beginners.
The app is available in the Google Play and Apple app stores, meaning it is compatible with most smartphones and mobile devices. In addition, you can download the app for free and start using PhotoDirector immediately with a 7-day free trial.
Unlike other photo editing apps, PhotoDirector offers special features specifically for editing Instagram photos. Along with being able to apply a 1:1 ratio through PhotoDirector, you can also take advantage of the app’s Instafill tool, which enables you to prepare images to share through Instagram automatically.
You’ll have no need to download several apps in order to apply filters to, crop, and incorporate advanced editing techniques into your photos. PhotoDirector is an impressive, all-in-one editing app perfect for Instagram users of any editing skill level.
Begin Editing Instagram Photos Like a Pro
Editing Instagram photos doesn’t have to be complicated or time-consuming. Applying a few of the professional-looking effects we discussed above is an easy way to elevate your pictures without spending weeks learning to use complex, expensive editing software.
Now that you know the basics of how to edit Instagram photos like a professional, you can use the skills you learned to elevate your editing game. In no time, you will begin gaining hundreds of “likes” on each post and impressing your friends with the clean, high-quality, appealing pictures in your gallery.
Your next step is to learn about editing videos for Instagram and writing engaging content for each post, but these skills can wait for another day. Today, you can spend time navigating through the fun effects in PhotoDirector and crafting your next Insta post.
Download PhotoDirector today to begin using these impressive editing tools and features for yourself.


