
How to Screen Record Windows 10 PC for free

Gaming videos are one of the most popular types of content on YouTube (second only to music), and 2 of the top 5 channels with the most subscribers are gaming related. If you want to compete in this saturated market, you’ll need to know how to make the best gaming videos possible.
Screen recording is a huge part of making gaming videos. While other videos rely on a good camera, gaming videos only need a reliable screen recorder. In this article, we will explain how to screen record on Windows 10, offer advice on the best screen recorders available, and answer all your screen recording FAQs.
This article has you covered even if you aren’t a gamer. Learning how to screen record on Windows 10 is a useful tool to help with how-to videos, tutorials, online learning, Zoom calls, presentations, and so much more.
- What You Need to Know Before You Start Screen Recording on Windows 10
- Best Free Screen Recorder for Windows 10
- How to Screen Record on Windows 10 With Built-in Options
- How to Screen Record on Windows 10 With No Limits and Effects
- How to Screen Record Your Desktop on Windows 10
- How to Screen Record Your Desktop and Webcam on Windows 10
- How to add Overlays and Effects to Your Screen Recording on Windows 10
- How to Stream Directly to Twitch, YouTube, or Facebook on Windows 10
- How to Edit Screen Recordings on Windows 10
- Tips for Screen Recording on Windows 10
- Download the Best Screen Recorder for Windows 10
- How to Screen Record on Windows 10 FAQ
What You Need to Know Before You Start Screen Recording on Windows 10
If you are a gamer who is just learning how to screen record on Windows, you may think the easiest and best way is with the Windows 10 native gameplay recorder, Xbox Game Bar. However, most gamers agree that getting third-party software is a much better way to screen record gameplay. Here are the drawbacks to using Game Bar to screen record your gameplay:
Unreliable
Xbox Game Bar is unreliable, and performance varies significantly depending on the game you are playing. Sometimes the app disappears altogether when you need it, and other times it just refuses to work. That would be very inconvenient if you have scheduled a live stream.
No streaming to YouTube
With Game Bar, you can live stream to Facebook, Twitch, and a handful of other streaming services, but not to YouTube.
Desktop can’t be recorded
The native recorder for Windows 10 will not record your entire screen, making it difficult to use in any screen recording scenarios besides gaming.
Time Limit
You can only set Game Bar to record for 30 minutes, 1 hour, 2 hours, or 4 hours, with 4 hours being the maximum recording length.
Limited Tools and Effects
Xbox Game Bar offers no effects or overlays, which means if you want to include webcam footage of yourself, you’ll need to download a third-party video editing software anyway. It also has very limited options for capturing, streaming, and recording. For instance, you can only choose between 3 audio options (Game, All, or None) and it will only record at 30 or 60 fps.
If you want to learn how to screen record on Windows the best way, we recommend downloading a third-party screen recorder with video editing capabilities, such as PowerDirector with Screen Recorder 4.
Best Free Screen Recorder for Windows 10
PowerDirector with Screen Recorder 4 - Best Overall Software
Screen Recorder 4, the screen capturing software available with PowerDirector, offers a comprehensive range of screen capturing and video sharing features in one user-friendly application. As a versatile solution for recording and streaming video, this robust program allows you to customize controls, integrate webcam commentary, and share content with your audience.
If you are looking for the best combination of video editing and easy screen recording, download PowerDirector 365 with Screen Recorder 4 by clicking the link below.
How to Screen Record on Windows 10 With Built-in Options
Follow the steps below to learn how to screen record on Windows 10 with its native screen recorder Xbox Game Bar:
- Open the app you want to record.
- Hit the Windows Key + Alt + R to start screen recording. A screen recording widget will appear in the corner to show you how long you’ve been recording.
- To stop recording, hit the Stop button on the widget, or hit Windows Key + Alt + R again.
- An alert will pop up that says Game Clip Recorded. Click on the alert to preview the screen recording. The video will also be saved as an MP4 file in your Captures folder.
How to Screen Record on Windows 10 With No Limits and Effects
In this section, we will teach you how to screen record on Windows 10 using PowerDirector with Screen Recorder 4. Screen Recorder 4 is one of the easiest screen capturing products to use, even if you have no video production and editing experience. Below, we look at how you can use Screen Recorder 4 to record, share, and stream your screen content with your audience.
Click the link below to download Screen Recorder 4 and follow along.
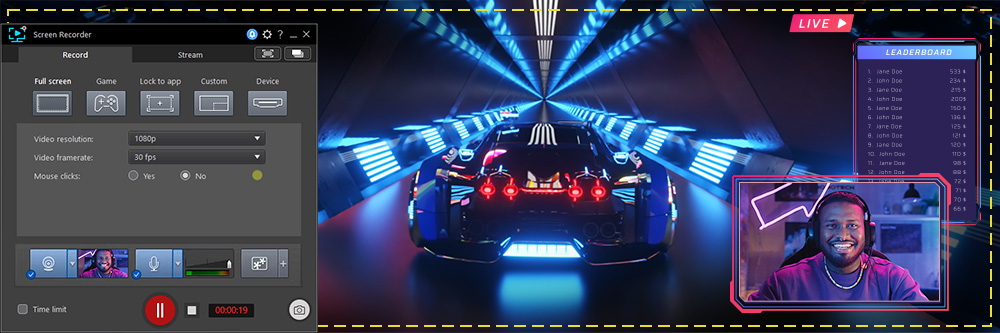
How to Screen Record Your Desktop on Windows 10
- Open PowerDirector, and under the Plugins menu, choose Screen Recorder.
- Select either Full Screen, Game, Lock to App, Custom, or Device under the Record tab to choose what part of your screen you want to capture.
- Choose the Resolution and Framerate from the respective dropdown menus.
- Click the Time Limit option, if you would like to pre-set the recording time before you begin. You can also click the Preview button to see what your recording looks like before you start.
- Click the red Record button to begin, and click it again to end the recording.


For more information on how to screen record on Windows with Screen Recorder 4, click here.
How to Screen Record Your Desktop and Webcam on Windows 10
Below we will explain how to screen record on Windows and capture webcam footage simultaneously. Click here to learn about our choice of best webcam software.
- After selecting your record screen option from the Record tab, open the Preference window by tapping the icon that looks like a gear. Then, click on Webcam.
- Select the webcam feed’s Resolution and Frame Rate from the dropdown menus.
- Click on the Preview button to adjust the webcam window’s position and size.
- If you have a background with a solid color, such as a green screen, you can use the Chroma Key option to replace your background with a custom image.
- Hit the red Record button to start the screen record and hit it again to stop.


How to add Overlays and Effects to Your Screen Recording on Windows 10
You can add an overlay as a BMP, GIF, PNG, or JPG image to your video during a recording. Examples of video overlays include logos and watermarks.
- Click on the + next to the Video Overlays button, which looks like two little snowflakes inside a box.
- Click Insert Image and open the image file on your computer.
- After importing the image from your computer, you can adjust its Opacity in the Video Overlays window, changing it into a watermark.

How to Stream Directly to Twitch, YouTube, or Facebook on Windows 10
If you purchased Screen Recorder 4 separate from PowerDirector, you can stream a video of your screen or game console directly to Twitch, YouTube, or Facebook. The streaming process for each platform is similar.
- Choose your record screen options (Full Screen, Custom Area, etc.) from the Record tab.
- Click on the Stream tab and select the platform to which you want to stream.
- Click Login and follow the instructions to sign in to your Twitch, YouTube, or Facebook account.
- After logging in, click the Settings menu to set the following options:
- Video title and description
- Privacy settings
- Video resolution and frame rate
- The URL for your live stream
- Feed settings from your webcam, microphone, and video overlays
- Check the Save Streamed Video to Disk option if you want the stream to record to your hard drive. The video file will save in your export folder to upload to another platform.
- To start streaming your screen, click Live. When you finish your live stream, click Stop.


How to Edit Screen Recordings on Windows 10
Screen Recorder 4 has basic editing tools that beginners can use to edit their gameplay videos. If you have Screen Recorder 4 through PowerDirector, you have the option to edit your screen recordings with more advanced tools and features. Below we will explain how to edit your screen recordings using Screen Recorder 4.
- Open Screen Recorder 4 and click on the Media Library icon in the top right of the screen. Select the video you wish to edit and click the Edit icon in the bottom right. Choose Edit with Screen Recorder’s Video Editor.
- Click on the Trim or Split icons directly above the timeline to remove unwanted footage.
- Click the Title tab along the top and drag a title onto the timeline under your video. Double-click the title to customize the text, then click OK.
- Click the Transitions tab along the top and drag a transition between two clips.
- Click the Music icon to the left of the timeline to choose a background track.
- If you would like to record commentary for your gameplay, click the Voiceover icon below the Music icon. Move the Slider on the editing timeline to where you want the commentary to begin, then click Record. Click Record again to stop.
- Click Produce to save your video and share it to the platform of your choice.
Tips for Screen Recording on Windows 10
Below are some tips for how to screen record on Windows 10 and deliver the best possible videos.
Tip 1: Enable Hotkeys
Hotkeys are a great way to get recordings started quicker, to pause and stop without touching your mouse, and instantly take screenshots. Screen Recorder 4 has customizable hotkey support so you are in control of assigning keyboard shortcuts. It’s also a good idea to use hotkeys if you are recording your mouse clicks for a tutorial video, and don’t want to record tasks like muting and unmuting your mic.
Tip 2: Clean Your Desktop
You would clean your house before having company over, wouldn’t you? Anytime your desktop is going to be recorded, you should clean it up before broadcasting it to the world. Besides looking messy and unprofessional, a cluttered desktop is distracting to viewers.
You should also check any part of your screen for personal information you don’t want to get out, such as your real name, pictures of your kids, your address, etc. If you plan to open your web browser during a record, clear your search history before you begin to save yourself any embarrassment!
With Screen Recorder 4, you can choose a specific area of your screen to record, so if that seems like too much hassle, just set your record screen settings to only record the game or app you are using.
Tip 3: Use an External Mic
If you plan to record commentary while you are recording, don’t rely on your computer’s built-in microphone. Your desktop mic is not high-quality and picks up background noise. If budget is an issue, you can get an inexpensive USB mic or headphones with a built-in mic that will still make a world of difference to your audio quality.
Download the Best Screen Recorder for Windows 10
Before you can record and stream video from your desktop, you need a program compatible with your system, which offers all the recording, editing, and live streaming features you need.
Whether you are learning how to screen record on Windows for work or gaming, Screen Recorder 4 is the best software for you. Screen Recorder 4 allows you to preview every element of your video, including the webcam feed, video overlay, and microphone volume.
Screen Recorder 4 offers all the record screen options you need, including custom screen size recording, game recording, and recording from a connected device. You can also record from your webcam and microphone while you screen capture. You can add a video overlay, such as a watermark or logo, and with the chroma key feature, you can change backgrounds with solid colors into customized backgrounds.
The Screen Recorder 4 interface is highly intuitive, and you should have no problem navigating the different options and settings to create a high-quality, professional video. With the customizable hotkeys, you can program your keyboard for commands. And if tutorial videos are your thing, Screen Recorder 4 will record, animate, and even let you choose the color of your mouse clicks.
Click the button below today to drastically improve your screen recordings and gaming videos with PowerDirector and Screen Recorder 4.
How to Screen Record on Windows 10 FAQ
1. How Do I Record Screen on My iPhone?
To record the screen on your iPhone, follow these steps.
- Go to Settings, then Control Center, and select the Green icon next to Screen Recording. This will add the Screen Recording feature to the Control Center.
- Open Control Center, tap the Screen Recorder icon and then wait for the countdown of three seconds.
- Once you’ve finished with your recording, simply tap the Red Bar at the top of your screen and select Stop.
For a complete step-by-step guide, check out our article How to Screen Record on iPhone.
2. How Do I Record Screen on My Android?
The record screen process is roughly the same across Android devices.
- Swipe down twice and long-press the Edit Button. Drag the Screen Recorder tool to the Quick Settings menu.
- Swipe down twice to access the full Quick Settings menu and select the Screen Recording tool.
- Tap Start.
- Once you’ve finished with your recording, swipe down and tap the Screen Recorder notification.
For a complete step-by-step guide, check out our article How to Screen Record on Android [Step by Step Guide].
3. How Do I Record Screen With Sound on My iPhone?
Your iPhone’s default settings will only record the sound coming from your phone. To record screen on your iPhone with external audio, follow these steps.
- Go to Settings, then Control Center, and select the Green icon next to Screen Recording. This will add the Screen Recording feature to the Control Center.
- Open Control Center and tap the Screen Recorder icon.
- Select the Red Microphone icon to start recording external sound.
- Tap Start Recording
4. How Do I Record Full Screen on Windows 10?
You can easily record full screen on your Windows 10 desktop by using PowerDirector with Screen Recorder 4.
- Open PowerDirector, and under the Plugins menu, choose Screen Recorder.
- Select Full Screen from the record screen options.
- Choose the Resolution and Framerate from the respective dropdown menus.
- Click the red Record button to start.
5. Can I Use Zoom to Record a Video?
Users with a free Zoom account can record the audio and video from their Zoom meetings and save the file on their computer. Users with a premium Zoom account can upload their Zoom meetings to the Zoom cloud and retain timestamps, participant names, and audio transcription features.
6. How Do I Record Screen in PowerPoint?
To record screen in PowerPoint, follow these steps.
- Open a new or existing presentation.
- On the Insert tab of the ribbon, select Screen Recording.
- On the Control Dock, click Select Area and highlight the part of your screen you want to record.
- Click Record to start. Use the Pause and Stop controls as needed.
7. Why Doesn't My PowerPoint Have a Screen Recorder?
If the Screen Recording tab isn't visible, you will need to enable the Recording Tab within PowerPoint.
- Click on File, then Options.
- With Options open, click on Customize Ribbon.
- Under Main Tabs, click the checkbox next to Recording.
- Click OK.
8. What Features Should I Look for in a Screen Recorder for Windows 10?
The top ten features you should look for are:
- Multiple record screen options (Full Screen, Custom Area, etc)
- Mouse click recording and animations
- Webcam integration
- Livestreaming features
- Direct uploads to Twitch, Facebook, and YouTube
- Overlays and effects
- Video editing tools
- Customizable hotkeys
- Low CPU for stutter-free recording and streaming
- Chroma key effects
If you’re looking for a product that checks all of these boxes, we recommend PowerDirector with Screen Recorder 4.
9. Does Windows 10 Have Screen Recorder?
Yes, Xbox Game Bar is the native screen recorder for Windows 10. However, it has many drawbacks such as time limits, a lack of tools and effects, and unstable performance. We recommend using third-party software to record screens, such as PowerDirector with Screen Recorder 4.
10. How Do I Record My Screen on Chrome?
To record screens using a Chromebook, follow the steps below.
- Press Shift + Ctrl + Show Windows.
- Choose Screen Record from the menu at the bottom.
- Choose either Record the Full Screen, Record a Partial Screen or Record a Window.
- Select Stop Recording when you are done.
Your screen recording will be saved in your Downloads folder.
11. What Screen Recorder Do Youtubers Use?
YouTubers use PowerDirector with Screen Recorder 4. Not only is it affordable and beginner-friendly, but it comes with tons of video editing tools to use on screen recordings, gameplay, and any other videos they need to edit for their channel.
YouTubers can use Screen Recorder 4 to add overlays such as their logo and subscribe buttons and add webcam footage with the background removed. There is a library of royalty-free music that is YouTube-approved, and direct uploads or live streaming to YouTube from the software.
12. How Do I Record My Screen While Gaming?
You can learn how to screen record on Windows while gaming by using PowerDirector with Screen Recorder 4 and following the steps below.
- Open PowerDirector, and under the Plugins menu, choose Screen Recorder.
- Select Game or Device if you are using a capture card to record directly from a gaming console.
- Choose the Resolution and Framerate from the respective dropdown menus. Most gamers opt for 1080p and 60fps.
- Click the red Record button to start.
For more information about how to screen record on Windows 10 while gaming, check out How to Record Gameplay on Windows 10 for Beginners.
13. Is Bandicam Safe?
Bandicam is a screen recording software for Windows. If you download the software from the official Bandicam website, there is no need to worry about its safety. However, many users have reported that it makes their Windows PCs run slowly.
14. Is Bandicam Free to Use?
Bandicam has a free version, but it is only meant as a free trial and has some limitations. The free version will display a watermark on your videos, recording time is limited to 10 minutes, and you can’t use the scheduled recording feature.
15. What is the Shortcut Key for Screen Recording in Windows 10?
Here’s how to screen record on Windows 10 using a shortcut key - simply hit the Windows Key + Alt + R. A small widget will appear in the corner to let you know how long you’ve been recording.
16. How Do Gamers Record Their Screens?
Gamers use PowerDirector with Screen Recorder 4 to record their screens. Screen Recorder 4 offers multiple ways to capture gameplay, from capturing your entire desktop, recording only the game on your screen, or recording directly from the gaming console with a capture card.
With PowerDirector with Screen Recorder 4, gamers can Livestream on up to 5 platforms at once, including YouTube, Facebook, Twitch, and even custom servers. It also offers webcam and external microphone integration with customizable settings.
For more information on how to screen record on Windows for gameplay, click here.
17. Why isn’t my screen recording working?
Maybe you’ve just finished learning how to screen record on Windows, but your screen still isn’t recording. There are several reasons your screen recording might not be working. Here are a few of the most common:
- Poor internet connection
- Restrictions in your Settings have not been changed to allow screen recording
- Lack of hard drive space
- You are trying to record a website or app with copyright restrictions


