

How to Create a YouTube Channel the Right Way for Beginners

You may be wondering if it’s too late to create a YouTube channel. Most sites go in and out of fashion so quickly, is it even worth learning how to create a YouTube channel in 2022?
Let’s look at the statistics. 2.6 billion people use YouTube worldwide. Over 122 million people use YouTube every day, and over 1 billion videos are watched daily! Over 90% of every 18-49-year-old living in the US uses YouTube. It remains the second most visited site on the internet behind Google, and last year YouTubers made a total of 8.6 billion dollars in ad revenue.
We’d say it’s the perfect time to create a YouTube channel.
Learning the ins and outs of YouTube can be overwhelming. That’s why we’ve put together the ultimate guide to teach beginners how to create a YouTube channel. We cover everything from how to edit YouTube videos, to optimizing your videos so you can make a profit.
- How to Create a YouTube Channel
- How to Edit a YouTube Video
- How to Upload a YouTube Video
- Tips for How to Create a YouTube Channel
- Download the Best YouTube Video Editor for Free
- How to Create a YouTube Video FAQ
How to Create a YouTube Channel
Create an Account
If you wish to create a YouTube channel, you first need a Google Account. Even if you're not interested in uploading videos, you'll need a Google account to leave comments, subscribe to channels, or save a video to watch later.
Already Have a Google account?
If you have a Google account, then go to YouTube.com, and sign in with your existing Google account using your email or phone and password. Now you're ready to create a YouTube channel and experience YouTube fully.
No Google account?
If you don’t have a Google account, then you'll need to create one here. Simply follow the instructions and provide the information required. You’ll have an account in a matter of minutes.
Once you are logged in, follow these steps to create a YouTube channel.
- Click the circle icon in the top right corner of the page. If you have a photo associated with your Google account, it will appear here. You can change it later.
- Choose Settings from the menu.
- You will see an overview of your account. Click Create a New Channel from the options under Your Channel.


Add Channel Name and Description
The next step you need to take to create a YouTube channel is choosing your channel’s name and description.
- Choose a channel name that is easy to remember and represents the kind of channel you want to create, then type it into the box that says Add Channel Name.
- Check the box to indicate you agree with the terms and conditions, then click Create.
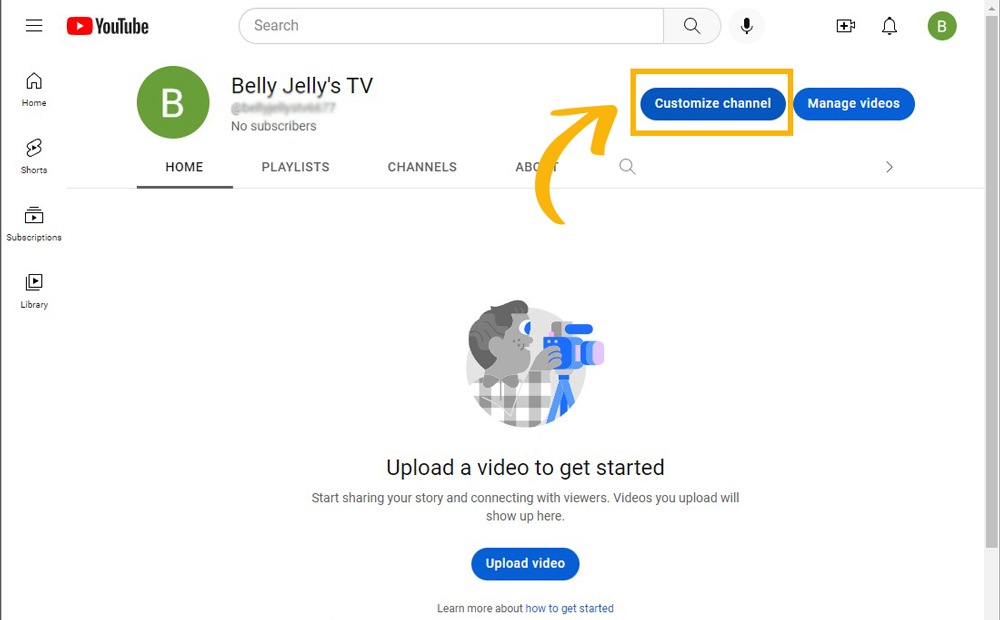
- Click Customize Channel from the top right corner.
- Click Basic Info, then fill in your channel’s description in the box provided.

Note: By checking the terms and conditions, you'll not only create a YouTube channel, but also a new Google Account. This account will have its own settings and YouTube history. It will be nested within your main Google account. This new account will be used to like and comment on other YouTube videos and participate on YouTube. It'll also have its own settings, as well as history. You can manage your YouTube account within Google settings from your primary Google Account.

This is a great place to let people know what your channel is all about. When you create a YouTube channel, think about what kind of videos you plan to upload and what the main goal of your channel will be. Be as descriptive as possible. YouTube scans this area of your channel for searches. Having a well-thought-out and thorough description keeps your channel well-optimized and enhances its visibility. Be sure to use popular keywords that are associated with the kind of channel you are creating.
Upload Profile Photo and Logo
Next it’s time to change/add your profile pic and add a logo or watermark that can be seen in the corner of your videos.
It’s important to remain consistent with your branding. Before you create a YouTube channel, decide on your channel’s look by choosing a color scheme and font, then stick with it for all of your branding elements.
- Click Branding under Channel Customization.
- Navigate to Picture and click Upload.
- Choose a profile pic from your files. Adjust the size, then click Done.
- If you are happy with your profile photo, click Publish.
- Scroll down to Video Watermark and click Upload.
- Choose your logo, then choose a Display Time. You can choose End of Video which will display your logo during the last 15 seconds of your YouTube video, Custom Start Time, or Entire Video.
- Click Publish.
YouTube recommends uploading a photo that is at least 98 x 98 pixels and 4MB or less. It can be a PNG or non-animated GIF.
Your profile image is the first impression viewers will have of your channel. A pixelated or blurry image will make your channel look unprofessional.
Next, it’s time to upload your video logo/watermark. This will appear in the bottom right of your videos and has the name of your channel. You can even add a Subscribe button.

Add Channel Art
Channel Art, also known as a banner image, shows up behind the Profile photo on your YouTube channel homepage. Good channel art maximizes user engagement as it gives a professional look to your channel.
- Click Branding under Channel Customization.
- Scroll to Banner Image and click Upload.
- Find your preferred channel art, then click Publish.
YouTube recommends channel art be at least 2048 x 1152 pixels and a maximum of 6MB.
For more information, check out our article How to Make a YouTube Banner That Exhibits Your Brand & Personality.
How to Edit a YouTube Video
Download a Video Editor
One of the most important items you’ll need to create a YouTube channel is user-friendly video editing software. Editing YouTube videos is often the most intimidating part for beginners. But an easy-to-use and affordable video editor will allow you to create a YouTube channel and upload videos in no time.
We recommend PowerDirector as the best YouTube video editor.
PowerDirector
Whether you are a professional YouTuber, or just starting out, PowerDirector has all the tools you need to create a YouTube channel with high-quality, clickable videos. It is the preferred choice of YouTubers because it is beginner-friendly but filled with advanced features, so it will grow with you as your video editing skills improve. PowerDirector is also affordable and comes with YouTube intro/outro templates, a royalty-free music library, and direct uploads to YouTube from the program.
Compatibility: Windows, Mac
PCMag Rating: 4.5/5
Price: Free
*Premium subscription available for $4.58/month
Key Features:
- Sky Replacement
- Motion Tracking
- Screen Recording
- Filters and Stickers
Create a YouTube channel today by clicking the link below and downloading the award-winning PowerDirector for free.
How to Make Basic Edits
Next, we will show you how to make some basic edits to your YouTube videos using PowerDirector. Download the software by clicking the links above this section, then follow along.
- Click the Import Media icon in the upper left, then choose to Import a Media Folder or Import Media Files.
- Choose your media files, then click Open. Your files will be added to the Media Library.
- Drag and drop a video file onto the Video Timeline. Continue adding your video clips in the order you want them in the video.
- Use the Video Timeline Slider to split and trim your clips. Move the slider where you want to split the clip, then click the Knife icon to split the clip or the Scissors icon to trim.
- Add transitions between clips by clicking on the Transition Room icon (looks like a lightning bolt) from the left-hand menu.
- Find a transition you like, then drag and drop it between 2 clips.
- Add text to your YouTube video by clicking on the Title Room (looks like a T) from the left-hand menu.
- Find a title template you like, and drag and drop it onto the next video track on the video timeline. Double-click on the title template to open the Title Designer.
- Add music to your YouTube video by clicking on the Media Room icon from the left-hand menu. Click Background Music.
- Choose a background track you like, then download it and drag it onto the audio track of the editing timeline.
- Once you are done editing your video, click the Produce button from the top left of the screen. Choose Online, then YouTube. Fill in the necessary information, then click Start to upload your video directly to YouTube.


From the Title Designer you can type in your text and customize it.


For more information on how to edit YouTube videos, check out our guide for beginners here.
How to Upload a YouTube Video
Add a Channel Trailer and a Featured Video
The 3rd tab under Channel Customization in your YouTube Settings menu is Layout. After you create a YouTube channel, you can customize how it looks and add a channel trailer and featured video.
A channel trailer only appears for non-subscribers and is a highlight reel of your channel that encourages users to subscribe and alerts them to your posting schedule.
- Click Layout under Channel Customization.
- Go to Video Spotlight, then click Add next to Channel Trailer for People Who Haven’t Subscribed.
- Select your channel trailer from your files, then click Publish.

Next, you can add a featured video for subscribers to see when they visit your channel. If you just learned how to create a YouTube channel, you won’t have many videos to choose from. Your featured video should just be the best video you have to offer so far. As your video base grows, you can use this section in different ways, such as featuring a Christmas video in December or featuring your most-viewed video.
- Click Layout under Channel Customization.
- Go to Video Spotlight, then click Add next to Featured Video for Returning Subscribers.
- Select your featured video, then click Publish.

You can remove or change your channel trailer and featured video at any time by clicking the Add buttons.
Upload Your First Video
Now that we’ve helped you create a YouTube channel, you need to fill it with content! Follow the steps below to upload your first video.
- Sign in to YouTube Studio.
- Click Create from the upper right-hand corner, then Upload Videos.
- Fill in the video’s Title and Description, and upload a Thumbnail.
- Check the circle indicating whether your video is made for kids, then click Show More.
- Add an end screen to your video, then click Next.
- Choose if you want your video to be Public or Private and if you want it published immediately or at a scheduled time.
- Click the Blue button in the bottom right corner (it will either say Publish, Done, or Schedule, depending on your choice in the previous step).


Here you can add Tags, a Rating, turn on Monetization, and more. We will take a closer look at these options in the section below (you won’t be able to monetize your first video, since you need 4,000 watch hours and 1,000 subscribers to do so).
Once you’ve filled in your video’s information, click Next.


Congratulations, you have learned how to create a YouTube channel and just uploaded your first YouTube video!
Optimize Videos
YouTube offers lots of different ways to optimize your videos. Don’t ignore any of the settings YouTube provides when uploading a video - take them all seriously! Each one is designed to send more eyeballs your way, which you will need if you are going to create a YouTube channel for the first time. Below we will discuss a few of the ways you can take advantage of these features.
Title - Creating a good title is the most important step for optimizing your YouTube videos. This begins with targeting certain keywords. To find out what keywords you should add to your title check out vidIQ or TubeBuddy. These sites determine the best keywords for your content. Remember that YouTube reads titles from left to right, so stack the important words at the beginning of the title (for instance, instead of saying “15 Things You Need to Know About the Grand Canyon,” you should say “The Grand Canyon - 15 Things you Need to Know”).
Description - The first 200 words of the episode description are the part YouTube scans when searching for data. Put your keywords into the first 200 words and save adding links for the end.
Tags - You can use up to 500 characters for YouTube tags, so try to use them all! Remember to choose tags that align with your topic, otherwise, you could harm your video and channel (if too many people start your video and then click off immediately because it is not as advertised, YouTube will stop recommending your video).
We recommend choosing a few tags that are common for all of your videos. These can be set to automatically populate all of your uploaded content. Then choose tags that are particular to the specific video. Be sure to use the keywords from the title and description as well.
Channel Layout - We’ve already discussed the importance of adding a channel trailer and featured video after you create a YouTube channel. However, it’s also a good idea to create sections and playlists for your viewers. Under Featured Sections, you can add a section and clump similarly-themed videos together. You then have the option to turn the section into a playlist. Organizing your page not only looks clean and professional, but it also helps the viewer find the video they are looking for. And creating playlists means your content will continue playing, thus increasing your views.
Tips for How to Create a YouTube Channel
Tip 1: Don’t Go Too Broad
If you are going to create a YouTube channel, the first step is to decide your channel’s niche. You may think the best strategy is to choose something that will appeal to the broadest group of people. However, this is not the case with YouTube. There are going to be millions of videos on every broad topic imaginable, and if you are a new YouTuber, your video will be in the back of the bunch. The more specific you get, the smaller your competition will be, and the easier it will be for like-minded people to find you.
Tip 2: Seek Advice from Pros
With so much content out there, it’s rare for someone to randomly Go Viral like in the early days of YouTube. If you want to create a YouTube channel and are serious about monetizing it, don’t rely on your content alone. Each step of your YouTube video should be carefully planned and optimized to get the most views. Use a professional SEO site to help establish keywords and read as many blogs on the topic as you can. Hey, you are already reading this one, which means you are on the right track!
Tip 3: Know the YouTube Community Guidelines
One of the worst things you could do for your channel is to get a violation. The first time YouTube flags your content, you will get a warning and be asked to remove it. The next time you violate the guidelines, you will be given a strike and won’t be allowed to post for 7 days. 3 strikes in 90 days lead to a permanent ban from YouTube.
Be sure to read the Community Guidelines thoroughly. While there are obvious rules about hate speech and depictions of violence, there are also more commonly violated rules such as copyright infringement and misinformation. Please note, the guidelines extend to thumbnails, titles, descriptions, live streams, and comments as well as videos.
Download the Best YouTube Video Editor for Free
If you are about to create a YouTube channel, you have many decisions to make, tons to do, and lots of equipment to purchase. You certainly don’t have time to learn complicated and expensive video editing software.
That’s why we recommend PowerDirector as the best video editor for new YouTubers. PowerDirector is filled with easy-to-use tools and features and has a clean, intuitive user interface. It also has advanced features you would expect to see in more expensive software, so you can make professional-looking, high-quality content, even if it’s your first time making a video.
PowerDirector has all the tools you need to create a YouTube channel, such as templates for intros and outros, YouTube-approved background music and sound effects, stickers, animated titles, green-screen effects, and direct uploads to YouTube.
Download PowerDirector by clicking the link below, and create a YouTube channel today.
How to Create a YouTube Video FAQ
Yes, it is completely free to create a YouTube channel.
Ad revenue for 1,000 views equals $7, which is $4.18 after YouTube takes its cut. However, the number can fluctuate from $3-$5 depending on several factors, such as the type of ads and how many viewers clicked on them.
It is easy to create a YouTube channel - simply sign in to YouTube using a Google account and click Create a New Channel. Follow our guidelines above for more information.
However, earning money after you create a YouTube channel takes a little more effort. Before you can even begin earning money on Youtube, you first need to join YouTube’s Partner Program (YPP).
To join YPP, you need to be in good standing with YouTube, have 4,000 public watch hours in the last 12 months, and have a minimum of 1,000 subscribers.
It is free to create a YouTube channel, and the only equipment you really need is a phone to record, and a computer to edit and manage your videos. As your channel starts to make money, you can invest in higher quality production, like a DSLR camera, microphone, lighting, etc.
A video makes $0.01 - $0.03 per view in advertising dollars, but this is not the amount the YouTuber is paid. How much of that amount a YouTuber gets depends on Ad quality, the number of clicks an ad receives, video length, and other factors.
On average, a YouTuber makes about $0.004 for one view.
No. In fact, according to a 2021 poll, there were 31 million channels, and only 80,000 of those were eligible for the YouTube Partner Program. Of those, not all are making a living from YouTube, when you consider a YouTuber makes only around $4 for a thousand views. The YouTubers who are really bringing in the dough are doing more than just sitting back and racking up views. They are pitching sponsorships, selling merchandise, connecting with brands, and more.
Yes, YouTube pays by the month, either by direct deposit or a mailed check.
You need at least 1,000 subscribers to join the YouTube Partner Program and monetize your channel. While YouTube pays per view and not per subscriber, a high subscriber count can help in other ways, such as gaining ad sponsorships. It also helps keep viewer numbers up, since subscribers automatically get alerted to your channel’s new content.
On average, a channel with 5,000 subscribers can make about $350 a month.
If you are a beginner who wishes to create a YouTube channel, read our article above, and check out other YouTube related articles on our website.

The CyberLink Editorial Team is composed of product testing specialists and content creation experts with over 20 years of hands-on experience and rigorous research in the multimedia editing industry. As the official voice of CyberLink, the team consistently delivers practical, easy-to-follow tutorials across video, photo, and audio editing, while highlighting AI innovations, product insights, and emerging industry trends. Their work empowers millions of creators worldwide each year to elevate their content. Beyond the blog, the team actively shares editing tips and product updates across YouTube, Facebook, Linkedin and Pinterest.
😎 Outside of their work, they enjoy capturing travel moments and meticulously editing photos and videos for their social channels.


