

How to Replace the Sky in Videos [3 Sky Replacement Tips]

Are you looking for a cool way to add visual appeal to your outdoor video footage? The video sky replacement effect is a perfect option!
The best sky replacement effects allow you to swap out the existing sky in any video footage for a vibrant sunset, an eye-catching Northern Lights scene, or other aesthetically pleasing sky images.
The easiest sky replacement tool for video is available in PowerDirector. It makes it quick and easy to apply pro-level sky replacement video effects to your footage.
PowerDirector is available on Windows and Mac. Download it for free and follow along below to learn the best tips when doing video sky replacement.
How to Replace Sky in Video
PowerDirector's intuitive interface and AI-powered tools make it easier than ever to apply professional effects to your video footage. The program's sky replacement tool requires no previous editing skills or experience to master, allowing you to begin using it almost instantly.
You can follow these steps to replace the sky in your videos using PowerDirector:
1. Import your video footage into PowerDirector.
Your first step is to upload your video into the PowerDirector program. We recommend choosing a video that has a clear, unobstructed view of the sky for the first time. However, PowerDirector's AI technology can detect the sky in most outdoor videos, whether it is partially hidden or not.

2. Navigate to the “Plugins” tab, then select “AI Sky Replacement.”
Once you have the video you would like to edit in PowerDirector, the next step is to select "AI Sky Replacement" under the "Plugins" tab at the top of the page. A new window will pop up with the sky replacement editing tools.

3. Under “Select source video,” click the box icon, then select “Import From Media Room.”
Next, you will need to specify which video you would like to edit the sky of. You can select the video by clicking the box icon in the top left of the window, then selecting “Import From Media Room.” This window will show you all of the videos that you currently have in your timeline.

4. Select the sky footage to replace the sky in your source video
PowerDirector includes dozens of sky replacement videos in its AI Sky Replacement editor. You can choose any of these unique sky videos to overlay onto your source video. Simply select a sky from the list and view the effect in the preview window.

5. Adjust the fade, position, and scale of the sky replacement footage.
Once you settle on the sky footage to use in your source video, you can make any necessary adjustments to it using the sliders on the right side of the sky replacement window.

6. Click “Transform Video.”
To apply these changes to your video, click “Transform Video” in the bottom right of the window. The program will take a few seconds to render the changes to your footage.
Tips for Sky Replacement
PowerDirector includes all of the tools you need to apply a clean, natural sky replacement effect to your video. Using the sliders within the sky replacement window, you can adjust several parameters to make your new sky footage look as realistic and natural as possible compared to the rest of your footage.
Here are a few tips for how to perfect your sky replacement effect using PowerDirector's built-in tools.
1. Try Out Different Sky Positionings
PowerDirector makes it easy to change the sky position within your footage. Once you select a sky video in the AI Sky Replacement editor, you can change its positioning using the sliders on the right-hand side of the window. Changing Position X adjusts the position on a horizontal axis while sliding Position Y moves the sky footage up and down.

2. Adjust the Land Ambient
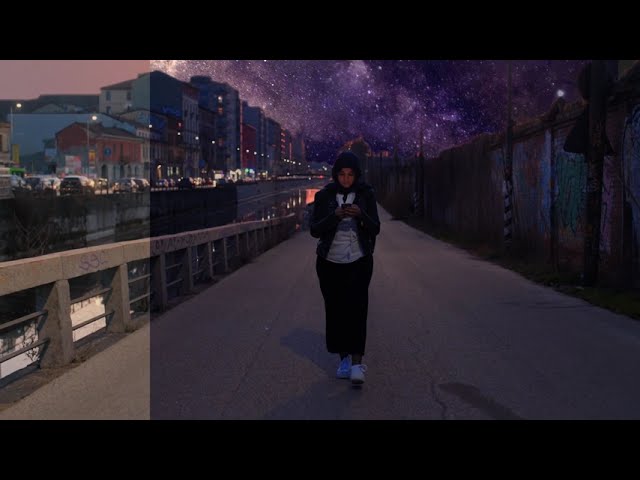
PowerDirector's “Land Ambient” slider allows you to adjust the color of the land in your photo to match your new sky footage. If you want to overlay night sky footage on your video, for example, you should make sure that the land in your source video looks dark enough to match the nighttime appearance of the sky.
We recommend playing around with the “Land Ambient” slider until your sky and land look seamless and cohesive.

3. Adjust the Sky Fade
Adjusting the “Sky Fade” slider can also create a more natural appearance in your video footage. If your new sky footage is more vibrant than your existing footage, it may look out of place compared to the rest of the objects and landscapes in your video.
Using the slider to adjust the "Sky Fade" can allow you to tone down the vibrancy of your replacement sky and make it look more cohesive with the rest of the footage. Again, we recommend playing around with this slider and testing out a few different fade levels until you find one that looks natural.

The Best Sky Editor
In the past, you would have needed to map out your footage, insert vectors, and overlay a new sky image onto your video manually to swap out the sky. PowerDirector simplifies this video editing process with modern technology and artificial intelligence features, allowing editors like you to apply professional, high-quality changes to their video footage with a few clicks of a button.
You don't need to have any editing experience or familiarity with video editors to use the PowerDirector program to your advantage. Download PowerDirector today to try the sky replacement editor for yourself.
Want some more video editing pointers? We have you covered—here are five simple tips to fine-tune your footage like a pro.


![10 Best Christmas Card Ideas to Amaze Your Family [2026]](https://dl-file.cyberlink.com/web/content/b2695/l_Thumbnail.webp)