

How to Create a Bokeh Effect [Windows, Mac]


One of the most popular ways to highlight a specific area of a photo by blurring the background is a technique called bokeh. Photographers usually achieve this by using a fast lens and adjusting their camera settings. But with the recent advancements in photo editing software, you can create a bokeh effect after the fact on certain types of images.
This article will walk you through adding bokeh to existing images to increase your photos' aesthetic quality. We will use PhotoDirector to demonstrate because it is free to download and makes adding a bokeh effect easy.
PhotoDirector also offers a wide range of other editing tools to turn your photos into works of art and allows you to customize every detail along the way.
- What Is Bokeh?
- 3 Best Bokeh Effect Software
- How to Create a Bokeh Background on Windows and Mac
- How to Take Bokeh Photography
- Best Bokeh Effect Maker Free Download
- Bokeh Photography Effect FAQs
What Is Bokeh?
Bokeh is a photography effect that relates to the blurred background of an image. For example, in photos with a light source in the background, using a bokeh technique can alter the appearance of the points of light behind the subject, making them orb-like. Bokeh also refers to the shapes of the lights that appear in the photo, which can resemble hexagons or diamonds, for example. Bokeh is an excellent technique for drawing your viewer's attention to the subject of a photo.


3 Best Bokeh Effect Software
1. PhotoDirector - Best Bokeh Effects
A dedicated bokeh feature allows you to select an area of your image to blur and add bokeh lights with just one click. There are 25 different bokeh shapes to choose from, and you can animate the effect. Learn More >
2. Paintshop Pro - Best for Advanced Level Photo Editors
Manually create and add bokeh effects to your photos with a comprehensive toolset. Learn More >
3. Adobe Lightroom - Best For Professional Photo Editors
Create bokeh effects with the software's masking tool. Not ideal for beginners because there are no pre-installed bokeh light effects or bokeh overlays. You have to create them yourself. Learn More >
To learn more about each software check out 5 Best Bokeh Effect Makers in 2022 [Desktop].
How to Create a Bokeh Background on Windows and Mac
Follow the instructions below to learn how to add bokeh effects to your images using PhotoDirector.
- Open PhotoDirector on Windows or Mac and tap Full Mode to access the full range of editing tools, including bokeh.
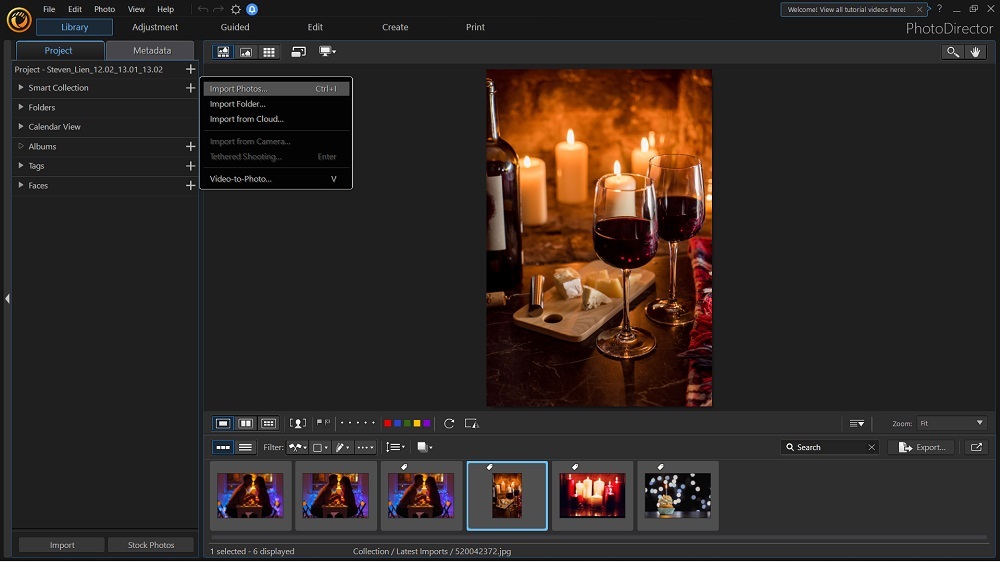
- To import a new photo from your computer, start by clicking on the Library tab at the top of the screen, then click on the plus symbol (+) next to Project on the left-hand corner of the screen. You will be prompted to select and open a photo.
- Once your photo appears in the main editing window, click on the Guided tab at the top of the screen.
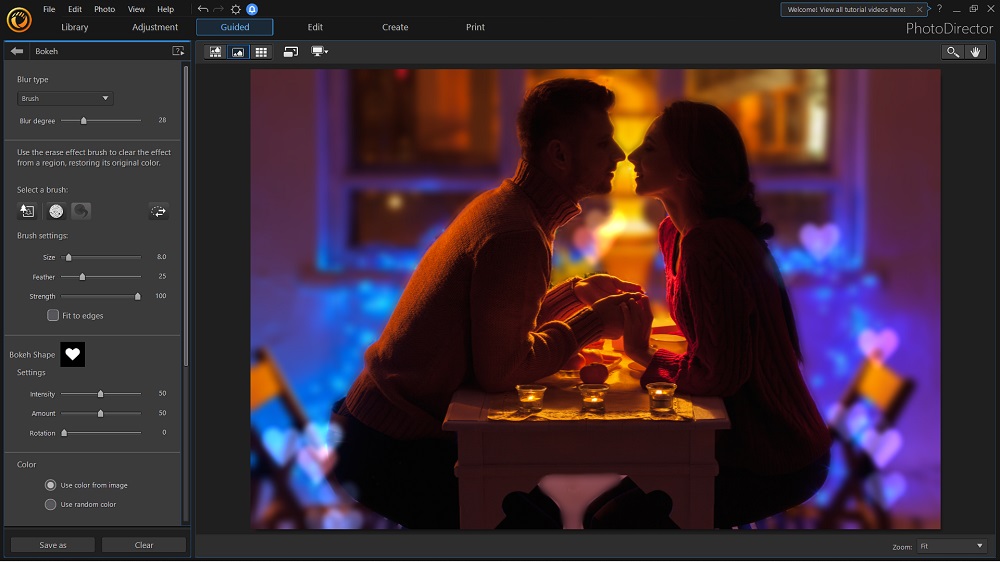
- From there, click on the button labeled Bokeh on the left-hand side, located in the Light Effect section of the menu.
- To select an area of the image to keep in focus, choose from one of the drop-down options under Blur Type at the top of the menu.
Selecting the Brush option gives you the greatest amount of control over the subject of your photo. Adjust the brush settings according to how much of the photo you want to highlight, then hover over your image and press down on your cursor or mousepad to select the subject you want to focus on. - Once you’ve highlighted your focus area, click on Bokeh Shape to choose from one of 25 unique shapes of bokeh lights.
In this section, you can also customize the Intensity, Amount, and Rotation of the effect by making adjustments to these settings. - To alter the colors of the bokeh light effects, select Color and use the respective sliders to adjust the Hue and Saturation.
- If you want to save the edits as a still photo, simply click Save As at the bottom of the menu to export the photo to your computer in the format of your choice (PNG, JPG, or TIF).
However, you also have the option of saving the image as a live animation, which you can activate by clicking the Enable Animation Effect checkbox. This feature will allow you to make modifications to the animation and even add background music.
Once you’ve completed your customizations, click on Save As at the bottom and choose New Video/GIF File when prompted, which will give you an option to save in a specific format: MPEG-4, WMV, or GIF.


How to Take Bokeh Photography
Bokeh photography is classically achieved using a digital single-lens reflex (DSLR) camera. It can take some time to master, but you can start by following the steps below to achieve a great bokeh effect, which typically looks best on portraits of people or nature.
- Using Aperture Priority or Manual mode on your camera will allow you to adjust the necessary settings to create bokeh. The key is to select a wide aperture by lowering your f-setting. Using f/1.8 or f/2.8, for example, will do just fine. Using a wide aperture will create a shallow depth of field, which is needed for bokeh.
Tip: To get more unique shapes from the background light sources, consider using a lens with fewer aperture blades (about 5 or 7), which will produce polygon-shaped bokeh lights. Or, if you’re going for a more natural look, a lens with 9 or 11 aperture blades will create circular orb-like shapes. - Use a lens with a long focal length (e.g., 200mm). To create the blurred background that defines bokeh, a longer lens helps to increase the intensity of the blur. Skip the wide-angle lens since getting a blurred background is more challenging.
Tip: Sometimes zooming in on the subject helps create a better bokeh effect. If you can’t fit your subject in the frame, take a few more steps away from your subject and re-shoot the photo. - Ideally, you should choose a background that has small points of light coming through, which is needed to get that classic dreamy effect in the background. When the light sources in the background are far from the subject, the bokeh effect will become even more dramatic. Be sure to have the subject well-lit; otherwise, your subject may become a silhouette.
- Put some distance between the subject of your photo and the background, then get fairly close to your subject and capture the shot. It’s important to note that if there is only a short distance between the subject and background, it will be more difficult for the background to appear out-of-focus. The further away the source of highlights is from your subject, the more dramatic the bokeh effect will be.
Best Bokeh Effect Maker Free Download
In the past, achieving a bokeh effect required a high level of technical photography knowledge, but more recently, photo editing programs allow even beginners to add bokeh to their images.
If you’re looking to create quality bokeh effects but don’t necessarily have the expertise to navigate complicated software, PhotoDirector will be your best bet. It’s free to download and makes editing photos a breeze.
Bokeh Photography Effect FAQs
Bokeh is a relatively new term used in photography, and it originates from the Japanese word boke, which roughly translates to “blurred.” The English spelling was popularized in 1997 in Photo Techniques magazine. Bokeh photography has gained popularity because it can create a dreamy illusion, ideal for portraits and macro photography.
Portraits and still-life photos are best for adding a bokeh effect since these images typically focus on a singular subject. Using photos with small light sources behind the subject, like street lights, candles, or Christmas lights, will look best.
In photos with a light source in the background, a bokeh effect can alter the shapes of the points of light that appear behind the subject, creating a dreamy effect to the image. Photo editing software such as PhotoDirector allows you to customize the shapes of the lights, which can resemble diamonds, hearts, or stars, for example.


