
How to Color Correct and Color Grade: The Ultimate Guide


You shot a true beauty of a video, the edit is as tight as can be and the transitions are right on point. You’re thinking ‘job done’ – let’s export this bad boy and get it out there – right?
Not so fast my friend.
Have you color graded? Not just that, have you color corrected?
To some editors, this is downright the last thing they care about (the editor writing this surely doesn’t have a deep, unrequited love for color correcting or grading, I can assure you of that). Others live for it and there are even folks out there who specialize solely in color grading. Gluttons for punishment I’d say!
Fact is though, whether you love it or hate it, color grading is something that must be done. It’s an essential part of the post-production process.
Fortunately, it’s easier than ever these days with something called LUTs, we’ll get to that in a second though, first let’s get the basics out of the way.
In this article we will be using and referencing PowerDirector and ColorDirector for color correction and color grading. We recommend you download both for free so you can try out the techniques as you read. Both are available in Director Suite 365, which is a complete collection of video, photo, and audio software. It includes all the tools a creative individual will ever need to make entertaining and engaging content.
- What Is Color Correction?
- What Is Color Grading?
- Why Do You Need Color Correction and Color Grading?
- How to Color Correct?
- Why Use LUTs?
- What Are LUTs?
- How to Color Grade with LUTs?
- Color Grading Software
- Conclusion
What Is Color Correction?
First, you need to know there is a difference between color grading and color correction. You can look at correction as step 1 and grading as step 2. It’s imperative that you color correct before you grade.
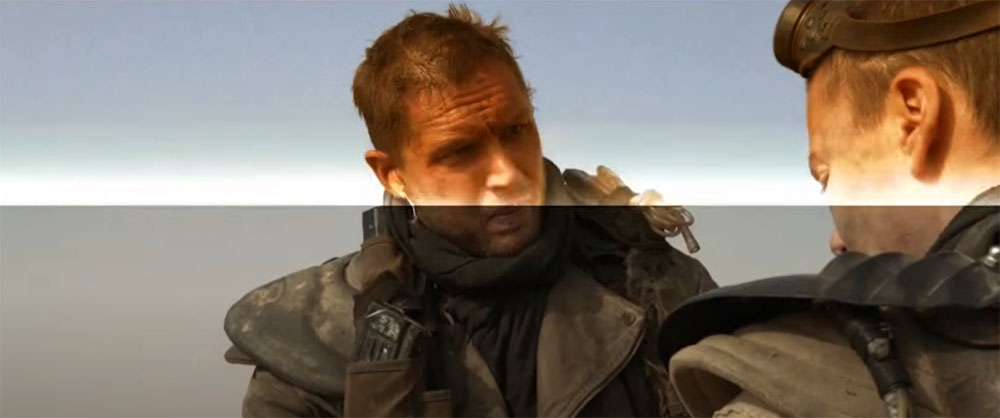
Video color correction is all about getting the colors essentially to neutral and natural, i.e., what they would look like to the human eye. This also includes correcting for things like exposure and white balance. You essentially want your cut to look “even”.
What Is Color Grading?
Color grading is where the magic happens so to speak. Grading is where you bring in the style and it’s a much more creative process overall. You’re playing with and changing the tone and feel of the footage with grading. Adding emotion, ambiance, and atmosphere depending on what your video demands.
Why Do You Need Color Correction and Color Grading?
Color correction and grading are what make your video or film have a cohesive look. Your story and the edit itself may have continuity but if your shot-reverse has one person looking warm and the other looking cold (unless this is some stylistic choice… not recommended) it’s going to totally throw your audience off. If two people are supposed to be in the same room talking to each other but they’re individual shots have inconsistent color, you’re going to ruin the effect of your reverse-shots.
Correcting and grading the footage is what you need to make things feel seamless and give them style.
- To Fix Color from Camera or Lighting Shifting
On a fundamental level, you’ll likely need to correct for some issues that took place while shooting. This happens in productions of all levels. Sometimes a shot is too bright or another is too dark, so you need to fix the exposure. Occasionally your white balance will be off so you’ll need to balance that across your sequence.
- To Enhance and Stylize Video
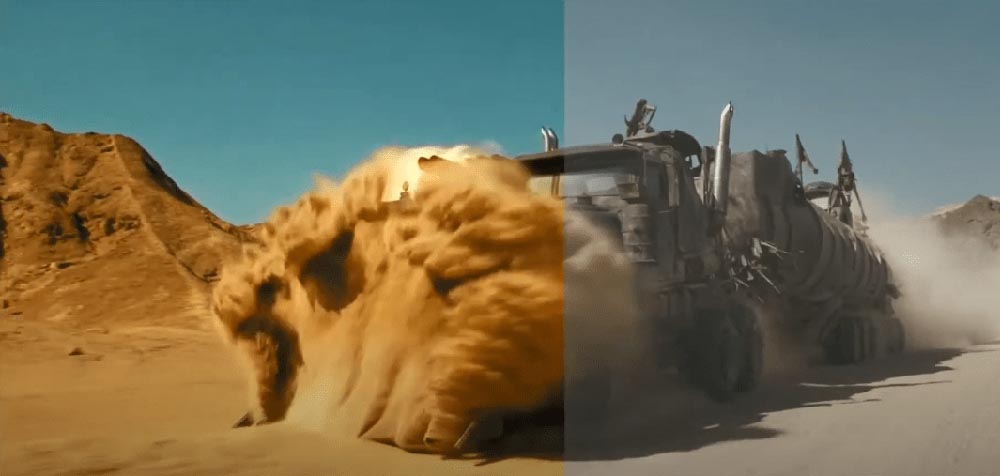
AKA the fun part! How you color the footage imparts a feel, a mood, and a vibe to the audience. Think of most sci-fi flicks that tend to have cooler color tones and a generally bluish hue. Our minds connect that with futuristic settings. The Matrix goes for a green cast to the colors while Mad Max: Fury Road wows with its vibrant, warm color treatment. On the flip side, romantic comedies go for natural colors and almost eschew style in the color grade.
How to Color Correct?
Check out this video to learn everything you need to start color correcting your videos.
Split Toning
Split toning is a great tool and technique to color correct your videos. Check out this article for an in-depth look into split toning.
Why Use LUTs?
In a nutshell, LUTs make your color grading an absolute breeze, particularly if you’re shooting in LOG. No longer do you have to tirelessly shift each color in the frame, laboriously move the exposure on each individual video clip, and ploddingly get things balanced. Shot by shot by shot.
Moreover, LUTs give you a great starting point from which to create your very own looks.
- One-Click Presets. They’re Easy!
No exaggeration, we’re talking a literal single click of the mouse and your footage is color graded. There are almost limitless possibilities as companies and individuals are constantly creating new LUTs for all genre and types of videos
Talk about a time saver.
What Are LUTs?
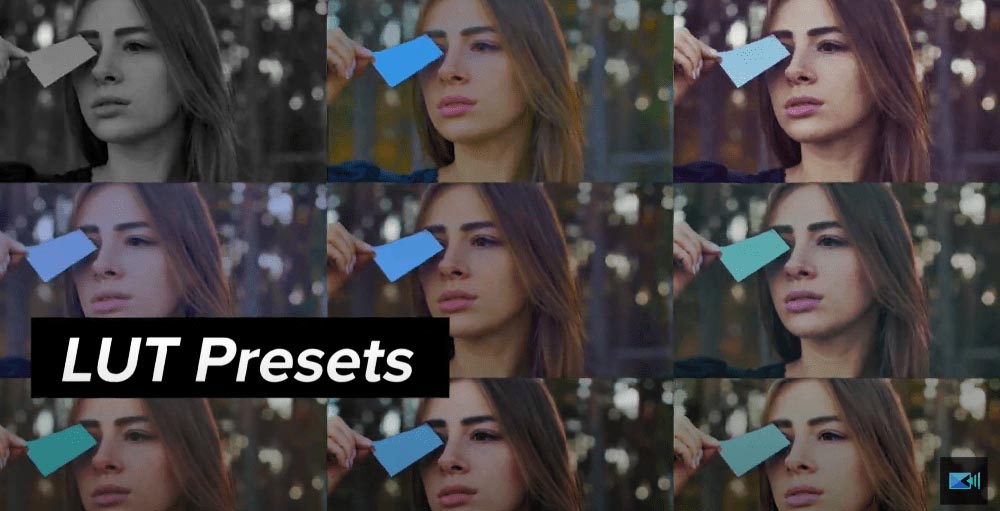
The simplest definition and best way to wrap your head around what a LUT is are to think of it as a color preset for your footage. You click on a particular LUT you’ve purchased or gotten for free (we’ll tell you where shortly) and that preset is applied to your footage.
There’s such a vast array out there to choose from, with a little research you can find just about any look. Including cinematic LUTs that allow you to mimic the style of your favorite films.
- Look-Up Tables
LUT, by the way, means Look Up Table and that brings us to the more complex definition.
A LUT holds a predefined mathematical formula that functions as a shortcut in adjusting your image. It’s essentially a table of numbers and when you apply it to your footage, the software “looks up” and transforms and modifies the colors and other visual aspects of your footage to whatever the LUT is predetermined to change.
Maybe you’d like to increase brightness, boost saturation, and add more warm color tones, you can find a LUT that would work on just those values, for example.
The idea is that each LUT transforms the source footage in a very specific way.
- Examples
Seeing a handful of examples is always beneficial to grasping the sheer force and magnitude of transformation that a dynamic color grade can bring to your project.
Here’s a recreation of the grade from Mad Max: Fury Road.
The House on Pine Street got a beautifully intense treatment from GradeKC.

The cinematographer Lawrence Sher does a phenomenal job explaining the use of color in film with plenty of examples mixed in. Really a great deep dive into the importance and impact of color in storytelling and how to use them both for shooting and color grading.
How to Color Grade with LUTs?
Color grading video has never been easier than with LUTs. They make it less about the annoyances of the process and more about unleashing your creativity with just a click. Easy peasy lemon squeezy is an understatement.
And the great thing is, you don’t need to go on some wild goose chase to find LUTs, they’re readily available and sometimes even free!
- Where to Get LUTs
Honestly just Googling “free LUTs” will supply you with a veritable cornucopia of freebies but that’s not a good enough answer. Check out these sites for some nice ones: - Free LUTs
- Shutterstock put together a great collection of 129 free LUT packages from around the web including a 35-pack of their very own from their RocketStock brand.
- PremiumBeat, known for their excellent music selection, compiled a stellar 29 LUT set (thanks for the round number guys…).
- Lutify will hook you up with 7 free ones when you start a free trial.
- Motion Array lays out a nice spread of 25 packs of LUTs (that’s a lot of LUTs y’all) at no cost.
- Color Grading Central offers up a bunch at no charge.
- PowerDirector comes with a ton of LUTs included and with 365 you get more every month. How’s that for a sweet deal?
- How to Use LUTs
It’s easy. Are you starting to sense a teheme here? Can it be as pain-free as it sounds? Yep. It very much can and it very much is. - Add Them to Your Editing Software
Adding them to your software is a cinch no matter which nonlinear editing (NLE) system you use. For the sake of organization designate a folder for your LUTs. These can accumulate fast and there’s nothing more annoying than having files dispersed all over the place.
Within your software, in the color correcting module or area, you’ll have a “browse” button or something to that effect that allows you to find and import, or drag and drop, the LUTs. - Apply Them to Clips
After you’ve color corrected your clips, applying LUTs is literally as quick as clicking the one you like and voilà, your clip is expertly graded! Of course, don’t hesitate to customize and tweak further. The LUT isn’t necessarily an endpoint but can rather be a jumping-off point for color grading.
Color Grading Software
There are plenty of options out there for editing software these days but let’s focus on one that’s easily accessible (keeping with our theme!) and loaded with features right out of the box.
- PowerDirector
The perfect option for Windows-based editors who want high-end post-production capabilities but without the backbreaking costs.
PowerDirector 365 comes with quite literally everything you would need from an NLE. We’re talking professional-grade creative effects, built-in and customizable motion graphics, title packages, and, of course, loaded with LUTs. It bears repeating, you get new LUTs every month when using 365.
All with an intuitive, easy to grasp interface and workflow and without the steep learning curve that other programs “offer”.
- ColorDirector
A powerful color grading tool that integrates seamlessly into your PowerDirector workflow? Yes, please. ColorDirector allows you to transform your footage into visually stunning professional-level work.
Cinema quality color and style. Precision color grading with professional results.
Add clarity to your video with de-haze and noise reduction tools. Color matching makes things even easier by allowing you to replicate the color style of any reference video. Oh, and if you’re playing with 360-degree footage, rest assured ColorDirector can handle it.
Going beyond color correction and grading, ColorDirector comes with some truly stunning effects. Transform your videos with color, style, and lighting effects. Add and animate lens flares and light rays. Don’t have a green screen to shoot with, no problem. The new Green/Blue Screen Maker lets you simply mask and track your footage to add a green or blue screen to any footage.
Conclusion
If there’s one takeaway from this, and we’ve mentioned it throughout, it’s that high-end color grading is both easy and easily within reach today. The answer to the vexing questions of how to color grade video and how to achieve professional-grade visuals has been resoundingly answered with an acronym: LUTs. They’re the secret sauce.
Happy editing!
If you're an aspiring editor looking to create cool videos, head on over to our complete guide on video editing effects. We've also got other great articles in our blog that'll introduce you to all the tools you need to enhance your portfolio.
Related Articles:
- Lighting, Color, and more
- Video Compositing
- Keyframing, Animation, and Titles
- Introduction to Basic Video Effects
Was this article helpful?
You May Also Like:


Recommended Products:


