

What Is Bitrate? Definition & Best Video Bitrate Settings

If you create videos for YouTube, TikTok, or Instagram, you’ve probably heard the term bitrate—but many creators don’t fully understand why it matters. Bitrate is the amount of data used per second of video, and it directly affects how sharp, smooth, or blurry your content looks after upload. Too low, and your video becomes pixelated; too high, and you end up with unnecessarily large files.
In this guide, you’ll learn what bitrate is, why it matters, and how to choose the right settings for each platform—plus how to easily control bitrate using a video editor like PowerDirector for the best results.
- What Is Bitrate? (Short, Simple Explanation)
- Why Bitrate Is the Secret to Professional-Looking Video
- CBR vs. VBR: Which Bitrate Type Should You Use?
- Recommended Video Bitrate Settings for YouTube, TikTok & Instagram (2026)
- How to Control Video Bitrate
- How to Check the Bitrate of Your Video
- Frequently Asked Questions About Bitrate
What Is Bitrate? (Short, Simple Explanation)
Bitrate refers to the amount of data used to encode one second of video or audio. It’s measured in bits per second (bps), kilobits per second (kbps), or megabits per second (Mbps).
In short, a higher bitrate delivers better image and sound quality—but it also results in larger file sizes.
Why Bitrate Is the Secret to Professional-Looking Video

Think of every video frame as a canvas. Bitrate is the amount of “paint” available to create that image. With a higher bitrate, your video can include more detail, smoother motion, and richer colors. With a lower bitrate, the image has less data to work with—often resulting in blurriness or blocky pixels.
Finding the Right Balance: Quality vs. File Size
 Source: Meld Studio
This is the trade-off every content creator faces:
- High bitrate: Delivers sharper visuals and smoother motion, ideal for large screens and fast-moving scenes. The downside is larger file sizes, longer upload times, and more storage usage.
- Low bitrate: Creates smaller files to share more easily, but quality loss becomes noticeable—especially in action shots or detailed footage.
The key is balance. You want the best possible quality without creating unnecessarily heavy files. Video editors like PowerDirector help you achieve this by adjusting bitrate intelligently, allowing you to compress videos without visible quality loss.
Video Bitrate vs. Audio Bitrate: What’s the Difference?
 Source: castr.com
Although these terms are often mentioned together, they control different aspects of your video:
- Video bitrate: Determines image quality, including resolution, color depth, and motion smoothness. It has the biggest impact on file size and is measured in Mbps.
- Audio bitrate: Controls sound quality for dialogue, music, and effects. It’s measured in kbps, with 192–320 kbps being a common high-quality range.
When exporting a video, both settings can be adjusted separately to ensure professional visual and sound for your content.
CBR vs. VBR: Which Bitrate Type Should You Use?
When exporting a video, you’ll usually see two bitrate encoding options: CBR (Constant Bitrate) and VBR (Variable Bitrate). Choosing the right one can make a big difference in both video quality and file size.
Constant Bitrate (CBR)
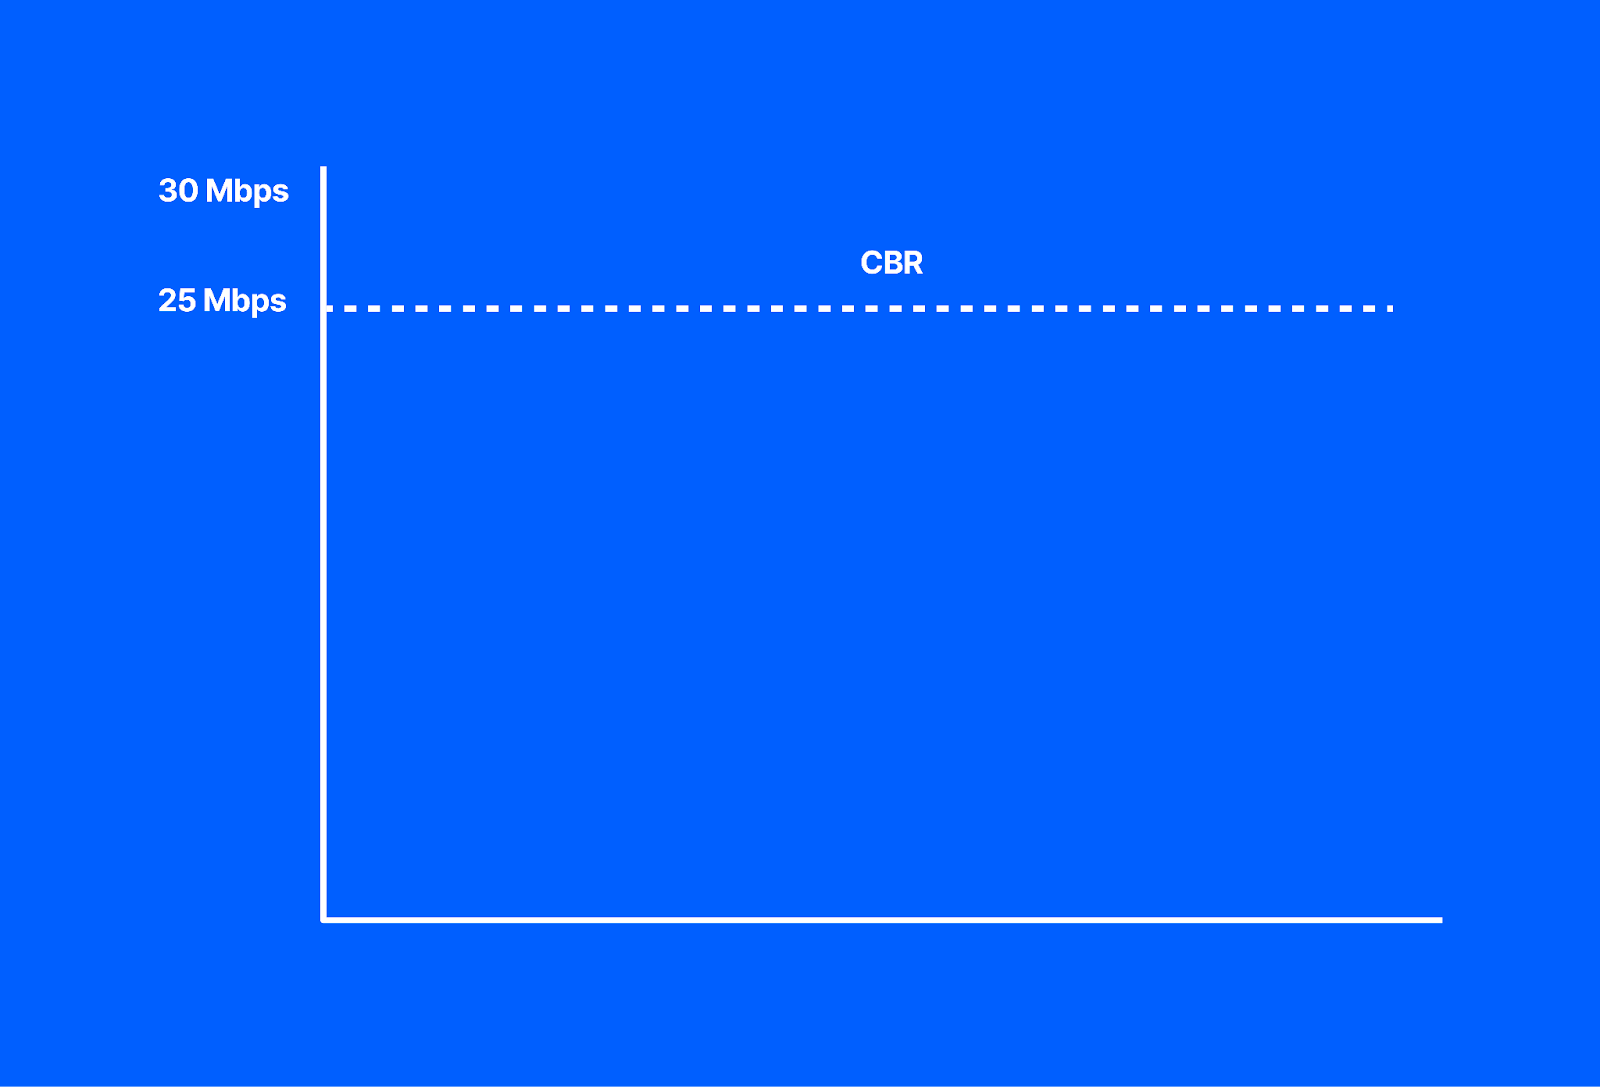
CBR uses the same amount of data for every second of the video, whether the scene is simple (a talking head) or complex (fast motion or explosions).
Pros
- Stable and predictable file size
- Ideal for live streaming on platforms like YouTube Live or Twitch, where bitrate spikes can cause buffering or stream drops
Cons
- Inefficient use of data
- Wastes bitrate on simple scenes and may not allocate enough data to complex ones, leading to occasional quality loss
Variable Bitrate (VBR)
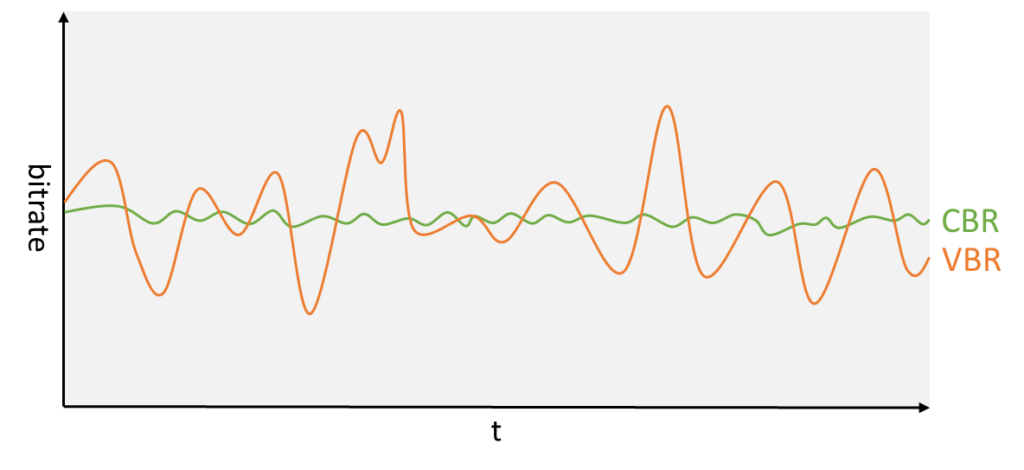
VBR is a smarter approach. It analyzes your footage and dynamically assigns more data to complex scenes and less to simpler ones.
Pros
- Better overall video quality
- More efficient file sizes
- The best choice for pre-recorded videos uploaded to YouTube, Instagram, or TikTok
Cons
- File size is less predictable
- Not recommended for live streaming with unstable internet connections due to bitrate fluctuations
Pro Tip
For recorded videos, always choose VBR to get the highest quality without unnecessary file size.
Use CBR only when you’re live streaming and need a stable, consistent bitrate.
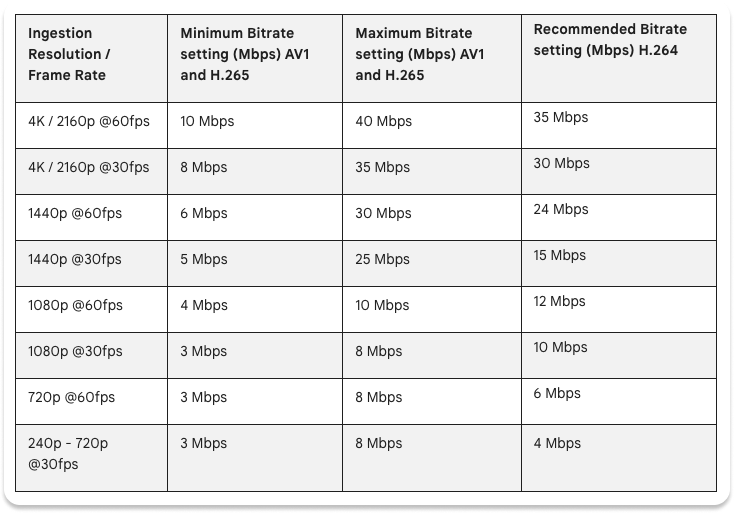
Recommended Video Bitrate Settings for YouTube, TikTok & Instagram (2026)
To make your videos look professional on each platform, it’s important to export with the recommended resolution, frame rate, and bitrate. Using the correct settings ensures your content stays sharp, smooth, and engaging for viewers.
Here’s a quick reference for 2026 based on official guidelines and best practices:
| Platform & Purpose | Resolution | FPS | Video Bitrate | Audio Bitrate |
|---|---|---|---|---|
| YouTube Upload | 4K (2160p) | 60 | 53–68 Mbps (VBR) | 320 kbps |
| YouTube Upload | 4K (2160p) | 30 | 35–45 Mbps (VBR) | 320 kbps |
| YouTube Upload | 1080p | 60 | 12 Mbps (VBR) | 192 kbps |
| YouTube Upload | 1080p | 30 | 8 Mbps (VBR) | 192 kbps |
| Instagram Reels / TikTok Upload | 1080p | 30 | 6–10 Mbps (VBR) | 128 kbps |
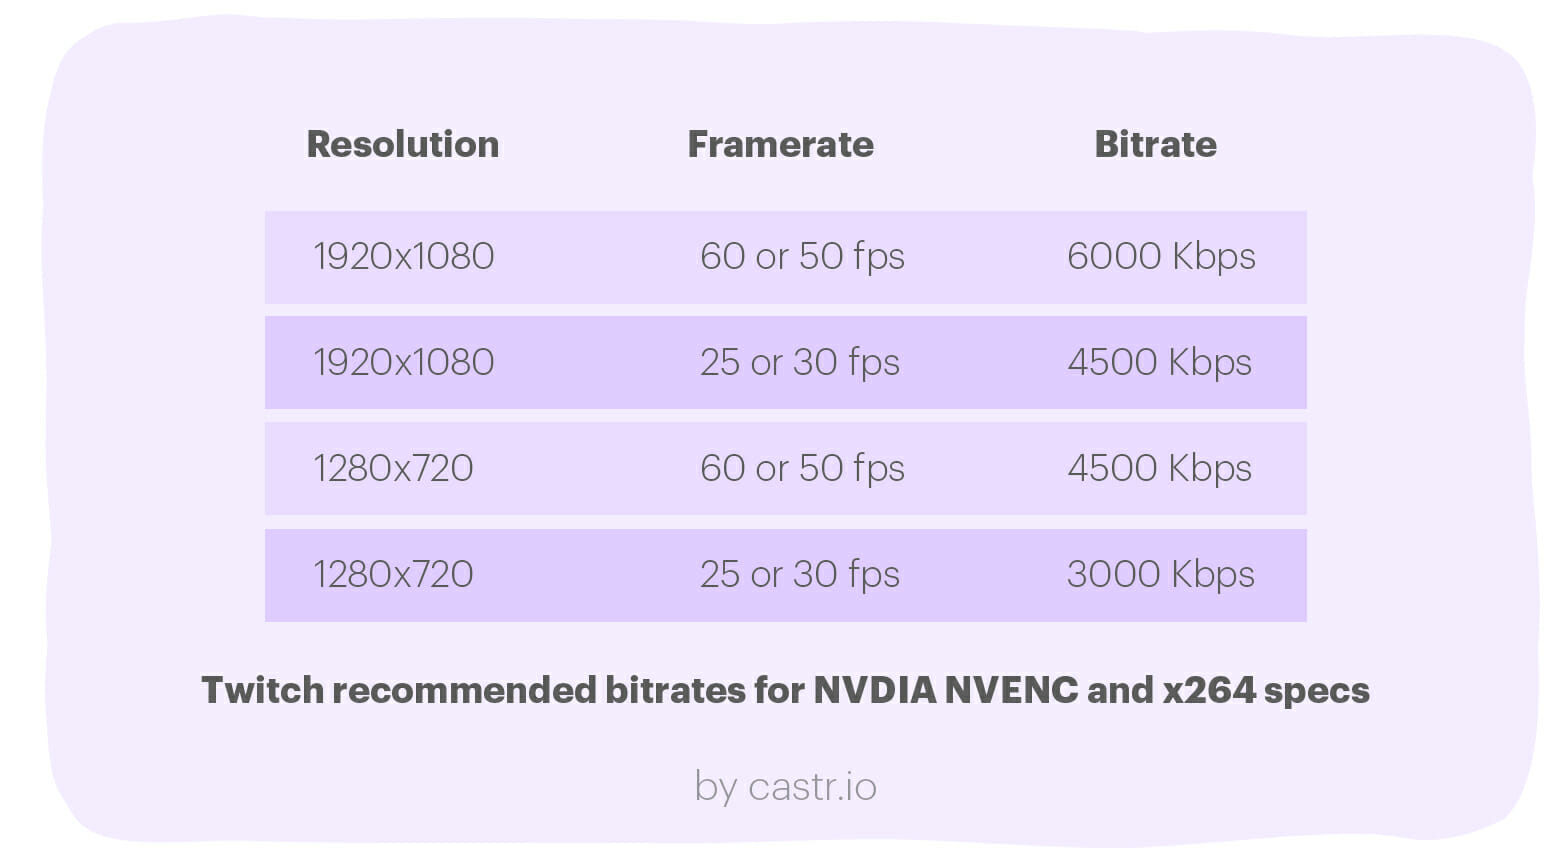
| Twitch Streaming | 1080p | 60 | 6 Mbps (CBR) | 160 kbps |
| Twitch Streaming | 720p | 30 | 3 Mbps (CBR) | 128 kbps |
Notes for creators:
- All bitrates are export recommendations. Platforms may recompress videos after upload.
- Recorded content: Use VBR for better quality with optimized file sizes.
- Live streaming: Use CBR to maintain a stable and uninterrupted stream.
- Test your settings: Even with recommended values, slight adjustments based on your content type can improve playback quality.
How to Control Video Bitrate
Controlling video bitrate during export is one of the most effective ways to maintain quality while keeping file sizes manageable. Video editors like PowerDirector simplify this process, allowing creators to adjust bitrate settings without navigating complicated technical menus.
How to Export a Video With the Right Bitrate (Step-by-Step)

- Open your project and go to Export
Once editing is complete, click the Export button at the top of the interface.
- Choose an export format
Select a widely supported format such as H.264 (AVC) or H.265 (HEVC).
▪ H.264 offers broad compatibility.
▪ H.265 provides more efficient compression, delivering similar quality at smaller file sizes.
- Select a quality profile
From the left panel, choose a preset that matches your platform, such as YouTube – 1080p Full HD. Presets help ensure correct resolution and frame rate.
- Adjust the video bitrate
Open the Video tab and choose between CBR and VBR.
▪ For recorded videos, select VBR.
▪ Enter the average bitrate (Mbps) based on the recommended table above (for example, 12 Mbps for YouTube 1080p at 60 fps).
- Set the audio bitrate
Switch to the Audio tab, select AAC (standard for most platforms), and set the bitrate (e.g., 192 kbps).
- Export the video
Click Start to export your video with the defined bitrate and quality settings.
With proper bitrate control, your videos can remain consistent and professional across different platforms. If your source footage is low quality, improving it before export—such as using tools like PowerDirector for AI video enhancement—can further optimize the final result. Eliminating guesswork from export settings is a key step toward higher-quality videos, and having precise control over bitrate, resolution, and encoding allows creators to focus less on technical matters and more on creative expression.
Try the free AI video editor now!
How to Check the Bitrate of Your Video
Knowing the bitrate of a video helps you understand its quality, file size, and whether it meets platform upload requirements. You can check video bitrate easily using built-in system tools—no additional software required.
Check Video Bitrate on Windows (For Windows 10 / 11)
 Source: videoconvert.minitool.com
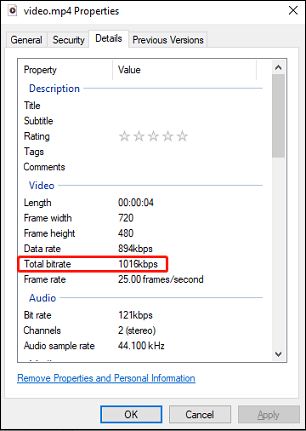
- Right-click the video file.
- Select Properties.
- Open the Details tab.
- Look for:
▪ Data rate → video bitrate
▪ Bit rate → audio bitrate
▪ Total bit rate → combined video + audio bitrate
This method is quick and ideal for confirming export settings.
Check Video Bitrate on macOS

- Open the video in QuickTime Player.
- Press Command + I to open Movie Inspector.
- Check the Data rate field to see the total bitrate.
 Source: triadctv.com
Optional: Advanced Bitrate Analysis with VLC
For more detailed technical information, you can use VLC Media Player (free and cross-platform):
- Open the video in VLC.
- Go to Tools → Codec Information.
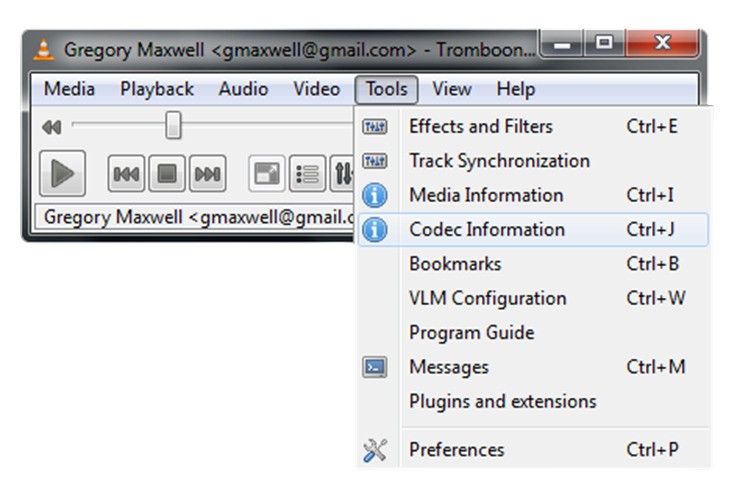
- View separate video and audio bitrate details, codecs, and encoding data.
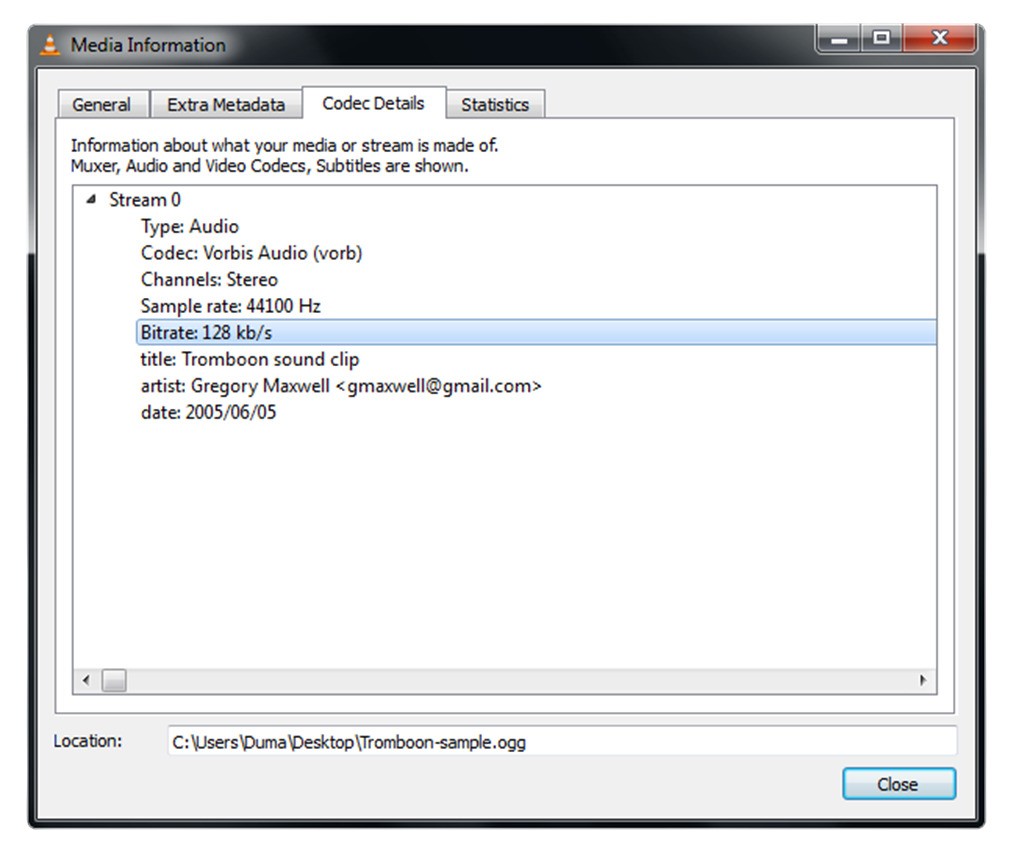


This option is useful if you need deeper insights for troubleshooting or optimization.
Frequently Asked Questions About Bitrate
Not always. A higher bitrate usually means better quality, but it also creates larger files. The best bitrate is the one that balances quality and file size based on your platform and content type.
For most platforms:
- 1080p at 30 fps: around 8 Mbps
- 1080p at 60 fps: around 12 Mbps
These settings provide excellent quality without unnecessarily large file sizes.
Higher bitrates are needed for 4K to support the increased resolution and detail.
Recommended Settings:
- 4K at 30 fps: about 35–45 Mbps
- 4K at 60 fps: about 53–68 Mbps
It depends on the use case.
For live streaming (e.g., Twitch), 6000 kbps (6 Mbps) is a recommended standard setting.
For uploaded videos, 6000 kbps may be too low for 4K but perfectly fine for 1080p content.
Video bitrate affects image quality, motion, and detail.
Audio bitrate affects sound quality, such as clarity of voice and music.
Both together determine the total file size and overall quality.
Video bitrate affects image quality, motion, and detail.
Audio bitrate affects sound quality, such as clarity of voice and music.
Both together determine the total file size and overall quality.
Use VBR (Variable Bitrate) for recorded videos to achieve better quality with optimized file size.
Use CBR (Constant Bitrate) for live streaming to ensure stable performance.
Yes. Higher bitrate = larger file size. Lower bitrate = smaller file size but reduced quality. Adjusting bitrate is one of the most effective ways to control video size and quality.


