






How to Remove Glare and Reflection from Photos with PhotoDirector

Glare is the blown-out patch you get when light bounces off glass, water, plastic or skin straight into the lens. The fastest way to fix it after the shot is PhotoDirector's AI Removal: import the photo, brush over the glare, save. The AI rebuilds the brushed area from the pixels around it in a few seconds.
Below are the exact steps on phone and on desktop, what AI Removal can and can't recover, and what to do when it can't.
What's Free and What Isn't:
- PhotoDirector Mobile: The app is free to download, but the AI Removal tool used in this guide requires a subscription. Once subscribed, it costs no credits and has no usage limit.
- PhotoDirector Desktop: The software is free to download, and Object Removal works in the free version, but exports carry a watermark. Once subscribed, you can export watermark-free versions. For complex scenes, you can choose to let the AI generate a high-quality fill for the removed area at a cost of 2 credits.
How we checked this guide:
Every step below was run end to end on PhotoDirector for desktop 25.0.7 and the PhotoDirector app 20.15.0 in August 2026. The screenshots are from that session.
Disclosure: PhotoDirector is CyberLink's own product, and this guide focuses on the program and app from start to finish.
- How To Remove Glare from a Photo With an App
- How To Remove Glare from a Photo on Desktop
- What AI Removal Can and Can't Fix (and What To Do Instead)
- FAQs about Removing Glare from a Photo
How To Remove Glare from a Photo with an App
Here are 5 steps to remove glare from a photo:
- Download PhotoDirector for Free
The first step is to download PhotoDirector in Google Play Store and App Store. Install the app for free and open it to begin.

- Import Your Photo
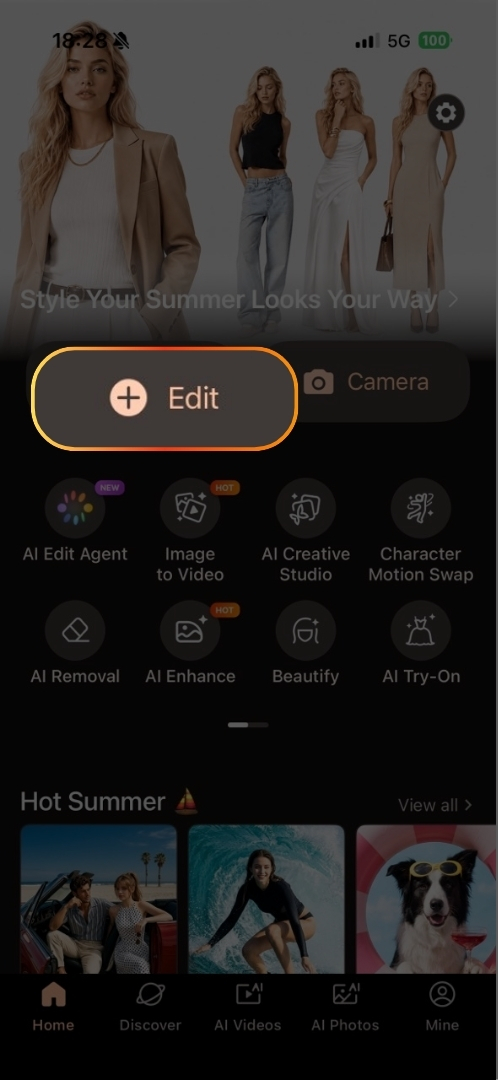
Once you have PhotoDirector installed, import the photo you want to edit by tapping Edit and choosing an image from your device's photo library, or take a new photo using the app's built-in Camera.
- Select the Removal Tool
After importing the image, tap on the "AI Removal" section in the app's interface. On mobile this tool is part of the subscription; once you're subscribed there is no credit cost and no limit on how many photos you can fix.

- Smart Select the Glare
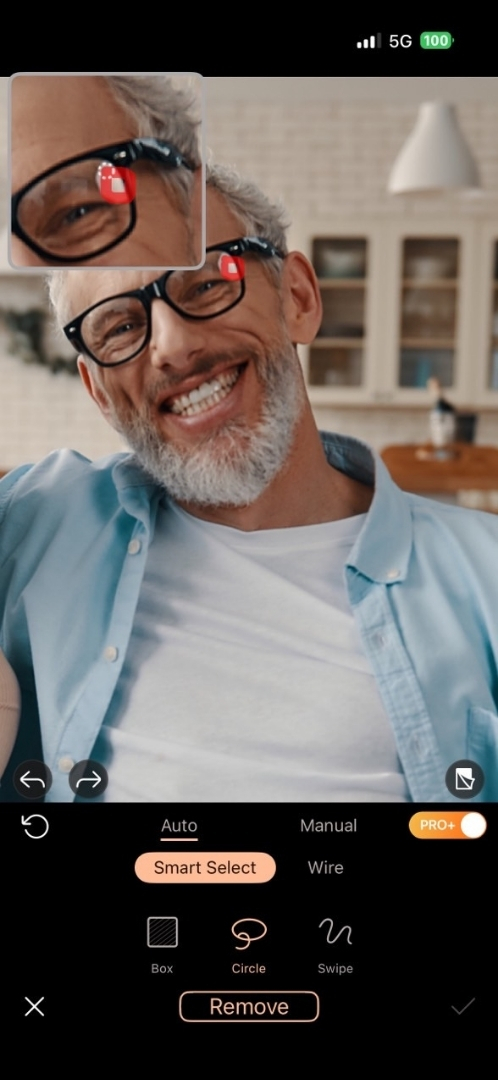
Use the auto-detect tool to mark the reflection areas using different methods: box, circle, or swipe. If the automatically detected area is too large, switch to manual mode and brush over the glare on your glasses or window.
🌟Pro tip: Glare on a plain background, such as a wall, sky, or tabletop, produces the cleanest results. Glare crossing a face, eye, or patterned fabric is more challenging because the AI has to reconstruct details rather than simply fill a flat area. For these complex cases, it's better to turn on the Generative AI option.
- Remove and Save
Click the "Remove" button and check the result. Once you're satisfied with the glare removal, save the edited photo by tapping the "Save" button. You can choose to save it directly to your device's photo library or share it with others through social media platforms or messaging apps.



How To Remove Glare from a Photo on Desktop
The desktop version gives you a larger canvas and finer brush control, which matters when the glare sits on a face or on detailed texture. Here are the 4 steps.
Whether it's sunlight bouncing off glasses or a reflection on a shiny surface, the workflow is the same: mark the bright area, let the AI rebuild it, then check the result at 100% before exporting.
- Open the launcher and click on "Object Removal"
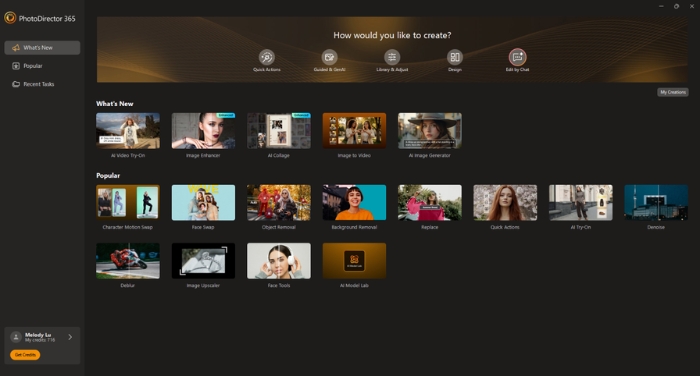
Start by launching PhotoDirector on your device. Once the main interface loads, locate and click on the "Object Removal" tab. It uses the same engine as the app's Removal tool, but with a larger preview. You can use it in the free version of PhotoDirector, but exports from the free version carry a watermark. A subscription is required to remove the watermark.
- Import Your Photo
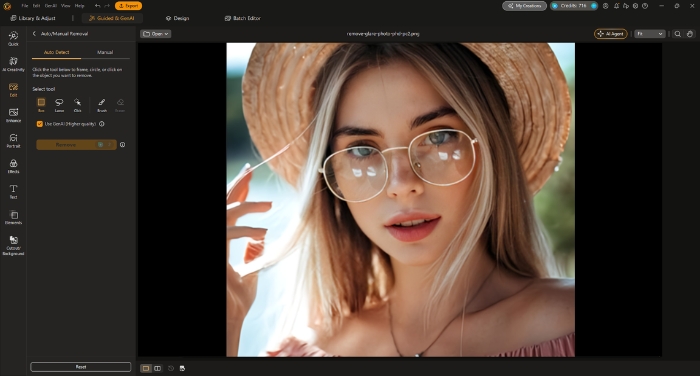
Upload your image by dragging it directly from the folder or selecting it through the file browser.
- Select the Area with Glare to Remove
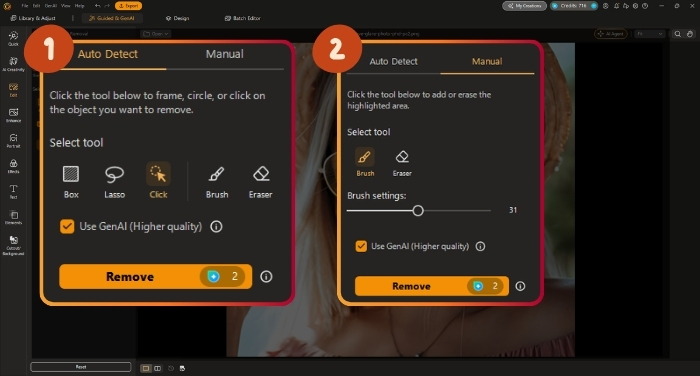
You can choose from three detection tools, Box, Lasso, and Click, to select the glare. PhotoDirector will automatically mark the area to remove. If the selected area is too large, use the Eraser to refine it. PhotoDirector also provides a manual Brush tool, allowing you to paint over the glare slowly and precisely. Zoom to at least 100% first. At fit-to-screen, it is easy to leave a thin bright rim around the removed area, which is one of the most common reasons a removal looks unfinished. If the first result isn't clean, undo it and try a slightly tighter selection rather than brushing over the same area twice.
On busy backgrounds, the standard fill may sometimes smear or look unnatural. In that case, you can have AI generate a high-quality fill for the removed area instead. This option costs 2 credits per use, so it's worth saving for shots where the standard fill doesn't produce a clean result.
- Save Your Edited Picture
Once you're happy with the result, click the "Export" button to save your edited photo.
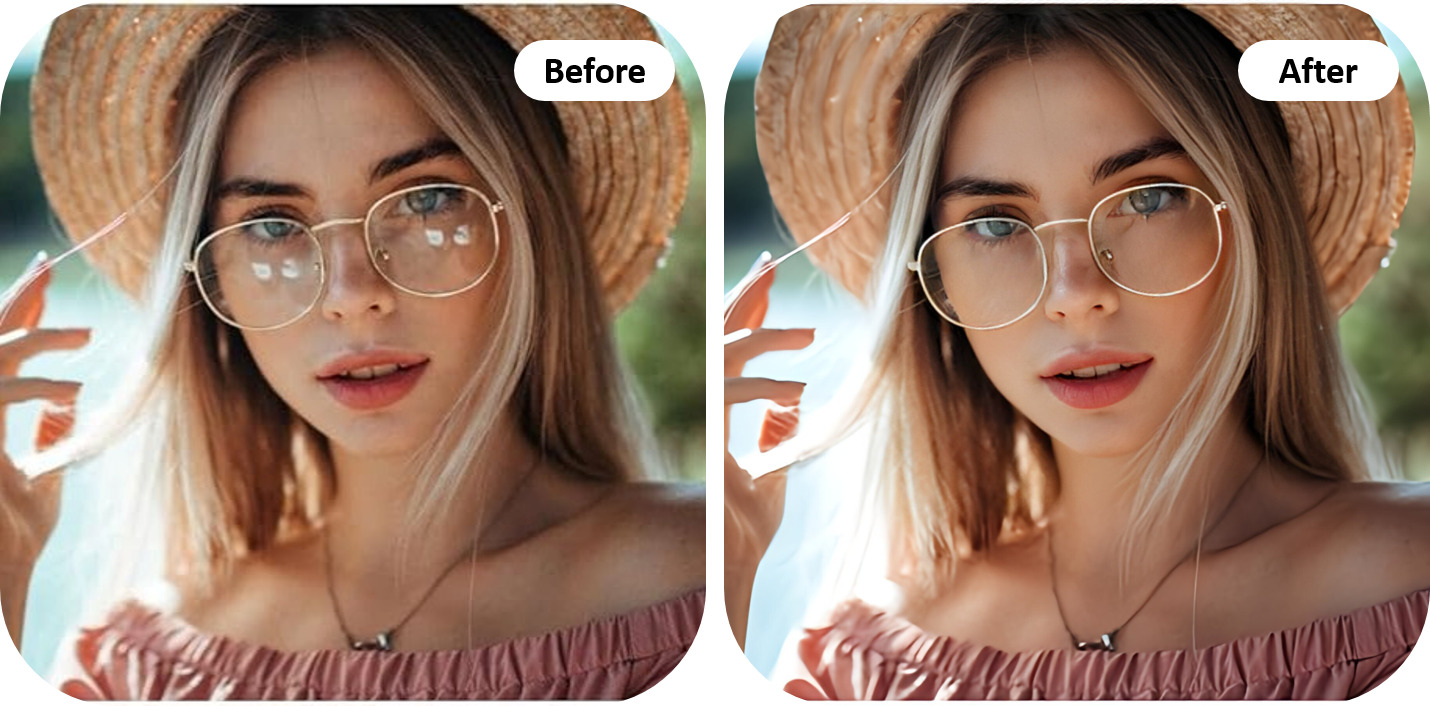


Besides glare and reflections, the AI Removal tool can also remove unwanted people or objects from your photo.
What AI Removal Can and Can't Fix (and What To Do Instead)
AI Removal rebuilds the area you brush from the pixels around it. That tells you almost everything about when it works:
- Works well: glare on a plain or repeating background (wall, sky, table, water), small specular hotspots on skin or objects, and reflections on glass where the background behind them is visible elsewhere in the frame.
- Works with care: reflections across eyeglass lenses. Brush the reflection only, not the lens edge or the eye. If you include the eye, the AI will rebuild it from the surrounding face and it will look wrong.
- Doesn't work: areas that are fully blown out to pure white across a large part of the subject. There is no detail left in the file for the AI (or any tool) to recover, so the result is a plausible invention rather than the real scene.
When AI Removal isn't the right fix:
- Shoot in RAW and pull the highlights back. A RAW file usually holds detail in bright areas that a JPEG has already discarded, so a highlight or exposure adjustment can recover glare that no removal tool can rebuild.
- Use a circular polarising filter at capture. A polariser cuts reflections off glass and water before they reach the sensor. It's the only method that removes glare rather than reconstructing what was behind it.
- Change your angle. Reflections are directional. Moving a step to the side, or tilting the subject a few degrees away from the light source, often removes the glare entirely and costs nothing.
FAQs about Removing Glare from a Photo
Glare in photos is typically caused by bright light sources reflecting off shiny surfaces such as glass, water, or polished objects. It appears as bright spots or streaks on the image, obscuring details.
It is directional: the reflection is only visible when the light source, the surface and your lens line up. That's why moving a step to one side, or tilting the subject slightly, often makes glare disappear before you take the shot.
Glare can distract viewers from the main subject of the photo and diminish image quality by washing out colors and details. It can also create unwanted reflections that obscure important elements of the composition.
You can fix a photo with glare by downloading PhotoDirector, which has an AI-based removal brush. The app is free to download and the Removal tool comes with a subscription; on desktop the same tool works in the free version, with a watermark on exports.
Follow these steps to remove glare from a photo when using PhotoDirector:
- Download PhotoDirector
- Import the image
- Tap "Edit" and choose "AI Removal" to remove glare
- Smart select the reflection or manually adjust the removal area
- Save and share with others
This only works if there is still some detail inside the bright area. If the glare is fully blown out to white, no removal tool can recover the original scene — see the section above for what to do instead.
The easiest method is an AI removal brush, because you only have to mark the glare rather than clone or retouch it manually. In PhotoDirector you brush over the affected area and the tool rebuilds it from the surrounding pixels in a few seconds. Expect to redo the brush once or twice on large reflections. A tighter second selection usually gives a cleaner result than one wide stroke.
Yes. Brush over the reflection on the lens only, keeping the brush off the eye and the frame edge. If you include the eye in the selection, the AI will rebuild it from the surrounding face and the result will look wrong. Reflections that cover most of the lens are the hardest case, because there is little of the eye left in the file to reconstruct from.
Three things matter for this specific task: an adjustable brush size (glare is rarely a neat shape), a preview large enough to check the edge of the removal at 100%, and a one-step undo so you can retry a selection quickly. PhotoDirector, the app used throughout this guide, and CyberLink's own product, offers all three on both mobile and desktop.

The CyberLink Editorial Team is composed of product testing specialists and content creation experts with over 20 years of hands-on experience and rigorous research in the multimedia editing industry. As the official voice of CyberLink, the team consistently delivers practical, easy-to-follow tutorials across video, photo, and audio editing, while highlighting AI innovations, product insights, and emerging industry trends. Their work empowers millions of creators worldwide each year to elevate their content. Beyond the blog, the team actively shares editing tips and product updates across YouTube, Facebook, Linkedin and Pinterest.
😎 Outside of their work, they enjoy capturing travel moments and meticulously editing photos and videos for their social channels.

![How To Easily Restore Old Photos with An App [iPhone & Android]](https://dl-file.cyberlink.com/web/content/b1757/l_Thumbnail.webp)


